
Installation and Operation Guide

TS-3000i Web Clock Installation & Operation Guide 2-5
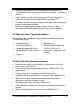
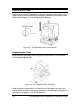
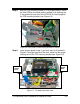
Step 8. After the FPR mounting bracket is in its proper position, return
the front PCB to its original position seated in its retaining slot.
In this position the top rear of the PCB will fit close alongside
the FPR mounting bracket (see Figure 2-6).
Figure 2-6: Front PCB & FPR Mounting Bracket in Position
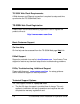
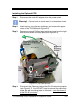
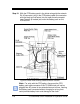
Step 9. Install the two plastic rivets (1 per each side) as illustrated in
Figure 2-7 through the side of the clock frame into the proper
locating hole in the FPR mounting bracket (see Figure 2-5).
Figure 2-7: TS-3000i Clock Rear View
Insert
Plastic
Rivet
Insert
Plastic
Rivet