
Installation and Operation Guide

7-6 TS-3000i Web Clock Installation & Operation Guide
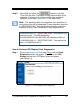
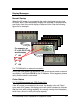
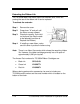
How to Perform Remote Connection Test
Step 1. Click on the Diagnostics link under Clock, and the Clock
Diagnostics screen will appear. Then click on the Remote
Connection Test tab and the Remote Connection Test screen
will appear (see Figure 7-6).
Figure 7-6: Clock Reset
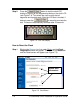
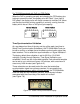
Note – If any of the clock’s single or multiple connection (i.e.,
connection to an enabled time server) commands fail, you will
see a red error in the status area. Also, if FTP, E-Mail, and
SNMP Traps are configured, they will be checked.
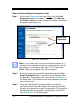
Step 2. Enter the remote host name/IP address and press the Test
Single Connection button. The status will be displayed after
the operation. If everything is Ok, you will see “Successful” in
the Status field. This checks the connection between this clock
and a remote host.
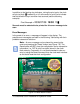
Step 3. Press the Test Multiple Connection button to check the
connection of the clock with enabled Time Servers and DNS
Servers using some of the clock’s configuration. The status will
be displayed after the operation. If everything is Ok, you will
see “Successful” in the Status fields.
Status Area
Information