
Installation and Operation Guide

TS-3000i Web Clock Installation & Operation Guide 7-5
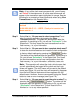
Note – If any of the clock reset commands fail, you will see a
red “Failed” in the status area. All of the reset commands will
appear in the transaction report highlighted in orange. See the
following for an example of reset commands when using View
Transactions from the Reports Utility
:
01/06/2009 08:46:26 : - USER -
A
ll transaction(s) have been
deleted
01/06/2009 08:47:13 : - USER - Clock print counter has
been reset to : 1
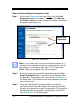
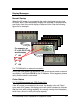
Step 2. Select Yes for, “Do you want to clear transactions?” and
clear the clock transactions by pressing the Clear
Transactions button. The status will be displayed after the
operation. If everything is Ok, you will see “Successful” in the
Status field. This only clears the clock transactions from the
flash memory, i.e., sync information.
Step 3. Select Yes for, “Do you want to do a complete clock reset?”
to clear the clock transactions and reset the clock configuration
to factory default settings by pressing the
button.
The status will be displayed after the operation. If everything is
Ok, you will see “Successful” in the Status field. This clears
the clock transactions and all user configurations from the
flash memory, i.e., sync information, schedules, users, etc.
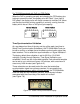
Note – This operation will reboot the clock, which means that
you will automatically be logged off the clock and the Login
screen will appear. The clock name will be reset to the default
name (see Figure 3-4), and the clock will temporarily disappear
from the list of Bonjour devices and then reappear with the
default name. However, Amano recommends using the “Reset”
button to clear an error message (see Figure 7-9).
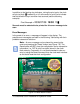
Step 4. Select Yes for, “Do you want to reset the print number?” by
pressing the
button. The status will be
displayed after the operation. If everything is Ok, you will see
“Successful” in the Status field. This will reset the Print
Number to 1 or to any value specified.