
Installation and Operation Guide


ii MTX-15 Installation & Operation Guide
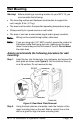
Basic Installation for Time Guardian MTX-15/A300 Package
Note: Other installations, i.e. with FPT40 terminal, with Time
Guardian Plus, or with Time Guardian Pro may be slightly
different. This procedure of connecting the MTX-15 terminal
utilize examples with Time Guardian software.
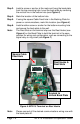
Step 1 – Unlock and remove the
rear terminal back plate. Connect the
MTX-15 terminal using direct connect,
Ethernet, or modem cable, and host
PC. Plug MTX-15 into AC power to
power up.
Step 2 – Install Time Guardian
Software on the host PC. The
installation should start automatically,
but if it stalls, browse on CD to
\Disk1\InstData\Windows\VM\install.exe
Step 3 – Perform software activation by entering
the Serial Number and perform on-line registration for
Time Guardian.
Note: QuickBooks® integration is available, but it
needs to be setup in Time Guardian. Also,
QuickBooks must be installed on the same host
computer and running.
Step 4 – perform the Wizard Setup for Time
Guardian and end by pressing
button.
Note: integration and synchronization will occur with
employee transfer from Time Guardian when the
MTX-15 terminal is polled.