
Installation and Operation Guide


2-14 MTX-15 Installation & Operation Guide
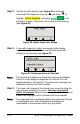
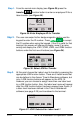
Step 1. From the normal main display (see Figure 34) press the
transfer
function button to enter an employee ID for a
labor transfer (see Figure 35).
Figure 35: Enter Employee ID for Transfer
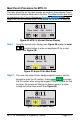
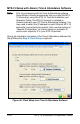
Step 2. The user can swipe his/her badge magnetic card or use the
keypad to enter the ID number. Press enter
to accept
the ID number when using the keypad. If the ID is valid for that
terminal, the screen will change to display name [if a name
exists] and display the JOB1, JOB2, JOB3, and JOB4 function
buttons under the first row of buttons (see Figure 36).
Figure 36: Select JOB for Transfer
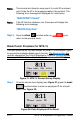
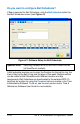
Step 3. At this point choose the Labor Level to transfer by pressing the
appropriate JOB function button. There are 6 Labor levels that
can be defined in the Amano Time & Attendance software, but
only 4 JOB fucntion buttons will appear on the MTX-15.
However you can choose to assign more than one labor level
to a JOB function button. Also, the labor level name will appear
after the JOB fucntion button has been pressed (see Figure ) if
a labor level has been defined in the Time & Attendance
software (see page 2-25) and transfered to the terminal.
Figure 37: JOB1 Selected for Labor Level 1