
Installation and Operation Guide


Page 1-16 MTX-15 Installation & Operation Guide
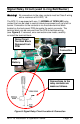
MTX-15 Startup (Initialization)
Once connections have been made and the terminal back plate has
been mounted on the wall, the MTX-15 terminal can be initialized. To do
so perform the following:
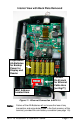
Step 1. Re-install the MTX-15 terminal on the back plate by placing the
notch on the bottom of the Back Plate (see Figure 3) over the
plastic tab in the bottom of the terminal cabinet. Pivot the
terminal up so the locating pin on the Back Plate aligns with its
corresponding hole in the cabinet. Rotate the key
counterclockwise to lock the terminal in place. Remove the
key.
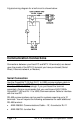
Step 2. Plug in the terminal AC power adapter into an outlet. The
terminal will beep and do the following:
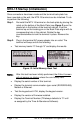
Test memory banks “0” through “6” and display the results.
Figure 12: Initial Memory Bank Test
Note: After this test has been initially performed, the 0 thru 6 screen
will not appear on startup
unless the coin battery fails.
Display the serial number of this terminal.
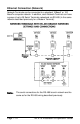
Display the terminal communication type: serial (RS232/RS485),
Modem or Ethernet.
Test the keypad and if OK, display the keypad version.
Display the version of firmware installed.
Display the Terminal Number (TN always defaults to “0” until
re-assigned by the Time & Attendance Software).