
Ventless Submittal Information
ManualsBrandsAmana ManualsCommercial Equipment15" Xpresschef 3i Series Combination Commercial Oven With 0.61 Cu. Ft. Capacity, 3000 Watts Impingement, 2000 Watts Microwave, 200 F To 520 F (95 C-270 C) Temperature Range, Stackable, 4 Stage Cooking, 11 Power Levels, 1200+ Menu Settings, 7" True-Touch H
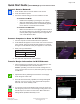
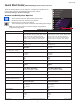
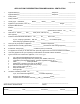


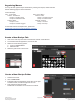

Table Of Contents
- Page 1_Cover Page for Ventless Guide_ARX-MRX
- Page 2_ARX-MRX TOC
- Page 3_ARX-MRX Ventless Q&A
- Page 4_ETL_Cert
- Page 5_UL 197 Scope
- Page 6_Intertek ETL Safety ATM for Raptor Series102452452MIN-001 ATM
- Page 7_Intertek ETL Sanitation ATM for Raptor Series_ATM102452452COL-002 ATM
- Page 8-9_103443931COL-001A_Intertek-ventless letter_pg2and4
- Page 10_Guidelines for Ventless Use_ARX-MRX
- Page 11_Heat Load Calculations_ARX-MRX_2000W
- Page 12_Heat Load Calculations_ARX-MRX_1000W
- Page 13-14_ARX-ALL Core_Specs_EN_r1
- Page 15-16_MRX-ALL Core_Specs_EN_r1
- Page 17-22_20217601_ARX-MRX_QSRG_EN
- Page 23_ Application for exemption
- Page 24-26_LA County Letter_ARX-MRX_May24-2018

©2017 ACP, Inc.
Cedar Rapids, IA 52404
For full product documentation visit:
www.acpsolutions.com
5
Part No. 20217601
Original Instructions
Quick Start Guide | ARX & MRX High Speed Commercial Oven
Connect Oven to Network:
1. Touch the blue menu icon at the bottom of the screen.
2. Touch the “Network” option.
3. Connect to network using your choice of Ethernet or Wi:
To connect via Wi-Fi:
• Enable Wi-Fi capability by touching the “On” option.
• Select the desired Wi-Fi network. Enter the network’s
password. If the network does not immediately appear,
touch “Search” to locate the Wi-Fi network.
To connect via Ethernet:
• Make sure the Ethernet cord is plugged into the back of
the oven and wall jack. If necessary, use pliers to gently
remove plastic plug from Ethernet port on right rear of
oven. Insert Ethernet cable.
Connect Computer to Oven via Wi-Fi/Ethernet:
1. Connect computer to same network and enter password.
2. An IP address will appear on oven control once it has connected
to the network. Open an internet browser window on computer
and type in the IP address exactly as it appears on oven screen.
3. Enter your log-in information:
4. The oven and computer are now connected.
Transfer Recipe Information via Wi-Fi/Ethernet:
1. After connecting the computer to the oven and logging in, click
on the “Upload Recipes” tab in browser window.
Caution: Uploading a new le will overwrite existing items on
oven.To ensure items are not lost, rst backup les by exporting
to USB drive.
2. Upload menu le by following the instructions on web page.
Touch the green check mark.
3. Once the le has been fully uploaded, a message will appear
that says “Upload Successful!” The recipes will be imported
when the oven enters standby mode.”
4. To cycle the oven through standby mode, touch the home icon
then the green power icon. Oven will begin cooling down. Touch
the red stop icon to return to home screen. Menu items and
settings will be uploaded and ready to use.
Log-in Information
Username ACP_MXP
Password Express
2
Page 21 of 26