
Instruction Manual

3
For the correct tubing size, follow the specification for the con-
denser/heat pump
The coil is shipped under pressure. Follow these
instructions to prevent injury.
WARNING
Special Instructions
This coil comes equipped with a check style flowrator for refrig-
erant management. For most installations with matching ap-
plications, no change to the flowrator orifice is required. How-
ever, in mix-matched applications, a flowrator change may be
required. See the Goodman piston kit chart or consult your
local distributor for details regarding mix-matched orifice siz-
ing. If the mix-match application requires a different piston size,
change the piston in the distributor on the indoor coil before
installing the coil and follow the procedure shown below.
1. Loosen the 13/16 nut 1 TURN ONLY to allow high pres-
sure tracer gas to escape. No gas indicates a possible
leak.
2. After the gas has escaped, remove the nut and discard
the black or brass cap.
3. Remove the check piston to verify it is correct and then
replace the piston. See piston kit chart in instructions.
4. Use a tube cutter to remove the spin closure on the suc-
tion line.
5. Remove the tailpiece clamped to the exterior and slide
the 13/16 nut into place.
6. Braze tailpiece to the line set liquid tube.
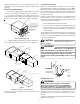
TAILPIECE
13/16" NUT
PLASTIC or BRASS CAP
WHITE
TEFLON SEAL
PISTON
Figure 1
7. Insert the suction line into the connection, slide the insu-
lation and the rubber grommet at least 18" away from the
braze joint. Braze suction line.
8. AFTER THE TAILPIECE HAS COOLED, confirm posi-
tion of the white Teflon
®
seal and hand tighten the 13/16
nut.
9. Torque the 13/16 nut to 10-30 ft-lbs. or tighten 1/6 turn.
Excessive torque can cause orifices to stick. Use the proper
torque settings when tightening orifices.
CAUTION
10. Replace suction line grommet and insulation.
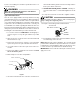
RUBBER
GROMMET
SUCTION LINE
WITH SPIN CLOSURE
Figure 2
11. Check fittings for leaks after complete installation. Evacu-
ate and charge on the low side.
NOTE: With the piston in the distributor, the seal end should
point inside the distributor body and should not be seen when
looking into the end of distributor. Make sure the piston is free
to rotate, and move up and down in the distributor body.
IMPORTANT: Note 2 in the Goodman piston chart does not
apply to CH coils.