
Installation Instruction


9
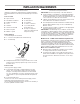
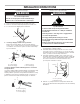
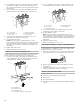
Style 2: Direct wire strain relief
■ Remove the knockout as needed for the flexible conduit
connection.
■ Assemble a UL listed conduit connector in the opening.
A. Removable retaining nut
B. Conduit
■ Tighten strain relief screw against the flexible conduit.
5. Complete installation following instructions for your type of
electrical connection:
4-wire (recommended)
3-wire (if 4-wire is not available)
Electrical Connection Options
If your home has: And you will be
connecting to:
Go to Section:
4-wire receptacle
(NEMA type 14-50R)
A UL listed,
250-volt minimum,
40-amp, range
power supply cord
4-wire connection:
Power supply cord
4-wire direct A circuit breaker
box or fused
disconnect
4-wire connection:
Direct wire
3-wire receptacle
(NEMA type 10-50R)
A UL listed,
250-volt minimum,
40-amp, range
power supply cord
3-wire connection:
Power supply cord
If your home has: And you will be
connecting to:
Go to Section:
3-wire direct A circuit breaker
box or fused
disconnect
3-wire connection:
Direct wire
4-wire connection: Power Supply Cord
Use this method for:
■ New branch-circuit installations (1996 NEC)
■ Mobile homes
■ Recreational vehicles
■ In an area where local codes prohibit grounding through the
neutral
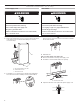
1. Part of metal ground strap must be cut out and removed.
A. Metal ground strap
B. Discard
C. Ground-link screw
2. Use a Phillips screwdriver to remove the ground-link screw
from the back of the range. Save the ground-link screw and
the end of the ground link under the screw.
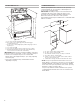
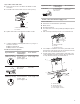
3. Feed the power supply cord through the strain relief on the
cord/conduit plate on bottom of range. Allow enough slack
to easily attach the wiring to the terminal block.
A. Terminal block
B. Ground-link screw
C. UL listed strain relief
D. Power supply cord wires
A
B
(12.7 cm)
5"
³⁄₈
"
(1.0 cm)
3"
(7.6 cm)
³⁄₈
"
(1.0 cm)
A
B
C
A
B
D
C