R BUILT BETTER THAN IT HAS TO BE ™ OwnerÕs Manual Covering model ACM0720A Contents Important Safety Information ....................................... 3 Installation..................................................................... 5 Other Helpful Information............................................. 6 Cooking Utensils........................................................... 8 Electric Microwave Keep instructions for future reference. Be sure manual stays with microwave. Feature Diagram ......
Thank you for buying an Amana Microwave! Please take the time to complete the registration card and return promptly. If the registration card is missing, call Amana Consumer Affairs Department. When contacting Amana, provide product information from serial plate: Model Number Manufacturing (P) Number Serial Number (S/N) Purchase Date Dealer Name Dealer Address Dealer Phone Asure™ Extended Service Plan Amana Appliances offers long-term service protection for this new microwave.
IMPORTANT SAFETY INFORMATION w CAUTION To avoid risk of personal injury or property damage, observe the following: 7. Do not operate the oven empty. Either food or water should always be in the oven during operation to absorb microwave energy. 1. Be certain to place the front surface of the door three inches away or more from the countertop edge to avoid accidental tipping of the appliance in normal usage. 8. Do not use your microwave oven to dry newspapers or clothes. They can catch fire. 2.
IMPORTANT SAFETY INFORMATION Recognize this symbol as a SAFETY message w WARNING To reduce the risk of burns, electric shock, fire, injury to persons, or exposure to excessive microwave energy: 11. Do not store this appliance outdoors. Do not use this product near water - for example, near a kitchen sink, in a wet basement, or near a swimming pool, and the like. 12. Do not immerse cord or plug in water. 13. Keep cord away from heated surfaces. 14. Do not let cord hang over the edge of table or counter. 15.
Installation D. PLACEMENT OF THE OVEN w WARNING Your microwave oven can be placed easily in your kitchen, family room, or anywhere else in your home. Place the oven on a flat surface such as a kitchen countertop or a specially designed microwave oven cart. Do not place oven above a gas or electric range. Free air flow around the oven is important. To avoid risk of electrical shock or death, this oven must be earthed. w WARNING E.
Other Helpful Information GETTING THE BEST RESULTS FROM YOUR MICROWAVE OVEN SPECIAL TECHNIQUES IN MICROWAVE COOKING Keep an eye on things. The instructions in this book have been formulated with great care, but your success in preparing food depends, of course, on how much attention you pay to the food as it cooks. Always watch your food while it cooks.
Other Helpful Information Elevating: Thick or dense foods are often elevated so that microwaves can be absorbed by the underside and center of the foods. Piercing: Foods enclosed in a shell, skin, or membrane are likely to burst in the oven unless they are pierced prior to cooking. Such foods include both yolks and whites of eggs, clams and oysters, and many whole vegetables and fruits. Testing if cooked: Because foods cook so quickly in a microwave oven, it is necessary to test food frequently.
Cooking Utensils w CAUTION To avoid risk of personal injury or property damage, do not use stoneware, alumium foil, metal utensils, or metal trimmed utensils in the oven. MICROWAVE-SAFE UTENSILS 4. Plastic storage containers: These can be used to hold foods that are to be quickly reheated. However, they should not be used to hold foods that will need considerable time in the oven as hot foods will eventually warp or melt plastic containers. 5.
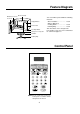
Feature Diagram Oven Front Plate Window Door Screen Door Seal Display Window Control Panel Door Open Button Safety Door Lock System Your oven will be packed with the following materials: Glass Turntable ...................... 1 each Owner's Manual & Cooking Guide........................ 1 each Rotating Ring.......................... 1 each This microwave oven is designed for household use only. It is not recommended for commercial purposes.
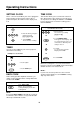
Operating Instructions SETTING CLOCK TIME COOK This is a 12 hour clock. When your oven is plugged in for the first time or when power resumes after a power interruption, the numbers in the display reset to 0. This function allows you to cook food for a desired time. And in order to give you the best results, there are 10 power level settings in addition to HI-POWER because many foods need slower cooking (at less than HI-POWER).
Operating Instructions MULTI-STAGE TIME COOK CHILD LOCK For Multi-Stage cooking, touch PROGRAM and repeat Time Cook steps 1-3 on previous page before touching the START pad for additional Time and Power program you want to add. Auto Defrost can be programmed before the first stage to defrost first and then cook. This is a unique safety feature that prevents unwanted oven operation such as used by children. Once the child lock is set, no cooking can take place.
Operating Instructions AUTO COOK Auto Cook made easy! Your oven’s menu has been preprogrammed to cook food automatically. Tell the oven what you want. Then let your microwave oven cook your selections. Example: To cook popcorn(3.5 oz.), simply follow the step below *Place popcorn in the oven and close the door. Touch POPCORN once. The oven begins the cooking you selected without the need to touch START. Be sure to close the door before selecting categories.
Operating Instructions NOTE: When you touch the START pad, the display changes to defrost time count down. The oven will beep during the DEFROST cycle. At each beep, open the door and turn, separate, or rearrange the food. Remove any portions that have thawed. Return frozen portions to the oven and touch START to resume the defrost cycle. The oven will not STOP during the BEEP unless the door is opened. AUTO DEFROST Three defrost sequences are preset in the oven.
Operating Instructions w CAUTION To avoid risk of property damage do not use alumium foil in microwave oven. MEAT POULTRY 1. No special techniques are required. The roast should be prepared and seasoned (if desired) as for any other conventional method. Meat should be thoroughly defrosted before cooking. 2. Place the meat on a microwave roasting rack or ovenproof plate and place on the turntable. 3.
Operating Instructions FISH 1. Arrange fish in a large shallow non-metallic dish or casserole. 2. Cover with pierced microwave plastic film or casserole lid. 3. Place the dish on the turntable. 4. Cook according to the instructions in the cooking chart (below). Butter can be added to the fish if desired. 5. Let STAND as directed in the cooking chart before serving. 6. After standing time, check to see that the fish is thoroughly cooked. The fish should be opaque and flake easily.
Heating or Reheating Guide To heat or reheat successfully in the microwave, it is important to follow several guidelines. Measure the amount of food in order to determine the time needed to reheat. Arrange the food in a circular pattern for best results. Room temperature food will heat faster than refrigerated food. Canned foods should be taken out of the can and placed in a microwavable container. The food will be heated more evenly if covered with a microwavable lid or plastic wrap, vented.
Fresh Vegetable Chart Amount Cook time at HIGH 2 medium 4 medium 8~10 12~15 Asparagus, Fresh, Spears 1Ib. 51/2~81/2 Beans, Green & Wax 1 lb. Beets, Fresh Vegetable Artichokes (8oz. each) Instructions Standing Time Trim. Add 2 tsp water and 2 tsp lemon juice. Cover. 2-3 minutes Add 1/2 cup water. Cover. 2-3 minutes 10~13 Add 1/2 cup water in 1- 1/2 qt. covered casserole. Stir halfway through cooking. 2-3 minutes 1 Ib. 161/2~191/2 Add 1/2 cup water in 1- 1/2 qt. covered casserole.
Troubleshooting w WARNING To avoid risk of severe personal injury, electrical shock or death, do not remove outer case of at any time. Only an authorized servicer should remove outer case. BEFORE CALLING FOR SERVICE Check the following list to be sure a service call is really necessary. A quick reference of this manual as well as reviewing additional information on items to check may prevent an unneeded service call.
Amana Warranty Full ONE Year Warranty Amana Appliances will repair or replace, including related labor and travel, any part (f.o.b. Amana Iowa) which proves defective as to workmanship or materials. Limited Warranty After one year from the date of original retail purchase, Amana will provide a free part, as listed below, to replace any part that fails due to a defect in materials or workmanship. The owner will be responsible for paying all other costs including labor, mileage, and transportation.