Swing 2 -Axis Camera Mount Instruction Manual
Introductions: The Swing 2-Axis Camera Mount is a new gyrostabilised Camera Mount designed by Alware. It is made of flash, light and strong fiber glass plates as well as clean anodized CNC Aluminium Rods and high quality Flange Bearings. The unit is designed for full-fit GAUI 330X/ 500X Quadflyer, DJI F450/F550 Multicopters with Arch-Bridge Landing Gear. Swing 2-Axis Camera Mount allows you to Tilt and Roll your camera in the sky to shoot stable image or video.
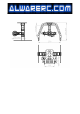
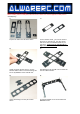
Dimension:
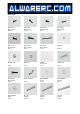
Part List : Hex screw M2 x 6 mm 54 pc s Hex screw M2 x 8 mm 16 pc s Hex screw M2.5 x 6 mm 6 pc s Hex screw M2 x 12 mm 4 pc s Hex screw M3 x 10 mm 2 pc s Hex screw M3 x 12 mm 4 pc s Hex screw M3 x 45 mm 1 pc s M2 Nuts M3 self-Lock Bearing Square rod 9 pc s 4 pc s Washer 3 x 8 x 0.8 2 pc s Hex screw M3 x 18 mm 2 pc s Steel connector 4 pc s Nylon washer 2 mm 2 pc s Nylon washer 3.
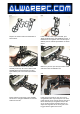
Important Notice for assembly: When installing metal to metal parts, little amount of Thread Lock must be applied for safety reason. Assembly Step : S1 S2 Prepare the Fiber Parts as shown above. For this camera stand , you can use small of big servo for the Tilt Axis, you may choose the correct Tilt Servo Mount Frame for you own servo.
Assembly Step : S7 S8 Install the other pieces (S4 & S5). Please follow the installation direction as the photo shown above. The edge of all Flange Bearings must facing to the outwards direction. Install another U-board Frame to the U-board Assembly and secure it using M2x6mm Screws. S9 S10 Install the Camera Stand Frame, Tilt Gear and the Tri-Frame together using M3x10mm screws, 3x8x.8mm Washers and M3 self-lock Nuts. Completed Cam Stand Assembly of Step 9.
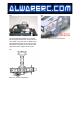
Assembly Step : S13 S14 Prepare the Trunk Frames and Trunk Ribs as shown above. Install a Trunk Frame, 2pcs Trunk Rib, 2pcs 35mm Alu Rods(secure with M2x8mm Screws), a M3x45mm Screw together with one 2mm Nylon Washer plus one 3.5mm Nylon Washer as shown above. S15 S16 Insert the M3x45mm Screw of the Trunk Assembly from Step 14 to the U-board-stand Assembly Bearing and followed by a 2mm Nylon Washer plus one 3.5mm Nylon Washer. Make sure you have put the Nylon washer 2mm and 3.
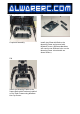
Assembly Step : S19 s20 Secure the Roll Servo Mount on a Al Square Rod using 2pcs M2x5mm Hex Cap Screws and then install it onto the Lower U-FRame using 2pcs M2x6mm Hex Cap Screws. Lastly adjust the Roll Servo Assembly to be align with the Large Gear before tighten all the screws. Close view of Roll axis servo installation. S21 Back View of Servo Installation.
Assembly Step for Arch-Bridge Landing Gear (Not included unless otherwise specified.) : S22 s23 Complete Assembly of Arch-Bridge Landing Gear. First, install 4pcs M2x4x39mm Alu Rods to the Landing Gear frames using M2x6mm Hex Cap Screws. S24 s25 Insert 3pcs of Landing Gear Rid to each side of Landing Gear Frame and install another Landing Gear Frame together using M2x6mm Screws. Insert 6mm Fiber Glass Post to the end hole of the Landing Gear Frames. (You may rotate the Post into the holes easier.
Assembly Steps : S28 Completed assembly. S30 Install the Mounting Frame to the Square Rods which has been installed on the Trunk Frames using M2x8mm Hex Cap Screws. S29 Install 4pcs 39mm Alu Rods to the Mounting Frame and secured with M2x6mm Screws. (Different Machines will need to use different holes on the Mounting Frame. More details are shown bellow.
Installation Steps to different Multicopters Mounting Holes for GAUI 500X and 330X. Using 4pcs M2x4x39mm Alu Rods, 4pcs Hex Steel Connection Rods and M2x8mm Hex Cap Screws. Mounting Holes for DJI F330. Using “Mounting Frame Set for DJI Multicopters”, 4pcs M2x4x39mm Alu Rods and M2x12mm Hex Cap Screws. Mounting Holes for DJI F450. Using “Mounting Frame Set for DJI Multicopters”, 4pcs M2x4x39mm Alu Rods and M2x12mm Hex Cap Screws. Mounting Holes for DJI F550.