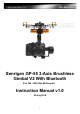
Senrigan GP-55 3-Axis Brushless Gimbal V2 With Bluetooth (For 600 -1000 Size Multicopter) Instruction Manual v1.
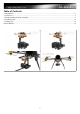
Table of Contents 1. Introduction.........................................................................................................................................................3 2. Check List............................................................................................................................................................5 3. Equipment Required For Assembly....................................................................................................................
1. Introduction Brushless Gimbal is the next generation technology for high quality aerial photography. Senrigan GP-55 Brushl ess Gimbal is driven directly with two Brushless Motors for 3-axis movement roll, tilt and yaw without gears or belts. The main advantages of this design compared to traditional actuators (servos) are the Brushless Gimbals have no backlash in the gear/belt, and it provides the instantaneous response to the disturbance.
Maximum motor current: 1,5 A/ each motor Voltage Output: 5V 1A (suitable to power the receiver directly) -Brushless Gimbal Motor Weight: 94g /Pcs -Brushless Gimbal with Controller: 652g (Without Camera) Included: 1x Senrigan GP-55 3-Axis Brushless Gimbal V2 (Non-assembled) 1x 32 bits SimpleBGC Camera Stabilizer System with Alu Case protection 1x Frame IMU Unit 1x Camera IMU Unit 1x Bluetooth Module 12x High Quality Rubber Damper Balls 1x Tilt and Yaw Controlling Connector (Please be noted that Camera, Aircr
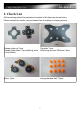
2. Check List All the package should be packed and contain all the items as shown below. Please contact the vendor you purchased from if anything is missing at once. Damper plate up *1pcs Damper plate down *1pcs (with big circle in the middle.
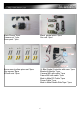
Black Pieces *4pcs Camera nut *1pcs Scew pack *1pcs Black gimbal piece *6pcs Alu rods *4pcs Boom mount yellow piece set *4pcs Hex screws *8pcs M3 self-nuts *8pcs 32 Bits Gimbal Controller with case *1pcs Bluetooth Module *1pcs Camera IMU with cable *1pcs Frame IMU with cable *1pcs Male to Male RC Cable *1pcs Power Cable *1pcs Male to Male Double Side Tape *1pcs 6
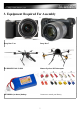
3.
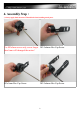
4. Assembly Step : **Always apply little amount of Threadlock when installing metal parts. Use M3x5mm screw only, screw longer M2.5x6mm Hex Cap Screw then 5mm will damaged the motor! M3x5mm Hex Cap Screw M2.
M2.
M2.5x6mm Hex Cap Screw M2.
Use M3x5mm screw only, screw longer then 5mm will damaged the motor! M3x6mm Hex Cap Screw Assembly 11
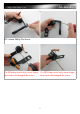
Recognize the position of the Three Motors (Pan, Roll and Tilt motor). Use two layers of Double Side Tap to Stick the Camera IMU here. (Follow the orientation as shown) Install the Frame IMU using Double Side Tape. (Follow the orientation as shown) Connection Diagram of the two IMUs.
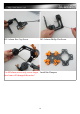
Install the Gimbal Controller using Round Cap Screw M3x4mm *2pcs Stick the Bluetooth Moudle as shown. Connect the Bluetooth Module to the Controller. (Tips: RX--> TX , TX--> RX) Wiring all Motor and IMU wires through Connect the end side of the IMU wire to the center hole of the motors and along I2C port on the Controller. the Gimbal Frame Ribs.
Connect Motors to the Controller. Secure the Top Mounting Frame using 4pcs M3x6mm Hex Cap Screws. The Pan(+-360 degree) and Tilt(+45-90 degree) axis of GP-55 can be controlled by using any two Free channels of your receiver.
Finish assembly. Mount GP-55 to the Multicopters.
5. Tuning Tips Specification for the 32 Bits Alexmos Controller with GP-55V2 Gimbal 32 bits SimpleBGC Camera Stabilizer System with Alu Case protection Twins IMUs with Alu Case protection Firmware: The newest 2.42b6 (updateable freely in the future) Power supply voltage: 8–25 V (2s-6s LiPo), Default setting for 7.4v Lipo Maximum motor current: 1,5 A/ each motor Voltage Output: 5V 1A (suitable to power the receiver directly) Pre-programmed for Sony NEX N7/ similar size Mini DSLR Cameras.
End of Manual 18