
user manual
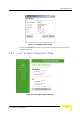


Table Of Contents
- Voice Gateways System Manual
- About This Manual
- Contents
- Chapter 1 - System Description
- Chapter 2 - Installation
- Chapter 3 - Using the Web Configuration Server
- 3.1 Introduction to the Web Configuration Server
- 3.2 Accessing the Web Configuration Server
- 3.3 Using the Web Configuration Server
- 3.4 Home Menu - Product Info Page
- 3.5 WAN Menu
- 3.6 VLAN Tagging Menu
- 3.7 Telephone Menu
- 3.8 BW Reservation - DRAP Configuration Page
- 3.9 System Menu
- 3.10 Upgrade Page
- 3.11 Restart Page
- 3.12 Logout Page
- 3.13 Parameters Summary
- Appendix A - Internal Class 5 Services
- Appendix B - Default Telephony Parameters
- Appendix C - New Features
- Glossary

VLAN Tagging Menu
Voice Gateways System Manual 37
VLAN ID: 60
VLAN NAME: Voice&Mng
VLAN Priority: 6
WAN: Yes
LAN: No
3 Click OK to add the VLAN to the Tagged Port Membership table.
4 Enter the VLAN ID for Voice and Management (60) in the field Default VLAN
ID on WAN port, and click Save.
5 In the Page Selection bar, click on VoIP VLAN Configuration to open the VoIP
VLAN Configuration page. Enter 60 in the VLAN Tag fields for both Call
Signaling and RTP. Enter 6 in the Priority Tag field for both Call Signaling and
RTP. Click Save VoIP VLAN Settings. Go back to the VLAN Tagging page.
6 There is no need to define VLAN in the Port Tag Membership table or in the
Untagged WAN and LAN fields. Untagged packets will pass through LAN to
WAN and WAN to LAN.
7 Restart the unit to apply the changes.