
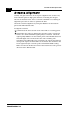
Programming instructions


3-6
BreezeNET DS.5800 System Manual
Manual Revision: 1.0
Assigning and Editing IP Addresses Manually
(based on MAC addresses)
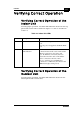
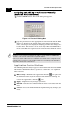
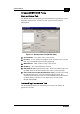
1. Click the Set IP button. The Set IP dialog box appears.
Figure 3-2: The Set IP Dialog Box
2.
Type the parameters in the appropriate fields and click OK; the MAC
address is shown on the bottom label of the Indoor and Outdoor
units. A message box is displayed notifying you when the changes are
to take affect. This feature can be used only if BreezeCONFIG DS is
on the same Ethernet segment as the unit and not behind the router.
Application Control Buttons
The following buttons always appear at the bottom of the BreezeCONFIG
DS window. Additional buttons, specific to certain tabs, are explained
when relevant.
! Hide to Tray – Minimizes the application into the icon, placed in
the Windows task bar (at the bottom of the Windows desktop). To
restore the application, click the icon.
! Apply – Implements any changes you made.
! Refresh – Refreshes the window with the most recent data from the
unit.
! Cancel – Closes the window without implementing any changes you
made.
NOTE:
In order to see the unit after assigning the IP address, the PC with BreezeCONFIG DS
should be on the same IP subnet as the assigned IP address.
Units receive auto IP address if there is no DHCP server and the unit is configured to work
in Smart mode (see page 3-7). The IP address will be chosen randomly in the 169.254.x.x
range with a subnet mask of 255.255.0.0.