
Specifications


Chapter 2 - Installation Installing the Outdoor Unit
BreezeNET B 30 System Manual
2.3.5.2 Units with a Waterproof Seal Supplied with the Ethernet
Cable (not applicable for BU/RB-B10)
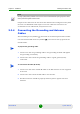
1 Verify that the o-ring supplied with the cable kit is in place.
2 Connect the RJ-45 connector of the Ethernet cable to the outdoor unit.
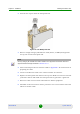
3 Attach the waterproof seal to the unit. Tighten the top nut.
4 Route the cable to the location selected for the indoor equipment.
5 Assemble an RJ-45 connector with a protective cover on the indoor end of the
indoor-to-outdoor cable.
See Appendix C for instructions on preparing the cable.
2.3.5.3 BU/RB-B10 ODU
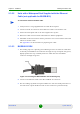
1 The sealing cap has a special groove allowing to insert an ethernet cable with
an already assembled RJ-45 connector through the cap. To expose the groove,
lightly squeeze the cap. Carefully insert the cable with the assembled
connector through the groove.
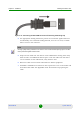
2 Connect the Ethernet cable to the IDU COM RJ-45 connector.
3 Put the sealing cap back in its place. Make sure that the small protrusion on
the side of the cap fits inside the hole on the connector's protective body.
To connect the indoor-to-outdoor cable:
Figure 2-10: Inserting the IDU COM Cable into the Sealing Cap