
User's Manual Part 2


BreezeCOMPACT System Manual
Chapter 2 - BreezeCOMPACT InstallationConnecting the BreezeCOMPACT Cables
Chapter 2 - BreezeCOMPACT Installation Connecting the BreezeCOMPACT Cables
62
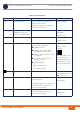
For connectors with a sealing gland, insert the cable into the gland before connecting it, as described in
the procedures below. There are two sizes of sealing glands, labeled 10.5 and 7.9 on their plug.
After connecting each cable, make sure that the nut of each sealing gland is properly tightened and that
the sealing gland is tightly attached to protective body of the connector to ensure proper sealing against
rain and moisture.
Use only the special wrench supplied with the equipment (see Figure 2-28).
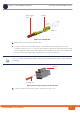
Refer to Figure 2-17.
1 Release the sealing gland nut from the gland base and remove the plug.
2 Thread the cable through the released nut.
3 Insert the cable through the gland and push it until it is connected to the unit connector.
4 Return the sealing nut to the gland and firmly tighten to ensure proper sealing.
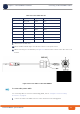
Figure 2-28: Sealing Gland Special Wrench
NOTE!
Unused connectors should always be sealed with the cover firmly tightened to the protective body of
the connector.
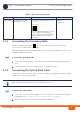
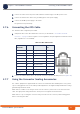
To connect a cable to a connector with a small gland (7.9):