
User's Manual Part 2


BreezeCOMPACT System Manual
Chapter 2 - BreezeCOMPACT InstallationConnecting the BreezeCOMPACT Cables
Chapter 2 - BreezeCOMPACT Installation Connecting the BreezeCOMPACT Cables
61
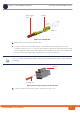
2 Connect the other end of the power cable (with the terminal rings) to the DC power source.
3 Connect the shield of the cable to the grounding point of the power supply.
4 Connect the AC/DC power supply to the mains
The system is now powered-up.
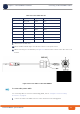
2.7.6 Connecting the GPS Cable
The GPS data cable is supplied open-ended.
1 Crimp both sides of the cable with RJ-45 connectors, as described in “To assemble the RJ-45
connector:” on page 57. Refer to Figure 1 for Pin assignment (The pin assignment is identical for both
sides, regardless of color standard).
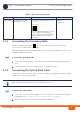
2 Connect the cable from the GPS to the GPS IN connector located on the BTS panel (see Figure 2-22).
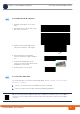
2.7.7 Using the Connector Sealing Accessories
The outdoor equipment is supplied with the connectors sealed with either flexible plastic covers, plastic
caps or sealing glands. Some of the cables provided by Alvarion are supplied crimped and with a sealing
gland already attached to them.
When there is a flexible cover and you need to use the connector, remove the cover and connect the
cable. Use appropriate sealing methods to ensure protection against rain and moisture.
When there is a cap covering the connector and you need to use the connector, add a sealing gland
before connecting the cable.
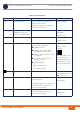
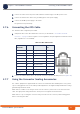
Table 2-6: GPS Cable Pinout
Pin #
GPS RJ45
Pair Function Pin #
BTS
1 2T 1PPS_P from GPS 1
2 2R 1PPS_N from GPS 2
3 3T RX_P from GPS 3
4 1R VCC 12V 4
51TGND 5
63RRX_N from GPS6
74TTX_N to GPS7
84RTX_P to GPS8
Shield Shield