
User's Manual
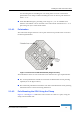
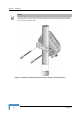
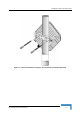
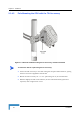
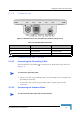
Table Of Contents
- BreezeMAX CPEs Product Manual
- About This Manual
- Contents
- Figures
- Tables
- Chapter 1 - Products Description
- Chapter 2 - Installation
- 2.1 Installing the ODU of the PRO-S CPE
- 2.2 Installing the IDU-1D Indoor Unit of the PRO-S CPE
- 2.3 Installing the Si CPE
- 2.4 Installing the 3.5 GHz Detached Antenna
- 2.5 Installing the 2.3/2.5 GHz Detached Antenna
- Chapter 3 - Commissioning
- Chapter 4 - Operation
- 4.1 The SU Installer Monitor Program
- 4.2 Using the Monitor Program
- 4.3 The Main Menu
- 4.4 Unit Control Menu
- 4.5 Registration Parameters Menu
- 4.6 BST/AU ID Parameters Menu
- 4.7 ˘Radio Parameters Menu
- 4.8 Performance Monitoring Menu
- 4.9 Multirate and ATPC Parameters Menu
- 4.10 ˘SU Parameters Summary
- Appendix A - The Web Configuration Server
- Appendix B - Troubleshooting
- Glossary

Installing the ODU of the PRO-S CPE
BreezeMAX CPEs Product Manual 25
the mounting kit for installing the unit using either vertical or horizontal
polarization. The clamp enables installing the unit on diverse pole diameters
from 1" to 4".
A Tilt Pole Mounting kit, providing a tilt range of +/-15° is available from
Alvarion. The Tilt kit can be attached to the ODU and be mounted on a 1" to 4"
pole using two 9/16" wide metal bands.
2.1.4.1 Polarization
The ODU with integral antenna can be pole mounted to provide either vertical or
horizontal polarization.
The Polarization Arrow on the back of the unit indicates the type of polarization.
For vertical polarization install the unit with the Polarization Arrow pointing
upward (as in the figure above).
For horizontal polarization install the unit with the Polarization Arrow pointing
sideward and the connectors facing downward.
2.1.4.2 Pole Mounting the ODU Using the Clamp
Figure 2-2 and Figure 2-3 illustrate how to mount an ODU on a pole, using the
clamp and threaded rods.
Figure 2-1: Back View of CPE-ODU-PRO-SA (integral antenna)