
User's Manual
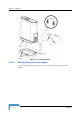
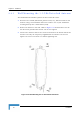
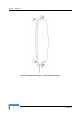
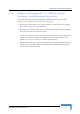
Table Of Contents
- BreezeMAX CPEs Product Manual
- About This Manual
- Contents
- Figures
- Tables
- Chapter 1 - Products Description
- Chapter 2 - Installation
- 2.1 Installing the ODU of the PRO-S CPE
- 2.2 Installing the IDU-1D Indoor Unit of the PRO-S CPE
- 2.3 Installing the Si CPE
- 2.4 Installing the 3.5 GHz Detached Antenna
- 2.5 Installing the 2.3/2.5 GHz Detached Antenna
- Chapter 3 - Commissioning
- Chapter 4 - Operation
- 4.1 The SU Installer Monitor Program
- 4.2 Using the Monitor Program
- 4.3 The Main Menu
- 4.4 Unit Control Menu
- 4.5 Registration Parameters Menu
- 4.6 BST/AU ID Parameters Menu
- 4.7 ˘Radio Parameters Menu
- 4.8 Performance Monitoring Menu
- 4.9 Multirate and ATPC Parameters Menu
- 4.10 ˘SU Parameters Summary
- Appendix A - The Web Configuration Server
- Appendix B - Troubleshooting
- Glossary

46 Installation
Chapter 2 - Installation
2.4.1 Wall Mounting the 3.5 GHz Detached Antenna
The installation kit includes 2 plastic anchors and 2 #8 screws.
1 If anchors are needed (wall-board, plaster board, etc.), drill two holes for the
anchors using a 5 mm drill bit and insert anchors. Use a 9/64" drill bit for
screwing directly into a solid surface (stud).
2 Fasten the antenna to the wall. Refer to Figure 2-15 for directions. Use the
two #8 screws provided with the kit. Do not over tighten.
3 Connect the antenna cable to the connector located on the bottom side of the
antenna. Use only the torque key supplied with the antenna. Do not over
tighten. Do not use a wrench or a similar tightening tool.
Figure 2-15: Wall Mounting the 3.5 GHz Detached Antenna