
User Manual
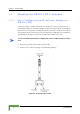
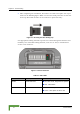
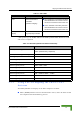

Table Of Contents
- BreezeMAX CPEs Product Manual
- About This Manual
- Contents
- Figures
- Tables
- Chapter 1 - Products Description
- Chapter 2 - Installation
- 2.1 Installing the ODU of the PRO-S CPE
- 2.2 Installing the IDU-1D Indoor Unit of the PRO-S CPE
- 2.3 Installing the Si CPE
- 2.4 Installing the 3.5 GHz Detached Antenna
- 2.5 Installing the 2.3/2.5 GHz Detached Antenna
- Chapter 3 - Commissioning
- Chapter 4 - Operation
- 4.1 The SU Installer Monitor Program
- 4.2 Using the Monitor Program
- 4.3 The Main Menu
- 4.4 Unit Control Menu
- 4.5 Registration Parameters Menu
- 4.6 BST/AU ID Parameters Menu
- 4.7 ˘Radio Parameters Menu
- 4.8 Performance Monitoring Menu
- 4.9 Multirate and ATPC Parameters Menu
- 4.10 ˘SU Parameters Summary
- Appendix A - The Web Configuration Server
- Appendix B - Troubleshooting
- Glossary

Aligning the PRO-S CPE’s Antenna
BreezeMAX CPEs Product Manual 63
3 From the Pocket PC/Notebook, connect to the SU and complete the process of
configuring basic parameters.
4 Verify that the the unit is synchronized with a Base Station. If the SU is not
synchronized with a Base Station, ensure that all parameters are configured
properly. If the unit is still not synchronized with a Base Station, improve the
quality of the link by changing the direction of the antenna or by placing the
antenna at a higher or in an alternate location.
5 Rotate (and/or tilt if applicable) the ODU/antenna until the maximum link
quality (SNR and RSSI) reading is achieved. If you encounter prolonged
difficulty in achieving the expected link quality, try to improve the reception
quality by placing the antenna at a higher point or in an alternate location.
6 Secure the ODU/antenna firmly to the pole.
3.3.2 SU Alignment Unit (SAU)
The SU Alignment Unit can be used during installation and testing to support an
easy process of antenna alignment and provide the ODU's status indications. The
Velcro strap of the SAU enables to attach it either to a pole or on the installer's
arm/wrist, providing hands-free operation.
1 Remove the sealing cap of the ODU's SAU connector.
2 Connect the cable attached to the SAU to the SAU connector.
NOTE
Ensure that the front of the antenna is always facing the Base Station. However, in certain
conditions, such as when the line of sight to the Base Station is hampered, better reception may be
achieved using a reflected signal. In this case, the antenna is not necessarily directed toward the
Base Station.
CAUTION
In some cases, the antenna may need to be tilted to ensure that the level at which the SU receives
transmissions from the AU (and vice versa) is not too high. When the RSSI reading is higher than
-20 dBm, the received signal level is too high (saturation). This must be avoided, preferably by
up-tilting the antenna. As a rule of thumb, if the SU is located at a distance of less than 300 meters
from the AU, it is recommended to up-tilt the antenna by approximately 10° to 15°.
To connect the SAU to the ODU: