
Installation Guide

LINQ8ACM(CB) - 7 -
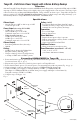
VR6 - Voltage Regulator
Overview:
VR6 voltage regulator converts a 24VDC input into a regulated 5VDC or 12VDC output. It is specifically
designed to work with LINQ8ACM(CB) by allowing to mount the Access Power Controller directly on top of
VR6 to save enclosure space and simplify connections. Refer to VR6 Installation Guide Rev. 050517.
Specifications:
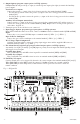
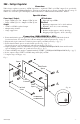
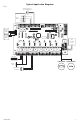
Connecting LINQ8ACM(CB) to VR6:
1. Fasten male/female spacers (provided) to pems that match the hole pattern for VR6 in the desired
location/enclosure. Use metal spacer for the mounting hole with star pattern (Fig. 3a, pg. 7).
2. Plug-in male 8-pin connector to female 8-pin receptacle on VR6 board (Fig. 3, pg. 7).
3. Fasten female/female spacers to male/female spacers (Fig. 3, pg. 7).
Use metal spacers over mounting hole with star pattern (Fig. 3a, pg. 7).
4. Align 8-pin male connector with female receptacle of LINQ8ACM/LINQ8ACMCB, then attach board to
spacers utilizing provided 5/16” pan head screws (Fig. 3, pg. 7).
5. Connect 24VDC power supply to terminal marked [+ PWR1 –] of LINQ8ACM/LINQ8ACMCB (Fig. 3, pg. 7).
6. Select output voltage 5VDC or 12VDC using switch [S1] on VR6.
7. Complete steps 4-10 (pgs. 3-4).
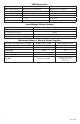
Power Input / Output:
• Input: 24VDC @ 1.75A – Output: 5VDC @ 6A.
• Input: 24VDC @ 3.5A – Output: 12VDC @ 6A.
Output:
• 5VDC or 12VDC regulated output.
• Output rating 6A max.
• Surge suppression.
LED Indicators:
• Input and output LEDs.
Electrical:
• Operating temperature: 0ºC to 49ºC ambient.
• Humidity: 20 to 93%, non-condensing.
Mechanical:
• Product weight (approx.): 0.4 lb. (0.18 kg).
• Shipping weight (approx.): 0.5 lb. (0.23 kg).
Pan Head
Screw
8-Pin
Connector
Male/Female
Spacer
Spacer
Pem
Pem
LINQ8ACM/
LINQ8ACMCB
VR6
Metal
Spacer
Fig. 3
Fig. 3a