
Installation Instructions Owner manual


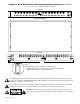

- 8 - HubWayLDH Active Hub Unit
Altronix is not responsible for any typographical errors.
14058thStreet,Brooklyn,NewYork11220USA,718-567-8181,fax:718-567-9056
website:www.altronix.com,e-mail:info@altronix.com,LifetimeWarranty,MadeinU.S.A.
IIHubWayLDH8/HubWayLDH16 H22M
MEMBER
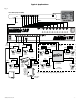
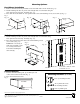
Mounting Options:
Fig.5
Wall Mount Installation
1-Installmountingbrackets(A)ontheleftandrightsideofrackchassisusing
four(4)flatheadscrews(B)(included)(Fig.6a).
2- Place unit at desired location and secure with mounting screws
(notincluded)(Fig.6b).
Caution: It is necessary to
make sure mounting screws
are securely fastened to a
beam when installing the
unit vertically.
Rack Mount Installation
1- Remove and discard factory installed screws from both sides of rack chassis (Fig.5a).
2-Installmountingbrackets(A)ontheleftandrightsideofrackchassisusing the
four(4)flatheadscrews(B)(included)(Fig.5b).
3- Place unit into desired EIA 19” rack position and secure with mounting screws (notincluded)(Fig.5c).
Fig.7
Fig.6
Shelf Installation
1- Positionandaffixrubberpads(C)(included)ateach
corner on the bottom of the unit(Fig.7).
2- Place unit in desired location.
B
A
C
Mounting Hardware (Included):
B
A
Fig.6b
Fig.6a
C
A
B
Fig.5b
Fig.5a
Fig.5c
Top Top Top
Front
Left
Front
Left
FrontLeft
Left Side
Rubber Pad
Two(2)mountingbrackets
Six(6)flatheadscrews
for mounting brackets.
Four(4)rubberpads.
Remove
Dottedlinesindicatestuds
behindsheetrock.