IP over Coax Receiver Installation Guide Models Include: eBridge16PCRX - Sixteen (16) Channel Receiver Z1409 I.T.E. 43KC Rev. 072412 More than just power.
Overview: The eBridge16PCRX is a CAT5 to Coax cable Managed Ethernet Midspan receiver. The receiver enables fast 10/100Base-T Ethernet digital communication to be received over Coax cable. An eBridge16PCRX receiver sends power over the coax to the eBridge1PCT 15.4W (PoE) or eBridge1PCTX 30W (PoE+) transmitter under PoE protocol. The eBridge1PCT/PCTX in turn delivers that power to a PoE enabled camera or IP device.
ment in an environment compatible with the maximum ambient temperature (Tma) specified by the manufacturer. Reduced Air Flow - Installation of the equipment in a rack should be such that the amount of air flow required for safe operation of the equipment is not compromised. Do not obstruct any air vents on the unit. It is recommended to leave half space above and below the unit.
Single IP camera: Fig. 2 RE2 (rear) - with four (4) 12VDC/7AH RE2 (rear) - with four (4) 12VDC/7AH batteries (Altronix model # BT126) batteries (Altronix model # BT126) eBridge1PCTX eBridge1PCTX IP Camera IP Camera eBridge1PCTX eBridge1PCTX IP Camera IP Camera BAT4 BAT3 BAT2 BAT1 BAT4 BAT3 BAT2 BAT1 + + --- --- + + --- --- + + --- --- + + --- --- + + --- --- + + --- --- + + --- --- + + --- --- Up to 1500 ft. Up to 1500 ft. Up to 1500 ft. Up to 1500 ft.
c. Click the Networking tab. Under this connection uses the following items, click either Internet Protocol Version 4 (TCP/IPv4) or Internet Protocol Version 6 (TCP/IPv6), and then click Properties. d. To specify IPv4 IP address settings, click Obtain an IP address automatically, and then click OK. e. To specify IPv6 IP address settings, click Obtain an IPv6 address automatically, and then click OK. For Windows 7: a.
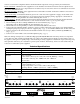
take specific steps that program your router to prevent such address conflicts. 2. If using a Static IP (recommended), you will need to input the information manually. In order for DDNS to work, you must enter valid data, compatible with your network, for all of the network setting fields: IP address, Subnet Mask, Inbound Port and Host Name. 3.
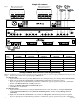
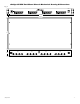
eBridge16PCRX Rack Mount Chassis Mechanical Drawing & Dimensions: Fig. 4 Ethernet 10/100 Base-T 1 2 3 10/100 Base-T 4 5 6 7 10/100 Base-T 8 9 10 11 10/100 Base-T 12 13 14 15 16 19.125" 0.75" 17.625" 8.5" Input 1 1.
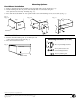
Mounting Options: Rack Mount Installation 1- Remove and discard factory installed screws from both sides of rack chassis (Fig. 5a). 2- Install mounting brackets (A) on the left and right side of rack chassis using the four (4) flat head screws (B) (included) (Fig. 5b). 3- Place unit into desired EIA 19” rack position and secure with mounting screws (not included) (Fig. 5c). Fig. 5 Fig. 5a Fig. 5b Top Fig.