
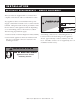
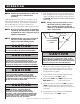
Gas Fryer With Basic Control Installation, Operation & Maintenence


NOTE: P
erform an initial Boil-Out to clean and
sanitize the fryer station before
operating.
Carbonized deposits along with an accumulation of oil
will eventually build-up on the interior of the frypot as
well as fryer accessories. It is important to periodically
remove these deposits, not only to maintain fryer
efficiency, but also to provide the highest product quality.
NOTE: Because each fryer station is controlled
separately, the following procedure must
be followed for every component fryer in
multiple-station units.
NOTE: Manual Boil-Out can only be performed
when the actual temperature of the
frypot is less than 230°F (110°C).
1. After emptying the fryer of oil or shortening, remove
filter cartridge from unit if equipped with a filtration
system. (See filtration instructions on page 19.) Close
t
he DRAIN. The handle should be rotated clockwise
until it stops.
NOTE: Always wear eye protection or a face
shield and protective rubber gloves
when cleaning the frypot as boil-out
chemical is an alkaline solution and can
cause severe burns.
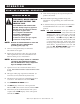
2. Fill the fryer to the maximum oil fill line with a
mixture of cold water and fryer boil-out solution.
Carefully follow the manufacturer’s directions for
mixing the boil-out solution.
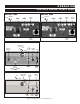
3. Turn the Master Power Switch (located within the
front access door) to the “ON” position.
4. Wait until the LED reads “HEAt”, then press the
BOIL OUT button on the control panel.
5. When 192°F (89°C) is reached, the LED will display
“bOIL” and that temperature will be maintained.
Using a separate timer, allow the frypot to boil-out for
10 minutes.
6. Turn the Master Power Switch located behind the
front access door to the “OFF” position.
Ga s Fr y er Op e r a ti o n & Ca r e M a n u al • 1 4
O P E R A T I O N
B O I L - O U T
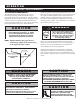
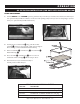
M
AXIMUM OIL FILL LINE
MINIMUM
OIL FILL LINE
K
ETTLE
FRONT
OIL/SH ORTENI NG
LEVE LS
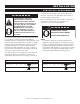
C A U T I O N
TO AVOID DAMAGING THE PUMP AND CONTAMINATING
CLEAN OIL WITH BOIL-OUT CHEMICAL ON UNITS
EQUIPPED WITH A FILTRATION SYSTEM, NEVER ALLOW
BOIL-OUT SOLUTION OR RINSE WATER TO CIRCULATE
THROUGH THE FRYER PUMP SYSTEM OR FAT DRAWER.
C A U T I O N
BEFORE ENTERING THIS PROGRAM, MAKE CERTAIN
THE FRYPOT IS EMPTY OF ALL OIL OR SHORTENING.
C A U T I O N
BOIL-OUT SOLUTION AND SURROUNDING METAL
SURFACES BECOME EXTREMELY HOT. TO AVOID
BURNS, ALWAYS USE HAND PROTECTION WHEN
PERFORMING THE BOIL-OUT FUNCTION AND FOLLOW
THE MANUFACTURER'S SAFETY INSTRUCTIONS FOR
THE BOIL-OUT PRODUCT BEING USED.
C A U T I O N
DO NOT LEAVE THE FRYER UNATTENDED DURING THE
BOIL-OUT PROCESS. THE FRYER MUST BE
CONTINUOUSLY MONITORED FOR BOIL-OVER
CONDITIONS, PARTICULARLY IN HIGH-ALTITUDE
LOCATIONS. IF BOIL-OVER IS IMMINENT, IMMEDIATELY
TURN THE MASTER POWER SWITCH OFF AND ALLOW
THE SOLUTION TO COOL. WHEN THE SOLUTION HAS
COOLED, RE-ENTER THE BOIL-OUT MODE.
C A U T I O N
KEEP A CONTAINER OF COLD WATER ON HAND
DURING BOIL-OUT IN CASE OF BOIL-OVER. IF BOIL-
OVER IS IMMINENT, IMMEDIATELY TURN OFF MASTER
POWER SWITCH AND POUR COLD WATER INTO FRYPOT
TO QUICKLY REDUCE SOLUTION TEMPERATURE.