
User`s guide
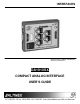

INTERFACES
7
7
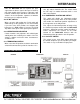
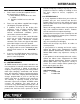
4.14. BANDWIDTH
The typical bandwidth of the DA1910SX is 420
MHz. The minimum bandwidth is 350 MHz. This
exceptionally high bandwidth allows the passing of
the third harmonics of the video signal, thus
maintaining the highest quality of the input signal.
4.15. CUSTOM MODIFICATIONS
The DA1910SX is designed for simple
customization. If desired, both buffered outputs can
offer the same signal types or have different signals
on each of the outputs. ALTINEX can customize the
unit for you. Please contact our sales team about
customizing the unit.
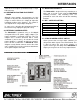
INSTALLING YOUR INTERFACE 6
Step 1. Connect the 2.5mm plug from the
provided AC Adapter to the to the POWER
input connector. Observe the LED near
the computer turning RED.
Step 2. Connect an appropriate input cable
between the COMPUTER INPUT
connector of the DA1910SX and the Video
output connector of the source.
Step 3. Connect an appropriate output cable
between the LOCAL MONITOR OUTPUT
connector of the DA1910SX and the Video
input connector of the local display.
Step 4. Connect an appropriate cable (3, 4 or 5
wire coaxial) between the MAIN OUTPUT
connector of the DA1910SX and the Video
input connector of the primary display.
Step 5. Set dip-switches on the front to define the
input (IDBIT / PIN4 & TERMINATION) and
output (SYNC ON G, H&V OUTPUT &
SERRATION) as described in the manual.
Step 6. Set the H. POSIT. ON dip-switch to the
OFF position and center the picture on
the primary display using its control.
Step 7. For primary displays other than LCD
projectors, set the H. POSIT. ON dip-
switch to the ON position and adjust the
position of the picture as needed using
the HORIZONTAL POSITION knob of the
DA1910SX.
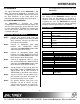
OPERATION 7
The settings of the DA1910SX Interface can be
adjusted using the Dip-switches as described in
section 4. There are no other adjustments necessary
to operate the unit. The DA1910SX will operate
successfully as long as cables are attached properly
and other technical specifications are followed.
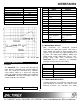
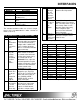
ACCESSORIES 8
Model No. Description
PS5502US
9 V 500 mA Power Supply (requires
Adapter Cable)
PS5512UK
9 V 500 mA Power Supply for UK
PS5522AU
9 V 500 mA Power Supply for
Australia
PS5532GR
9 V 500 mA Power Supply for
Germany
PS5542JP
9 V 500 mA Power Supply for Japan
Table 7. Power Supply selection.
Model No. Description
VGA-Pack
MS8125CA
VGA Output cable for DA1910SX
MS8126CA
VGA Input cable for DA1910SX
MAC–Pack
MS8121CA
MAC Output cable for DA1910SX
MS8122CA
MAC Input cable for DA1910SX
SUN/SGI–Pack
MS8123CA
SUN Output cable for DA1910SX
MS8124CA
SUN Input cable for DA1910SX
RGB-Pack
MS8129CA
5 coax. (BNC) cable for
DA1910SX
Table 8. Selection of Interface cables.