MAX Communication Server Release 7.
Contents Introduction ...................................................................................................................................................................3 Prerequisites ..............................................................................................................................................................3 Supported Polycom IP Phones ...........................................................................................................................
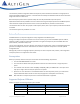
This document provides configuration details for Polycom IP phones and lists the limitations of using Polycom IP phones with AltiGen’s MaxCS 7.5 system. It also describes the new Polycom Advanced Features license and how to assign these licenses to extensions. Note that Polycom phones will not operate exactly the same way that AltiGen IP phones operate. Separate documents will be provided for end-users who will be using the Polycom phones with the MaxCS system.
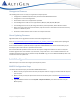
Unsupported Features The following features are currently not supported on Polycom phones. • Configuration of VLAN and QoS cannot be performed from MaxCS Administrator. • Configuration of a call recording button. • Some feature codes are not supported for speed dial. • The following feature codes are not supported: #12, #26, #27, #44, #45, #46, #81, #82. • The following features can only be configured from the phone: Speed dial, admin-defined numbers.
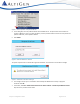
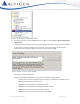
Figure 1: Choose System > Request Certificate 4. In the dialog box, enter the public IP address of this MAXCS server. The phones will use this address to connect to MaxCS. If there is no public IP address, use the private IP address. If there are both private and public IP addresses, use the public IP address. 5. Click Submit. Figure 2: Enter the MAXCS IP address The system requests that a certificate be assigned from AltiGen. You should see a confirmation message.
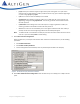
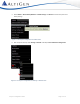
Figure 4: The Start menu showing MAXCS utilities 8. Once the services restart, log into MAXCS Administrator again and select System > System Configuration > Number Plan. In the lower section of the page, edit the Polycom Digit Map to be consistent with your system dial plan. For example, if your extension length, trunk access codes, or any other settings. do not match the defaults, then check the section below to see which entries you need to change.
o [1-7]xx means your extension length is 3-digits with a prefix starting with 1 to 7 (this means extension 123 is a valid extension number, but 823 or 923 are not); if your extension digit length is 4, then change [1-7]xx to [1-7]xxx o 9,11 forces a call to be sent immediately if 911 is dialed o 9,[2-9]xxxxxx means dialing trunk access code 9 plus a 7-digit local call; if your local call is 10digit dialing, change this to 9,[2-9]xxxxxxxxx.
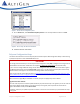
Figure 7: The IP Phone Configuration panel rd 11. On the General tab, check Enable SIP Telephony Service in the 3 Party SIP Device section. Click OK. rd Figure 8: The 3 Party SIP Device checkboxes 12. Continue with the next section. Polycom Configuration Steps This section describes how to use the Polycom phones and the Polycom Web Configuration Utility to finish setting up Polycom IP phones to work with MAXCS Release 7.5.
In the examples in this section, we use the following parameters: • 10.40.0.89 – The phone’s IP address • 206.40.10.25 – The MAXCS system’s IP address While performing these steps, substitute the correct IP addresses for your system. Note: The screen shots in this section may look different from your web utility interface. In addition, in a few cases a field or option may be found on a different menu that noted here. This is because the web configuration tool varies slightly from one model to another.
5. Select Utilities > Phone Backup & Restore > Global Settings. Click Restore to restore the phone to its factory settings. Figure 11: The Polycom configuration tool Utilities menu 6. After the phone reboots, select Settings > Network > TLS. Expand TLS Certification Configuration.
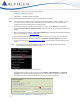
7. For Platform CA1, enter http://[MAXCS Server IP Address]/altigen.crt and click the Install button to install the AltiGen certificate (in our example, this is http://206.40.10.25/altigen.crt). Figure 13: The Polycom configuration tool TLS Certificate Configuration panel If the installation is successful, that row will be greyed out with the certificate information. Figure 14: The certificate has been installed 8. Under Settings > Network > TLS, expand the section TLS Applications. 9.
Figure 15: The Polycom configuration tool TLS Applications panel 10. Select Settings > Provisioning Server > DHCP. • Set Boot Server to Static Note: For some phone models, the DHCP options are found under Settings > Provisioning Server. Figure 16: The Polycom configuration tool DHCP menu 11. Select Settings > Provisioning Server. • Set Server Type to HTTPS • Set Server Address to the MAXCS System IP address (in our example, this is 206.40.10.
. Continue with the steps in the next section. Enterprise Manager Configuration Steps Follow these steps to confirm various settings in Enterprise Manager. 1. Log into MAXCS Administrator. In Enterprise Manager, click the Codec button on the toolbar. 2. Confirm that the codec profile for the Polycom IP phones has DTMF Delivery set to RFC 2833. 3. Confirm that SIP Early Media is set to Disabled. 4. Confirm that SIP Transport is set to UDP.
Figure 20: The Time Display settings 4. Reboot the Polycom phone so that your changes can take effect.
Configure DND Synchronization You can configure an extension to synchronize Do Not Disturb (DND) settings between a Polycom IP phone and a MAXCS client. Figure 21: Example of a Polycom phone display showing DND button 1. In MAXCS Administrator, select PBX > Extension Configuration. Select the extension. 2. Switch to the Answering tab. 3. In the Do Not Disturb section, select Enable Do Not Disturb. Click Ok. This setting will be sent to the Polycom phone when the phone reboots.
3. Select PBX > AltiGen IP Phone Configuration. Switch to the Polycom tab. Select the extension. Figure 23: IP Phone Configuration, Polycom tab BLF fields 4. The page shows you ten customizable sets of fields; each one is a lamp slot. You can configure a BLF slot or a Line Park slot for each of the ten sets of fields. In any available slot (1-10), select BLF from the first pull-down menu. 5.
Configure Line Park The Line Park feature is a kind of call park method. You can configure line park spots for a user to park calls on the Polycom phone. Figure 25: Example of a Polycom phone display showing Line Park slots LP13 and LP14 1. In MAXCS Administrator, set up Line Park groups (select PBX > Line Park Configuration). For detailed instructions, refer to the MAXCS Administration Manual. Figure 26: Configure Line Park Groups 2. Select PBX > AltiGen IP Phone Configuration.
Figure 27: Set up Line Park slots 4. In the middle field, enter the line park number (which you set up in step 2). If you enter a number that you’ve already assigned to a slot, you will see a notification. The Label field will populate automatically based upon the number that you entered. This text will appear on the Polycom phone beside the line park number. 5. (Optional) You can edit the text in the Label field as needed, to more clearly indicate the name of the group.
Figure 29: Setting Polycom phone to auto-answer in Client Polycom Paging Groups Note that Polycom paging works differently in Release 7.5 than in earlier releases. Please review this section carefully. Polycom extensions can make one-way audio announcements to other Polycom users who are in the same Polycom paging group.
Configure Polycom Paging Once you have enabled Polycom Paging for an extension, the user can subscribe to paging groups, change the default paging group, configure whether pages play during active calls, and send pages. To configure Polycom Paging groups, 1. In MAXCS Administrator, select PBX > Paging Group Configuration. 2. Click Add to add a new group. 3. Enter the paging group number. 4. Check Polycom paging group. 5. Assign an available paging channel ID number for the group (1-25).
8. Click Reboot affected Polycom phones. This sends the updated configuration to any Polycom extensions that are impacted by the changes; phones with active calls will be rebooted after the call ends. After the phone reboots, the members of the paging group will see a new softkey on their Polycom phones for that paging group. Configure Device Auto Answer Users can have the Polycom phone automatically answer calls by using the feature in MaxAgent, MaxCommunicator, AltiConsole, and MaxOutlook.
Push Digit Map to Polycom Phones A digit map is provided for Polycom phones. It defines when to send the dialed digits to MAXCS. 1. In MAXCS Administrator, select System > System Configuration. Open the Number Plan tab. Figure 33: Polycom Phone Digit Map 2. Update the Polycom digit map as needed; refer to page 6 for descriptions of the string components. 3. Click Apply and Reboot All Affected Polycom Phones. All registered Polycom phones will be rebooted.
• Polycom phones work differently with Global extensions than AltiGen IP phones. Specifically, you cannot set a Global extension as a BLF softkey for a Polycom phone; the phone will not show any status updates. In addition, when a Polycom user transfers a call to a Global extension, the caller ID is not sent. • If a Polycom user places a conference call on hold and then all other participants drop off of the conference, the Polycom user will still have a “Hold Conference” MaxAgent record.
• MAXCS version number • Number and types of boards in the system • Server model • The telephone number where you can be reached Polycom Configuration Guide Page 24 of 24