New Features Guide MAXCS 7.
Contents Introduction ........................................................................................................................................................... 4 Operating System Support...................................................................................................................................... 4 Location-Based E911 Configuration (For Roaming Users) ........................................................................................ 4 About E911 Location IDs ..
E-mail: info@altigen.com Web site: www.altigen.com All product and company names herein may be trademarks of their registered owners. Copyright © AltiGen Communications, Inc. 2014. All rights reserved. MaxCS 7.
Introduction This guide describes the enhancements that have been added in MaxCS Release 7.
E911 Location ID information is associated with the IP phone itself, rather than being tied to a specific user or extension. This way, no matter who logs into an IP phone, the correct E911 Location ID will be transmitted during an emergency call. Once these E911 Location IDs are configured within MaxCS Administrator, administrators can either push the correct information to the AltiGen IP phones or update the E911 information on each AltiGen IP phone via the phone’s menus.
• Location ID 3 – Sunnyvale • Location ID 4 – Los Gatos Another organization may choose to create different E911 Location IDs for each floor of a large office building, similar to this approach: • Location ID 1 – Basement/garage • Location ID 2 – Floor 1 • Location ID 3 – Floor 2 • Location ID 4 – Floor 3 Yet another schema could be to implement E911 Location IDs by the type of use of various building sections, by floor, similar to the following method.
2. Administrators configure password protection, so that changing the E911 information for a phone requires a user to enter a password (optional). See Requiring a Password to Change E911 Location ID on page 9 for details. 3. Administrators view (and update) the E911 assignments for IP phones. Administrators can either push the updated information to the phones or have users enter the appropriate information on the phone itself. See page 10.
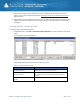
Location-based E911 Field 2. Description Enable Callback This setting determines the routing for the call back from the PSAP center. • With Callback enabled, the DNIS number of incoming calls is used to match the E911 CID of the 911 call history to determine the callback extension. • With Callback disabled, call will be routed to the standard incoming call routing of MaxCS, regardless of the E911 call history. The default setting is Disabled.
Figure 3: Add a new E911 Location entry 4. In the dialog box, complete each field and click OK. Refer to Table 1 for field descriptions. Note: In order to support E911 LIDs across multiple servers, such that if one server fails the other will correctly handle E911 LID calls, we recommend that each server have an identical list of E911 Location IDs.
3. Once you check that checkbox, the Password field above it becomes active. Enter a password. Your entry will be the password that the user must enter in order to change the Location ID assigned to the phone. Click OK. You can use the Apply To feature to apply this requirement and the password to multiple phones.
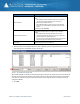
E911 Assignment Field The current state of this IP phone. You can filter the results as needed. • Active – The IP phone is currently registered with the MaxCS system. • Inactive – The IP phone is not currently registered with the MaxCS system (the phone may have been unplugged or was logged out of the system). Status 4. Description To change the E911 Location ID for an IP phone, select the entry and click Change LID.
Figure 6: The License Information page Figure 7: The Client SEAT License Management page For details on how to configure this connector, refer to the separate document, Application Notes: MaxCS 7.0 Connector for Salesforce. MaxCS 7.
AltiReport Enhancements AltiReport uses an email server to send scheduled reports. In MaxCS 7.0 Update 1, AltiReport can now communicate with encrypted email servers such as the Google mail server (Gmail) or the Hotmail server. AltiReport detects the requirements of the specified email server automatically; no configuration is needed to indicate whether the email server requires encryption.
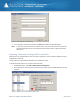
In order to support Microsoft Outlook 2013, MaxOutlook uses an updated 3rd party Outlook integration library. Because of this, the MaxOutlook interface is slightly different from that of previous versions. Note: Users who upgrade their Microsoft Outlook application from version 2007/2010 to Outlook 2013 will need to reinstall MaxOutlook. The name of the menu in Microsoft Outlook 2013 has changed from “Add-ins” to “MaxOutlook” (see Figure 9).
Minimize Application Behavior When users minimize MaxCommunicator, MaxAgent, and MaxSupervisor, the application icon will now stay at Windows task bar and Windows system tray. Users can right-click an icon and choose Close Window to exit an application. Figure 11: Client applications minimize to task bar and system tray Display Voicemail Time as the Local Time or the Server Time MaxCS 7.
Figure 12: MaxCommunicator display option for voicemail: show server time or local time MaxAgent Voicemail Time Display MaxAgent offers a similar option, not only for personal voicemail, but also for the display of Workgroup voicemail messages. Figure 13: MaxAgent time display options for personal voicemail Figure 14: MaxAgent time display options for Workgroup voicemail The setting for personal voicemail display can be different from the setting for workgroup voicemail display. MaxCS 7.
MaxSupervisor Voicemail Time Display To adjust the voicemail time zone display in MaxSupervisor, users follow these steps: 1. Select the Restore Defaults tab. 2. A new option has been added to this panel. For Voicemail Timestamp, users choose either Server Time or Local Time and then click OK. Figure 15: MaxSupervisor voicemail time display option The Workgroup voicemail Date/Time column will update accordingly.
To easily move address between the lists, two buttons have been added. You can now move a SIP Device IP address from one list directly to the other, instead of removing it from one, then adding it to the other in a separate step. Figure 16: Move Device IP address from one list to the other Block Unauthorized SIP Invite Requests MaxCS 7.0 Update 1 includes a filter to block unauthorized SIP Invite requests.
Advanced Call Router Enhancements Note: Because this feature accesses an external database, 32-bit ODBC must be set up beforehand. Advanced Call Router (ACR) allows verification of incoming call information against the database. In earlier releases, ACR only confirmed that the specified information existed; it left the transfer target to be configured in the rule settings.
Figure 18: The Data Source panel showing the new Purpose options A new column, Purpose, is now included, to retrieve data for multiple data fields. It offers four options: • Target – Retrieves data for the call routing target (an extension number or group number); this option is required. • Priority – Retrieves data for the call priority value. • Skill – Retrieves data for the call skill value. • UserData – Retrieves data from the SQL query result and assigns that data to the UserData field.
The following figure shows an example where calls come in with different IVR tags. ACR searches the database and then retrieves Target field data for the destination extension.
In this scenario, the call router data source could be configured as shown in the following figure: 1 - Use “ProductID” for the IVR tag. ACR uses this IVR input data as the source to search the database. 2 - Use “productnumber” for the Product Number field value. The first record that matches the entered product number will be used. 3 - Use “extension” for the routing target. This tells ACR to retrieve this field from the matching record and use that data as the call’s routing target.
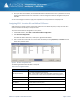
Product Number Extension Priority Skill 5001 101 1 4 5002 102 3 5 5003 103 5 6 The call router data source could be configured as shown in the following figure: 1 - Use “ProductID” for the IVR tag. ACR uses this IVR input data as the source to search the database. 2 - Use “productnumber” for the Product Number field value. The first record that matches the entered product number will be used.
Product Number Destination 5001 1001 5002 1002 5003 1003 Here are the fields in the AgentTable table: Field Name Field Type Description Destination Text The transfer destination. Extension Text The destination extension number. Priority Number The call priority. Skill Number The required skill level for the agent.
The call router data source could be configured as following: 1 - Use “routetable” in the Match Conditions list. ACR will search IVR data from this table. 2 - Use “agenttable” in the Data Retrieve from User Database list. This specifies the data to be retrieved from the second table. 3 – Enter additional search criteria in the “Where” clause. This will be used to link AgentTable with RouteTable. Figure 22: ACR Example 3 configuration Note: You can also create a view, to make the SQL query simpler.
AltiGen Technical Support AltiGen does not provide general configuration support for AudioCodes products. For general configuration information, refer to your AudioCodes documentation. AltiGen provides technical support to Authorized AltiGen Partners and distributors only. End user customers, please contact your Authorized AltiGen Partner for technical support.