
User guide

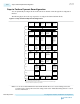


Steps to Perform Dynamic Reconfiguration
You can dynamically reconfigure blocks in the transceiver channel or PLL through the reconfiguration
interface.
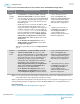
The following figure shows the steps required to reconfigure the channel and PLL blocks.
Figure 6-6: Steps to Perform Dynamic Reconfiguration
Step 1
Step 2
Step 3
Step 4
Step 5
Step 6
Step 7
Step 8
Example
Enable Dynamic Reconfiguration in the IP
Refer to Register Map for
-- feature address
-- valid value of writedata
for feature
Enable configuration
files in the IP
Enable configuration
files, multiple
reconfiguration
profiles in the IP
Enable configuration files,
multiple reconfiguration
profiles, Embedded
Reconfiguration
Streamer in the IP
Note the settings of
base and modified
configurations
Note the settings of
the base configuration
and generate the
corresponding
configuration files
Check if user has control
over Avalon-MM interface
Check if user has control
over Avalon-MM interface
Create and store the
parameter settings of
each configuration or
profile of the IP to the
corresponding
configuration files
Refer to the Lookup
registers to be accessed
for each special case,
for example, TX PLL
switching, TX PLL
Reference clock
switching, RX CDR
Reference Clock
Switching
Note the settings of
the modified
configuration
and generate the
corresponding
configuration files
Read from desired
feature address
Write to a soft control
register (x340) of the
desired channel with the
profile select bits, broadcast
bit, and configuration load
bits set accordingly
Find out the differences
in settings between the
various configurations
or profiles using
configuration files
Find out the differences
in settings between the
base and modified
configurations.
Perform read-modify-
write to feature address
with valid value
Poll soft status register
(x341) of the desired
channel at regular
intervals to read the
streamer busy status
bits
Check if user has control
over Avalon-MM
interface
Check if user has control
over Avalon-MM
interface
Read from the desired
lookup register
Perform read-modify-
write to each feature
address and bit
difference between the
configuration files
Check if user has control
over Avalon-MM
interface
Perform Logical
Encoding (only required
for TX PLL switching)
Recalibrate the channel
and/or PLL appropriately
after the busy bit is
deasserted (2), (3)
Recalibrate the channel
and/or PLL appropriately.
Reset the channel.
(2), (3)
Recalibrate the channel
and/or PLL appropriately.
Reset the channel.
(2), (3)
Recalibrate the channel
and/or PLL appropriately.
Reset the channel.
Recalibrate the channel
and/or PLL appropriately.
Reset the channel.
(2), (3)
Direct Reconfiguration
Flow
IP Guided
Reconfiguration Flow
IP Guided
Reconfiguration Flow
Using Multiple Profiles
(1)
IP Guided
Reconfiguration Flow
Using Embedded Streamer
(1)
Reconfiguration Flow
for Special Cases
Changing PMA Analog
parameters
Standard to Enhanced
Datapath
reconfiguration
Standard to Enhanced
Datapath
reconfiguration
Reconfiguration of
Local Clock Dividers
TX PLL switching
Note:
(1) Available for channel reconfiguration only.
(3)
Altera recommends that you do not reset the PLL after PLL recalibration.
Altera recommends that you hold the channel receiver in reset during reconfiguration of the channel receiver. Assert the channel RX resets, reconfigure
RX channel, deassert RX channel resets, recalibrate RX channel, and reset RX channel.
(2)
Perform read-modify-
write to each feature
address and bit
difference between
the base and modified
configuration files
Perform read-modify-
write to the required
feature address with
the desired/encoded
value (only required
for TX/PLL switching)
(2), (3)
Note: You can also enable ADME in the Native PHY and PLL IP cores for test and debug and use the
SystemConsole to change the transceiver settings. Refer to the “Embedded Debug Features” section
for more information.
6-12
Steps to Perform Dynamic Reconfiguration
UG-01143
2015.05.11
Altera Corporation
Reconfiguration Interface and Dynamic Reconfiguration
Send Feedback