
User guide
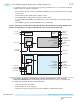
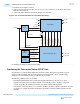

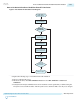
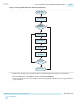
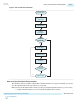

Table 2-195: Simulator Path
Simulator Path
Mentor Graphics ModelSim
Mentor Graphics QuestaSim
<drive>:\<simulator install path>\win32
(Windows)
/<simulator install path>/bin (Linux)
Synopsys VCS/VCS MX /<simulator install path>/bin (Linux)
Cadence Incisive Enterprise /<simulator install path>/tools/bin (Linux)
Aldec Active-HDL
Aldec Riviera-Pro
<drive>:\<simulator install path>\bin (Windows)
/<simulator install path>/bin (Linux)
3. On Assignments menu, click Settings.
4. In the Category list, under EDA Tool Settings, select Simulation.
5. In the Tool name list, select your simulator.
6. To enable your simulator, on the Tools menu, click Options and then click License Setup . Make
necessary changes for EDA tool licenses.
7. Compile your design and testbench files.
8. Load the design and run the simulation in the EDA tool.
To learn more about third-party simulators, click on the appropriate link below.
Related Information
• Mentor Graphics ModelSim and QuestaSim Support
• Synopsys VCS and VCS MX Support
• Cadence Incisive Enterprise Simulator Support
• Aldec Active-HDL and Riviera-Pro Support
Custom Simulation Flow
The custom simulation flow allows you to customize the simulation process for more complex simulation
requirements. This flow allows you to control the following aspects of your design:
• Component binding
• Compilation order
• Run commands
• IP cores
• Simulation library model files
The following figure illustrates the steps for custom flow simulation. If you use a simulation script, you
can automate some of the steps.
2-328
Custom Simulation Flow
UG-01143
2015.05.11
Altera Corporation
Implementing Protocols in Arria 10 Transceivers
Send Feedback