
User guide
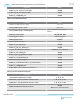
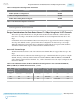
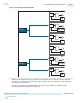
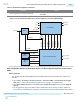

Table 2-193: Generation Options Parameters
Parameter Range
Generate parameter documentation file
On / Off
Figure 2-139: Connection Guidelines for an Enhanced PCS in Low Latency Mode Design
PLL IP
Data
Generator
Data
Verifier
Arria 10 Transceiver Native PHY
Reset Controller
pll_powerdown
rx_cdr_refclk
tx_serialclk0
pll_locked
pll_sel
reset
clk
pll_refclk
tx_ready
rx_ready
tx_parallel_data
tx_clkout
rx_parallel_data
rx_clkout
tx_serial_data
rx_serial_data
rx_is_lockedtodata
rx_cal_busy
tx_cal_busy
tx_analogreset
tx_digitalreset
rx_analogreset
rx_digitalreset
pll_cal_busy
How to Implement Designs for Data Rates Above 17.4 Gbps Using Enhanced PCS in Low Latency
Mode
Before you begin
You should be familiar with the Enhanced PCS and PMA architecture, PLL architecture, and the reset
controller.
1. Select Tools > IP Catalog > Interface Protocols > Transceiver PHY > Arria 10 Transceiver Native
PHY. Refer to Select and Instantiate the PHY IP Core on page 2-2 for detailed steps.
2. Select Basic (Enhanced PCS) from the Transceiver configuration rules list located under Datapath
Options.
3. Use the parameter values in the tables in Native PHY IP Parameter Settings for Basic (Enhanced
PCS) and Basic with KR FEC for each input of the Arria 10 Transceiver Native PHY Parameter Editor
UG-01143
2015.05.11
How to Implement Designs for Data Rates Above 17.4 Gbps Using Enhanced...
2-319
Implementing Protocols in Arria 10 Transceivers
Altera Corporation
Send Feedback