
User guide
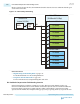

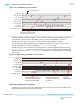


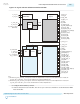
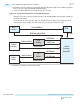


Figure 2-21: RX FIFO Deskew
rx_enh_data_valid
rx_enh_fifo_rd_en
rx_enh_fifo_full
rx_enh_fifo_pfull
rx_enh_fifo_empty
rx_enh_fifo_pempty
rx_enh_fifo_align_val
rx_enh_frame_lock
rx_enh_fifo_align_clr
3f
00
00
00
00
3f
00
3f
3f
00
00
3f
[5]
[4]
[3]
[2]
[1]
[0]
00
21 3f
21 3f3b
1e
001e
Each Lane Is
Frame-Locked
in a Different
Cycle
After deskew is successful, the user
logic asserts rd_en for all lanes to start
reading data from the RX FIFO.
data_valid is asserted,
indicating that the RX FIFO
is outputting valid data.
Deassertion of pempty
of all lanes before any
lane pfull goes high,
which means the deskew
is complete.
How to Implement Interlaken in Arria 10 Transceivers
Before you begin
You should be familiar with the Interlaken protocol, Enhanced PCS and PMA architecture, PLL architec‐
ture, and the reset controller before implementing the Interlaken protocol PHY layer.
Arria 10 devices provide three preset variations for Interlaken in the IP Parameter Editor:
• Interlaken 10x12.5 Gbps
• Interlaken 1x6.25 Gbps
• Interlaken 6x10.3 Gbps
1. Instantiate the Arria 10 Transceiver Native PHY IP from the IP Catalog (Installed IP > Library >
Interface Protocols > Transceiver PHY > Arria 10 Transceiver Native PHY).
Refer to Select and Instantiate the PHY IP Core on page 2-2 for more details.
2. Select Interlaken from the Transceiver configuration rules list located under Datapath Options,
depending on which protocol you are implementing.
3. Use the parameter values in the tables in Native PHY IP Parameter Settings for Interlaken. Or you
can use the protocol presets described in Presets. You can then modify the settings to meet your
specific requirements.
4. Click Generate to generate the Native PHY IP (this is your RTL file).
2-86
How to Implement Interlaken in Arria 10 Transceivers
UG-01143
2015.05.11
Altera Corporation
Implementing Protocols in Arria 10 Transceivers
Send Feedback