AUSTRALIAN HIGH DEFINITION PERSONAL VIDEO RECORDER PVR9600T / PVR9600Q User Manual Addendum
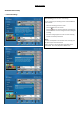
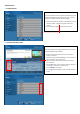
NEW FEATURES Added PVR Functionality Move Recordings Move Recording (access via Menu > Recordings) You can now move your recordings into an external USB Hard Drive as follows. 1. Select the recording you want to move. 2. Press the button on the remote. 3. Press the button to confirm acceptance of removing the Parental Guidance on the recording and to start moving the recording. 4. A success message appears on screen once the recording has been successfully transferred.
Lock Recording Lock Recording (access via Menu > Recordings) You can lock your recordings to prevent any accidental deletion as follows. 1. Select the recording you want to lock. 2. Press the # button on the remote and a lock icon appears on the selected recording. Once locked, this recording cannot be deleted. 3. To delete locked recording, press the # button on the remote to unlock. This recording can now be deleted.
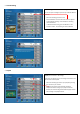
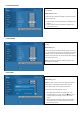
Series Tag Priority Setting Series Tag Priority Setting (access via Menu > Series) You can prioritise recording in between your Series Tags in case of auto recording conflict resolution (e.g. recording conflicts) as follows. 1. Select the recording you want to prioritise and press V+ to move up the list (more priority) or V- to move down the list (lesser priority).
Recordings Life Time Recordings Life Time (access via Menu > PVR Settings > Recordings Life Time) Default setting: OFF You can set the number of days (1, 3, 5, 7, 14, 30 & 365) for your recordings to remain in the internal Hard Disk Drive (HDD) before it is deleted. This is an automatic housekeeping feature to prevent your HDD from becoming full. If set to OFF, you have to manually delete your recordings in order to free up HDD space for future recordings.
Added Features Disable Channel Disable Channel (access via Menu > Settings > Channels) This is a handy feature to skip unwanted channels when you are scrolling the available channels using the CH+/CH-. You have the option to disable unwanted channel as follows. 1. Select the channel to be disabled. Press the # button on the remote to disable. A disable icon appears next to the channel. 2. Press the # button again to enable back the channel.
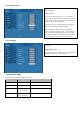
Lock Fascia Buttons Lock Fascia Button (access via Menu > Settings > General > Lock Fascia Buttons) Default setting: Disabled You have the option (Enable or Disable) to lock the front panel buttons as preferred. 1. If set to Enable, the front panel buttons is inoperable even if pressed. 2. If set to Disable, the front panel buttons operate as per normal when pressed. 4. Press the # button again to enable back the channel.
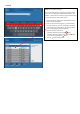
APPS APPS (access via Menu > APPS) This feature contains different APPS supported by the PVR. 1. NASA TV – select this APP and press OK to play NASA TV 2. Browser – currently disabled Note: Future APPS may be added in the future as they become available.
Search Search (access via Menu > Search) This is a convenient feature in searching for programs that you want to set a recording (both schedule and series tag) or set a reminder. It also allows you to search a program across the EPG and your Recordings list. Here is how it works. 1. Type a few letters (e.g. SES) and all the possible results are listed on top of the keyboard. 2. Once you see the wanted program (e.g. 1 Sesame Street), press the number (e.g.