
User manual


User Manual of Hikvision iVMS-4200 v2.0
29
Before you start:
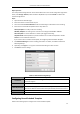
The newly installed storage devices need to be formatted. Go to the remote configuration page of the
device, click Storage->General, select the HDD or SD/SDHC card, and click Format to initialize the
selected storage device.
Steps:
1. Open the Record Schedule page.
2. Select the camera in the Camera Group list.
3. Check the checkbox Record Schedule under Local Recording to enable device local recording.
4. Select the record schedule template from the drop-down list.
All-day Template: for all-day continuous recording.
Weekday Template: for working-hours continuous recording from 8:00 AM to 8:00 PM.
Alarm Template: for motion detection or alarm input triggered recording.
Template 01-08: fixed templates for specific schedules. You can edit the templates if needed.
Custom: can be customized as desired.
If you need to edit or customize the template, see Configuring Record Schedule Template.
5. Click Advanced Settings to set the recording parameters. For details, see Table 3.1 Advanced
Recording Settings.
6. Optionally, click Copy to… to copy the record schedule settings to other channels.
7. Click Save to save the settings.
Table 3.1 Advanced Recording Settings
Parameters
Descriptions
Pre-record
Normally used for the event triggered record, when you want to record before
the event happens
Post-record
After the event finished, the video can also be recorded for a certain time.
Video Expired Time
The time for keeping the record files in the storage device, once exceeded, the
files will be deleted. The files will be saved permanently if the value is set as 0.
Redundant Record
Save the video files not only in the R/W HDD but also in the redundant HDD.
Record Audio
Record the video files with audio or not.
Configuring Record Schedule Template
Perform the following steps to configure the record schedule template: