Owner’s M ALPS Spas Owner’s Manual Ciara XLS Teton XLS Table of Contents Planning a Location for your Hot Tub Safety Precautions Controls Featured Operations Fill and Start-up Instructions Cleaning and Maintenance Spa Maintenance Troubleshooting Procedures Electrical Location in Concrete Slab Limited Warranty Electrical Hook Up Owner’s Record Tigra XLS ALPS-Spas 4400 Steve Reynolds Blvd. Norcross, Georgia 30093 770-381-2022 Fax: 770-925-1900 www.ALPS-spas.com ALPS-Spas 4400 Steve Reynolds Blvd.
PLANNING A LOCATION FOR YOUR HOT TUB Consider these things when determining a place for your hot tub. SAFETY FIRST: Do not place the hot tub within 10 feet (3m) of overhead power lines. *Make sure that your hot tub is positioned so access to the equipment compartment and side panels will not be blocked. Be certain your installation will meet all city and local safety codes and requirements. PRIVACY: Think of your surroundings during all seasons to determine your best privacy options.
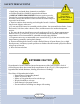
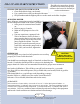
SAFETY PRECAUTIONS ! 1. Read, keep, and make these instructions available! 2. Children should be CLOSELY supervised at all times. DANGER! 3. RISK OF CHILD DROWNING! Extreme caution must be Risk of Injury exercised to prevent unauthorized access by children. To avoid Read and Follow all accidents, ensure that children cannot use hot tub unless they are Instructions supervised at all times. 4. Exercise caution when entering and exiting the hot tub. Surfaces may become slippery when wet. 5.
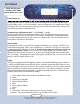
CONTROLS NEW EL/GL 2000 BALBOA CONTROL Quick Reference Card Initial Start-up: configuration numbers). This priming mode will last up to four minutes and then begin to preset filter cycles (--F) for two minutes. Once the diagnostics are complete the control will display the current temperature and begin to heat in the standard mode. The spa will maintain temperature in standard mode. Temperature Adjustment: 80 F – 104 F (26 C – 40 C) Once the spa is activated it will begin to heat to 100 F.
CONTROLS Preset filter Cycles: Your spa is programmed from the factory to filter twice a day for two hours each time. During this time pump one will come on in low speed automatically. The spa is fully operational at this time and safe to use. If for any reason you would like to change the filter settings please refer to the EL/GL Series laminated card. Setting the Time: Refer to the EL/GL Series laminated card.
FEATURE OPERATIONS Air Controls: The air controls are located around the top of the spa. These controls allow air into the jets. Leave all the air controls open. This will allow for increased flow and pressure from the jets. Hydrotherapy Jets: The hydrotherapy jets are recessed and located in the walls of the hot tub. Rotate the jet face counterclockwise to turn the jet on, clockwise to turn off. Turning a jet off or on will increase or decrease the effects of any jets not in the closed position.
FILL UP AND START INSTRUCTIONS The following procedures should be followed on initial startup and whenever the hot tub is drained for routine maintenance. FILLING THE HOT TUB WITH WATER 1. Clear all the debris from your hot tub. 2. Use a garden hose to fill your hot tub with water. 3. Fill just underneath the highest pillow or to the mark on the filter faceplate. APPLYING POWER Note: All power connections must be installed by a licensed electrician.
FILL UP AND START INSTRUCTIONS NOTE: Calcium deposits can also cause a restriction of air through your jets. Using a stain and scale remover regularly will greatly reduce the chance of this occurring. CHLORINE: Granulated chlorine must be used to remove bacteria and other organic matter from the water. Little or no chlorine causes the water to turn green and become unhealthy.
CLEANING AND MAINTENANCE You may need to renew the water in your tub every 3-5 months, depending upon the water condition. Read this before draining your hot tub. To prevent damage to the hot tub’s components, turn off power to the spa at the disconnect before draining the hot tub. Do not turn power back on until your spa has been refilled with water. There are certain precautions to keep in mind when draining your hot tub.
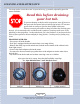
SPA MAINTENANCE FILTER CARTRIDGE MAINTENANCE Based on your model you may have 1 or 2 filters in your spa. Every few weeks you will want to check the filters and clean them. We recommend Cartridge Filter cleaner from AquaEZ®. - First turn your spa off at the disconnect breaker. Remove the filter cover by pulling it upwards. Remove the filter basket by pulling it out. Unscrew the filters by turning them counter clockwise. Spray the filters with Filter Cleaner. Let the cleaner sit for 30 minutes.
TROUBLESHOOTING PROCEDURES In the event ALPS’s hot tub is not working the way it should, please first review all the installation and operating instructions in this manual and check the message on the panel display. If you are still not satisfied it is working properly, please follow the appropriate troubleshooting instructions. Problem: Motor is running, but no water is coming out of the jets. Solution: This is a common problem that often occurs when the hot tub has just been filled with water.
ELECTRICAL LOCATION IN CONCRETE SLAB page 12 PS-Spas 4400 Steve Reynolds Blvd. Norcross, Georgia 300 770-381-2022 Fax: 770-925-1900 www.ALPS-spas.
WARRANTY INFORMATION Limited Warranty THIS LIMITED WARRANTY IS EXTENDED TO THE ORIGINAL PURCHASER OF A TETON XLS, CIARA XLS, K2 XLS, Tigra XLS OR SWIM SPA MANUFACTURED BY ALPS SPAS AFTER DECEMBER 1 2005, AND INSTALLED IN NORTH AMERICA ALPS SPAS are warranted against defects in the spa shell due to defects in workmanship and/or materials for Lifetime from the original date of sale ALPS SPAS are warranted against blistering, cracking, or delaminating of the interior surface of the spa due to defects in workm
WARRANTY INFORMATION PERFORMANCE OF WARRANTY. To obtain service in the event of a defect covered by this Limited Warranty, notify your ALPS Hot Tub dealer as soon as possible and use all reasonable means to protect the spa from further damage. Freezing temperatures require the hot tub to be protected from freeze damage occurring. Upon the presentation of a valid proof of purchase, a designated service technician will correct the defect subject to the terms and conditions contained in this Limited Warranty.
ELECTRICAL HOOK UP -AIN 0ANEL !-0 "REAKER , , ' , , ' )NSTALL !-0 BREAKER IN MAIN PANEL 3PA 7ATER PROOF OUTSIDE DISCONNECT AMP '&#) "REAKER • From main panel, run 6-2 with ground to outside disconnect. • Run 6-2 with ground from outside disconnect to spa. • ALPS SPAS recommends that a 60 AMP 220 GFCI must be used in disconnect. • Disconnect must be at least 6 ft. from spa! • Any of the four panels can be drilled out and removed for easy electrical entry.
ALPS Manufacturing We appreciate your business! Date Purchased: Date Installed: Dealer: PHone: Address: Spa Model: Serial Number: Owner’s Record Please read this “Owner’s Manuel” carefully, as it is designed to provide you with the information needed to maintain and use your new spa properly. IMPORTANT: ALPS Manufacturing reserves the right to change specifications or design without notification and without any obligation. Spa Dimensions Model Width Teton XLS 82 inches 208.3 cm Ciara XLS 84 inches 213.