
Setup guide

3.
Crossover Adjustment
a) Use the
~
or.
button to make the selection. In this example, "CROSSOVER"
b)
The user can also use these buttons to select "TIME
DELAY."
The following "FRONT
2"
adjustment procedures will be similar in nature to
adjustments for the other channels. Just substitute "FRONT
1,"
"REAR," or
"SUBWOOFER," for "FRONT 2." The procedure is the same with only the
parameters slightly different, as shown at the end
of
this section.
4.
Enter the Channel select mode
by
using the
~
button. "FRONT
1"
is displayed.
a) Use the
~
or.
button to choose a channel. In this example, "FRONT 2." Note:
Use the same procedure to select any
of
the other channels.
b)
User can also use the
~button
to return to the previous level with "CROSSOVER"
or "TIME DELAY" selections.
c) Once the channel has been selected, Press "ENTER" to begin making the
adjustment.
5.
Modify 2 different Crossover parameters: LEVEL and Fc (cut-off Frequency). Once
Fc is selected, the Crossover becomes active. Use the
~
or
~
buttons to choose the
parameter to modify. Use the
~
or.
buttons to change the parameter.
a) LEVEL is adjustable from -15 dB to
+
15
dB using the
~
or • buttons.
This adjustment changes the LEVEL in 1
dB
steps. The range for this parameter
remains the same for ALL Channels in ALL modes.
b)
The Fc adjustment depends on the output mode. The
~
or.
buttons select the
frequency.
The frequency range
of
FRONT 2 changes based on the FRONT 1 configuration.
Once FRONT 1 is activated (Fc selected), FRONT 2 changes from a High-pass
crossover
to
a Band-pass crossover. This is to accommodate the 2-way output mode.
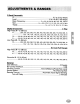
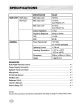
The Fc changes as follows:
Output
Mode
FRONT 1 FRONT 2 REAR
SUB
2
or
4 CH, wlwo
Su~
NA
HPF:
50
- 200 Hz
@-12dB/oct
HPF:
50
- 200
Hz
@ -12 dB/oct LPF:
50
- 200 Hz; -12/-24 dB/oct
2-Wrt.
4-CH,
~H;
wlwo
Su~
HPF: 200 - 5
kHz@-12dB/oct
LPF: 200 -
5k
Hz @ -12 dB/oct;
HPF:
50
- 200
Hz@
-12 dB/oct
LPF:
50
- 200 Hz; -12/-24 dB/oct
HPF: 50 - 200
Hz@-12dB/oct
c) For the Subwoofer Channel, a third parameter
is
available. Use the the
~
or •
buttons to toggle between the
12
dB/oct or 24 dB/oct crossover slopes.
d) Upon completing the adjustment, press ENTER to exit back to the "CROSSOVER"
sub-menu.
e)
If
all CROSSOVER adjustments have been completed, use the
~
button to return to
the PRESET selection mode. Press ENTER again to exit and save the adjustments.
f) Use the MODE button at any point, to return to the previous sub-menu to make
additional adjustments. "SAVE SETTINGS" stores changes in memory.