01GB00IVA-W520E.book Page 1 Thursday, June 10, 2010 4:15 PM ENGLISH Contents Operating Instructions WARNING WARNING ................................................. 4 CAUTION .................................................. 4 PRECAUTIONS ........................................ 5 Discs Playable on This Unit ................... 6 Getting Started DVD/Video CD Playing a Disc ................................................16 To display the DVD mode screen ...............17 If a menu screen appears .....
01GB00IVA-W520E.book Page 2 Thursday, June 10, 2010 4:15 PM Setup DVD Setup DVD Setup Operation ..................................... 24 Changing the language setting .................... 24 Setting of the Menu Language .................... 24 Setting of the Audio Language ................... 25 Setting of the Subtitle Language ................. 25 Changing the Country Code Setting ........... 25 Setting the Rating Level (Parental Lock) ........................................ 25 Setting the Downmix Mode .
01GB00IVA-W520E.book Page 3 Thursday, June 10, 2010 4:15 PM Rearview Camera Operation (Optional) Switching the Rear Camera Screen (Optional) .................................................... 46 Displaying the rear view video while the car is in reverse .................................. 46 Displaying the rear view video manually ................................................... 46 TUE-T200DVB Operation (Optional) Operating the TUE-T200DVB (Optional) ......
01GB00IVA-W520E.book Page 4 Thursday, June 10, 2010 4:15 PM Operating Instructions WARNING WARNING This symbol means important instructions. Failure to heed them can result in serious injury or death. KEEP SMALL OBJECTS SUCH AS BATTERIES OUT OF THE REACH OF CHILDREN. Swallowing them may result in serious injury. If swallowed, consult a physician immediately. USE THE CORRECT AMPERE RATING WHEN REPLACING FUSES. Failure to do so may result in fire or electric shock. DO NOT BLOCK VENTS OR RADIATOR PANELS.
01GB00IVA-W520E.book Page 5 Thursday, June 10, 2010 4:15 PM PRECAUTIONS Product Cleaning Use a soft dry cloth for periodic cleaning of the product. For more severe stains, please dampen the cloth with water only. Anything else has the chance of dissolving the paint or damaging the plastic. Temperature Be sure the temperature inside the vehicle is between +45°C (+113°F) and 0°C (+32°F) before turning your unit on.
01GB00IVA-W520E.book Page 6 Thursday, June 10, 2010 4:15 PM Discs Playable on This Unit Disc Accessories There are various accessories available on the market for protecting the disc surface and improving sound quality. However, most of them will influence the thickness and/or diameter of the disc. Using such accessories can cause operational problems. We recommend not using these accessories on discs played in Alpine DVD players. Playable Discs The discs listed below can be played on this unit.
01GB00IVA-W520E.book Page 7 Thursday, June 10, 2010 4:15 PM Discs that cannot be played Tips for making your own discs DVD-ROMs, DVD-RAMs, CD-ROMs (excluding MP3/WMA/ AAC files), photo CDs, etc. The IVA-W520E plays DVD Video, Video CD, Audio CD and has a built in MP3/WMA/AAC decoder. DualDisc This unit is not compatible with DualDisc. Using a DualDisc may cause unit malfunction, and may cause disc damage when the disc is inserted/ejected.
01GB00IVA-W520E.book Page 8 Thursday, June 10, 2010 4:15 PM Using DVD-Rs/DVD-RWs/DVD+Rs/DVD+RWs • This unit is compatible with discs recorded in the standard DVD-Video format. • Note that discs not finalised (processed to enable to play on playback-only DVD players) cannot be played on this DVD player. • Some discs may not play back, depending on the recording device and disc format. • Discs or files utilizing copy protection, may not be playable.
01GB00IVA-W520E.book Page 9 Thursday, June 10, 2010 4:15 PM On Handling Portable audio player • The unit can control a Portable audio player with the USB interface. Playable audio file formats are MP3 and WMA. • Portable audio player function is not guaranteed. Use Portable audio player according to the terms of agreement. Read the Portable audio player Owner’s Manual thoroughly. • Avoid usage or storage in the following locations: Anywhere in the car exposed to direct sunlight or high temperatures.
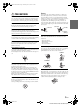
01GB00IVA-W520E.book Page 10 Thursday, June 10, 2010 4:15 PM SOURCE/ Getting Started button Turns the power on. Press and hold for at least 3 seconds to turn the power off. Recalls the SOURCE selection screen. VISUAL button Accessory List Recall the VISUAL selection screen. SETUP button • • • • • • • • • • • • • • • • • Head unit .............................................................................1 Power cable.........................................................................
01GB00IVA-W520E.book Page 11 Thursday, June 10, 2010 4:15 PM Inserting/Ejecting a Disc Adjusting the Volume 1 Adjust the volume by pressing Press on the unit. The display changes to the Eject/Tilt screen. 2 Insert a disc: Touch [Open] on the Eject/Tilt screen. The movable monitor will open, then insert a disc into the disc slot. Inserting a disc will close the monitor automatically. or . Volume decreases/increases continuously by pressing and holding or .
01GB00IVA-W520E.book Page 12 Thursday, June 10, 2010 4:15 PM Changes the items of source selection list. Changes to the Telephone Menu screen. (When the optional BLUETOOTH INTERFACE is connected and “BLUETOOTH IN” is set to HFP or HFP+Audio or a BLUETOOTH compatible navigation is connected and BLUETOOTH IN is set to Nav. (page 32)) Displays the rear view camera. (When an optional rearview camera is connected and Camera IN is set to ON.) Changes to main source screen. Displays the source selection list.
01GB00IVA-W520E.book Page 13 Thursday, June 10, 2010 4:15 PM Presetting Stations Manually Radio 1 Display example for FM Radio main screen 2 3 Tune in a desired radio station you wish to store in the preset memory by manual or automatic seek tuning. Touch [P1/2] to change the function guide. Touch and hold any one of the preset buttons [P.SET 1] through [P.SET 6] for at least 2 seconds. The selected station is stored. 4 Repeat the procedure to store up to 5 other stations onto the same band.
01GB00IVA-W520E.book Page 14 Thursday, June 10, 2010 4:15 PM CD/MP3/WMA/AAC Display example for MP3/WMA/AAC main screen To pause playback Touch [ / Touching [ ]. / ] again will resume playback. Inserting/Ejecting a Disc Refer to “Inserting/Ejecting a Disc” (page 11). [ ] button: Refer to page 22 CD: Displays the Track text*1/Disc text*1. • If there is neither Track nor Disc name information, “NO TEXT” will be displayed.
01GB00IVA-W520E.book Page 15 Thursday, June 10, 2010 4:15 PM M.I.X. (Random Play) Touch [ ] during playback. The tracks (files) on the disc will be played back in a random sequence. To cancel M.I.X. play, touch [ ALL*1 CD: ]. (off) MP3/WMA/AAC: 1 Touch [P1/2]*4 to change the function guide. 2 Touch [ ] and select the desired M.I.X. play. *3 *2 (off) *3 *1 If a CD Changer equipped with the ALL function is connected, ALL will also be selectable.
01GB00IVA-W520E.book Page 16 Thursday, June 10, 2010 4:15 PM Formats supported This device supports CD-ROM XA, Mixed Mode CD, Enhanced CD (CD-Extra) and Multi-Session. This device cannot correctly play back discs recorded with Track At Once or packet writing. DVD/Video CD Display example for DVD Video main screen Order of files Files are played back in the order that the writing software writes them to the disc. Therefore, the playback order may not be what’s expected.
01GB00IVA-W520E.book Page 17 Thursday, June 10, 2010 4:15 PM To display the DVD mode screen • If you try to activate the auxiliary device while driving, the display will show the warning-Picture off for your safety. If a menu screen appears On DVD mode, menu screens may appear automatically. If this happens, perform the operation described below to start playback. Direct Menu Operations Caution • Not all functions will operate for every DVD.
01GB00IVA-W520E.book Page 18 Thursday, June 10, 2010 4:15 PM Numeric Keypad Input Operations 1 Touch [Control] to display the operation keys. Displaying the Menu Operation Mode Screen 1 Touch [P1/2] on the DVD mode main screen. The function guide changes. 2 Touch [MENU CONT]. The menu operation mode screen appears. • For further operation, see “If a menu screen appears” on page 17. Stopping Playback (PRE STOP) 2 Touch [Key]. The menu operation mode appears. 3 Touch [Key] again.
01GB00IVA-W520E.book Page 19 Thursday, June 10, 2010 4:15 PM Finding the Beginnings of Chapters/ Tracks During playback, touch [ ] or [ ]. The chapter/track switches each time the button is touched, and playback of the selected chapter/track starts. :Touch this to start playback from the beginning of the following chapter or track. :Touch this to start playback from the beginning of the current chapter or track. Repeat Playback Use this function to play the disc’s titles, chapters or tracks, etc.
01GB00IVA-W520E.book Page 20 Thursday, June 10, 2010 4:15 PM Searching Directly by Chapter, Track Number Use this function to easily move to the beginnings of the chapters or tracks on the disc. 1 Video CDs disc with multiplex audio 1 The function guide changes. 2 Touch [P1/2] in any mode other than stop mode. Audio LL Touch and enter the chapter, track number you want to play. See page 18 for operation of the numeric keypad. 4 Touch [Enter] to confirm your selection.
01GB00IVA-W520E.book Page 21 Thursday, June 10, 2010 4:15 PM A Other Useful Features Adjusting the Audio Setting range: F15 to R15 • If an optional IMPRINT audio processor (PXA-H100) is connected to this unit and you have set the 2.2ch (3WAY)/4.2ch (FRONT/REAR/ SUBW.) switch to 2.2ch (3WAY), you cannot adjust the FADER mode. For details, refer to the Owner’s Manual of PXA-H100. B 1 Press SETUP on the unit. The SETUP main screen is displayed.
01GB00IVA-W520E.book Page 22 Thursday, June 10, 2010 4:15 PM Setting the Treble Centre Frequency The displayed treble frequency is emphasised. Touch [ ] or [ ] of Treble Freq to select the desired treble centre frequency. Setting range:10 kHz, 12.5 kHz, 15 kHz, 17.5 kHz • The treble level settings will be individually memorized for each source (FM, AM, CD, etc.) until the setting is changed. The Treble frequency settings adjusted for one source are effective for all other sources (FM, AM, CD, etc.).
01GB00IVA-W520E.book Page 23 Thursday, June 10, 2010 4:15 PM Internal MP3/WMA/AAC Player/external MP3-compatible DVD Player/Changer Mode 1 The folder list screen appears. Select a desired folder and then touch [ ]. ([ ] appears only when a file is present in the selected folder.) The file list screen is displayed. • Touch [ ] to play back the folder directly. 2 Touch [ ] of a desired file name. The selected file will be played back.
01GB00IVA-W520E.book Page 24 Thursday, June 10, 2010 4:15 PM Display example for the numeric keypad input screen Setup DVD Setup DVD Setup Operation The Parking Brake must be engaged to access the DVD mode screen. Attempting to access this screen while driving will display the warning-Can’t operate while driving. The numeric keypad input screen closes when the area is touched while displayed.
01GB00IVA-W520E.book Page 25 Thursday, June 10, 2010 4:15 PM Setting of the Audio Language Setting the Rating Level (Parental Lock) Set the audio language produced from the speakers. This function can help restrict the viewing of movies to children of appropriate age levels only. Setting item: Audio Language Setting contents: Auto / EN / JP / DE / ES / FR / IT / SE / RU / CN • When “Auto” is selected, the primary audio language among the recorded ones is played.
01GB00IVA-W520E.book Page 26 Thursday, June 10, 2010 4:15 PM Setting the Downmix Mode This function applies to Dolby Digital, DTS stream sound. Setting item: Downmix Mode Setting contents: Surround / Stereo Surround: Stereo: Surround compatible Downmix Stereo Downmix Playing MP3/WMA/AAC Data (File Play Mode) When using discs containing both audio data and MP3/WMA/AAC data.
01GB00IVA-W520E.book Page 27 Thursday, June 10, 2010 4:15 PM Selecting the Visual EQ Mode (Factory’s setting) DISPLAY Setup You can select a mode suitable for the subject image. Further setting item: Visual EQ Setting contents: OFF (FLAT) / Night M. / Soft / Sharp / Contrast / P-1 / P-2 Display Setup Operation The Parking Brake must be engaged to access the Display mode screen. Attempting to access this screen while driving will display the warning-Can’t operate while driving.
01GB00IVA-W520E.book Page 28 Thursday, June 10, 2010 4:15 PM Adjusting Image Contrast Adjusting the Minimum Level of Backlight Further setting item: Contrast Setting content: -15 to +15 Contrast adjustment range is -15 to +15. “Low” and “High” appear as the minimum and maximum values specified. You can adjust the brightness of the backlight (LOW). This function could be used, for instance, to change the screen brightness while travelling at night.
01GB00IVA-W520E.book Page 29 Thursday, June 10, 2010 4:15 PM GENERAL Setup General Setup Operation The Parking Brake must be engaged to access the General mode screen. Attempting to access this screen while driving will display the warning-Can’t operate while driving. The following steps 1 to 4 are common operations to each “Setting item” of GENERAL Setup. Refer to each section for details. 1 Press SETUP on the unit. The SETUP main screen is displayed.
01GB00IVA-W520E.book Page 30 Thursday, June 10, 2010 4:15 PM SYSTEM Setup System Setup Operation Setting the External Device Interrupt Mode If a device having the interrupt feature is connected, audio will be automatically muted whenever the interrupt signal is received from the device. Setting item: IN Int. Mute Setting contents: OFF / ON The Parking Brake must be engaged to access the System mode screen.
01GB00IVA-W520E.book Page 31 Thursday, June 10, 2010 4:15 PM Setting the Rear Camera Input Setting the Navigation Interruption With an optional rear camera connected, rear view video is output to the monitor. When the rear camera is connected, set this item to ON. Setting item: Camera IN Setting contents: OFF / ON After setting this item to ON, touch [ further items can be adjusted. ], the following You can set whether the rear camera guide line is displayed or not.
01GB00IVA-W520E.book Page 32 Thursday, June 10, 2010 4:15 PM Adjusting the External Input Audio Level Setting the OPTION Button on the Unit After setting to ON in “Setting the AUX Mode”, this setting can be carried out. The unit’s Setting item: Level Setting contents: Low / High Setting item: Option Key Setting contents: Audio Setup / MAP Low: High: Decreases the external input audio level. Increases the external input audio level.
01GB00IVA-W520E.book Page 33 Thursday, June 10, 2010 4:15 PM IMPRINT Operation (Optional) Alpine introduces IMPRINT - the world’s first technology that thoroughly eliminates in-car acoustic problems that normally degrade sound quality, which enables us to experience music the way the artist intended. When the IMPRINT audio processor (PXA-H100) (sold separately) is connected to this unit, MultEQ and the following sound adjustment can be performed.
01GB00IVA-W520E.book Page 34 Thursday, June 10, 2010 4:15 PM Setting the Response Slope for the High Range Speaker (TW Setup) Depending on the response characteristics of the speaker, care should be taken when setting the response slope of the high range speaker to FLAT in 2.2ch (3WAY) mode (see “Adjusting the Crossover Settings (X-Over)” on page 35), as speaker damage may result. Setting item: TW Setup Touch [ ] or [ ] of TW Setup to select Factory’s or User’s.
01GB00IVA-W520E.book Page 35 Thursday, June 10, 2010 4:15 PM Adjusting the Graphic Equalizer Curve (G-EQ) You can modify the equalizer settings to create a response curve more appealing to your personal taste. Setting item: G-EQ 1 Adjusting the Crossover Settings (X-Over) Before performing the following procedures, refer to “About the Crossover” (page 38). Setting item: X-Over 1 L+R: Sets the same adjustment values for the left and right channels.
01GB00IVA-W520E.book Page 36 Thursday, June 10, 2010 4:15 PM 4 Adjust the crossover to your preference. Selecting the Cut-Off Frequency Touch [ ] or [ ] of Freq., then select the cut-off frequency (crossover point). The adjustable bandwidth differs depending on the speaker (channel). Calling up the Preset Memory 1 2 2.
01GB00IVA-W520E.book Page 37 Thursday, June 10, 2010 4:15 PM These values are the time correction values for the different speakers. Setting these values to make each sound reach the listening position at the same time as the sound of other speakers. About Time Correction The distance between the listener and the speakers in a car vary widely due to the complex speaker placement.
01GB00IVA-W520E.book Page 38 Thursday, June 10, 2010 4:15 PM Level adjusting Output frequency range (0 to –12 dB) About the Crossover Crossover (X-Over): This unit is equipped with an active crossover. The crossover limits the frequencies delivered to the outputs. Each channel is controlled independently. Thus, each speaker pair can be driven by the frequencies for which they have been optimally designed.
01GB00IVA-W520E.book Page 39 Thursday, June 10, 2010 4:15 PM External Audio Processor Operation (Optional) A compatible, external audio processor is operable from this unit when connected. Some audio processors may require a wired controller. The explanations below use the PXA-H700/PXA-H701 as an example. Refer to the operating instructions of the audio processor for more details. • The adjustments or settings performed on the connected audio processor cannot be operated properly from this unit.
01GB00IVA-W520E.book Page 40 Thursday, June 10, 2010 4:15 PM MX DVD (OFF, Movie MX 1 to 2) The dialogue portion of the video is reproduced more clearly. (DVD Music) This disc contains a large quantity of data such as music clip. MX uses this data to reproduce the sound accurately. Setting the External Audio Processor Following Steps 1 to 5 describe the common procedures for operating the Audio Processor setting function. For details of the setting function items, refer to descriptions of respective items.
01GB00IVA-W520E.book Page 41 Thursday, June 10, 2010 4:15 PM If PL II Music is selected, the centre width can be adjusted with following operations. This function offers the optimum vocal position by adjusting the centre channel position between the centre speaker and the L/R speaker. (The adjustments established in “Adjusting the acoustic image (BI-PHANTOM)” (page 43) are ineffective while this function is activated.) Touch [ ] or [ ] of Centre Width Cont. to adjust the level.
01GB00IVA-W520E.book Page 42 Thursday, June 10, 2010 4:15 PM Performing Time Correction Manually (T.Corr) Because of the particular conditions inside the vehicle, there can be major differences in the distances between the various speakers and the listening position. It is possible to calculate the optimum correction values and eliminate the time error at the listening position yourself using this function.
01GB00IVA-W520E.book Page 43 Thursday, June 10, 2010 4:15 PM Parametric Equalizer Adjustments The frequency bands of the graphic equalizer are fixed. This makes it very difficult to correct for undesired peaks and dips at specific frequencies. The parametric equalizer’s centre frequency can be tuned to these specific frequencies. Then, the bandwidth (Q) and level are fine-tuned, independently, to make the necessary corrections. The parametric equalizer function is an advanced tool for serious audiophiles.
01GB00IVA-W520E.book Page 44 Thursday, June 10, 2010 4:15 PM Adjusting the speaker levels (Output Level) Adjusting the DVD Level The test tones help to make the volume adjustments of the different speakers. When levels are equal, a strong sense of presence can be heard from the different speakers at the listening position. The volume (signal level) for Dolby Digital, Dolby PL II, DTS and PCM modes can be set.
01GB00IVA-W520E.book Page 45 Thursday, June 10, 2010 4:15 PM Navigation System (Optional) Switching the Navigation Screen (Optional) If an optional Alpine Navigation System is connected to the IVA-W520E, the Navigation screen can be displayed on this unit.
01GB00IVA-W520E.book Page 46 Thursday, June 10, 2010 4:15 PM Rearview Camera Operation (Optional) When the optional direct rearview camera HCE-C107D, etc. is connected, rear view video can be output to the monitor. • You can also connect any rearview camera (with RCA video output), by using the included Camera Input Adapter. • Be sure to set “Camera IN” to ON before using the rearview camera, refer to “Setting the Rear Camera Input” on page 31.
01GB00IVA-W520E.book Page 47 Thursday, June 10, 2010 4:15 PM Changer (Optional) Controlling CD Changer (Optional) An optional 6-disc or 12-disc CD Changer may be connected to the IVA-W520E if it is Ai-NET compatible. With a CD Changer connected to the Ai-NET input of the IVA-W520E, the CD Changer will be controllable from the IVA-W520E. If you connect a changer compatible with MP3, you can play CD-ROMs, CD-Rs, and CD-RWs containing MP3 files on the IVA-W520E.
01GB00IVA-W520E.book Page 48 Thursday, June 10, 2010 4:15 PM Playback USB Memory (Optional) 1 BANK Function (USB memory only) What is a Bank? A bank is a unit of up to 1,000 songs, which is stored in memory. “Banking” refers to the action of building up a bank (of songs) from the songs available in USB memory. About Banking While a bank is being built up, “Banking” is displayed.
01GB00IVA-W520E.book Page 49 Thursday, June 10, 2010 4:15 PM Searching by artist name Random Play Shuffle (M.I.X.) The Shuffle function of the USB memory or Portable audio player is displayed as on the IVA-W520E. Shuffle ALL: All songs in the USB memory or Portable audio player are played back in random sequence. Any one song does not play back again until all songs have been played back. Shuffle Songs: Song shuffle randomly plays back songs within a selected category (playlist, album, etc.).
01GB00IVA-W520E.book Page 50 Thursday, June 10, 2010 4:15 PM Select the desired Folder (Folder up/ down) If you listen to a file from a selected folder, the folder can be changed. Touch [ ] or [ ] to select the folder. Creating the playlist from the Artist/ Album information of the current song When a song is played back, a playlist about all the songs with the same Artist or Album stored in the USB memory or Portable audio player can be created. 1 Touch [P1/2] when a song is played back.
01GB00IVA-W520E.book Page 51 Thursday, June 10, 2010 4:15 PM 3 Touch [ ] or [ ] to select the desired song. Return to the beginning of the current song: Touch [ ]. Advance to the beginning of the next song: Touch [ ]. 3 4 To pause playback, touch [ / / ]. Searching for a desired Song An iPod/iPhone can contain hundreds of songs. By keeping these songs organised in playlists, the IVA-W520E can use these to ease song searches.
01GB00IVA-W520E.book Page 52 Thursday, June 10, 2010 4:15 PM Random Play Shuffle (M.I.X.) The Shuffle function of the iPod is displayed as Remote Control on the IVA-W520E. Shuffle ALL: All songs in the iPod are played back in random sequence. Any one song does not play back again until all songs have been played back. Controls on Remote Control Shuffle Albums: The songs on each album are played back in proper order. Upon completion of all the songs on the album, the next album is selected randomly.
01GB00IVA-W520E.book Page 53 Thursday, June 10, 2010 4:15 PM DVD Video/Video CD: • Move to the desired position on the disc. • During playback, press and hold for more than 1 second to reverse the disc at double speed. Hold for more than 5 seconds to reverse the disc at 8 times the normal speed. Hold for more than 10 seconds to reverse the disc at 21 times the normal speed. DVD Video: • When pressed and held in while in the pause mode, the disc is played in reverse slow motion at 1/8th the normal speed.
01GB00IVA-W520E.book Page 54 Thursday, June 10, 2010 4:15 PM Numeric Keypad 2 Inputs numbers. Replacing the battery Put the battery in the case with the (+) indication upward as shown in the illustration. MONITOR Button Not used. ANGLE Button DVD Video mode: Switches the angle of the picture. SUBTITLE button DVD Video mode: Switches the subtitle. • The SETUP operation of the unit cannot be carried out from the remote control. • Some operations may not be possible depending on the disc.
01GB00IVA-W520E.book Page 55 Thursday, June 10, 2010 4:15 PM * The separately sold digital audio processor (PXA-H701, etc.) is required to enjoy full 5.1-channel surround sound. Information The IVA-W520E performs Dolby Digital decoding when it outputs analog audio signals, it just happens to be 2-channel audio not 5.1-channel. About DVDs Music CDs and DVDs have grooves (tracks) in which the digital data is recorded.
01GB00IVA-W520E.book Page 56 Thursday, June 10, 2010 4:15 PM List of Language Codes (For details, see page 24.
01GB00IVA-W520E.book Page 57 Thursday, June 10, 2010 4:15 PM List of Country Codes (For details, see page 25.
01GB00IVA-W520E.
01GB00IVA-W520E.book Page 59 Thursday, June 10, 2010 4:15 PM In Case of Difficulty If you encounter a problem, please turn the power off, then on again. If the unit is still not functioning normally, please review the items in the following checklist. This guide will help you isolate the problem if the unit is at fault. Otherwise, make sure the rest of your system is properly connected, or then consult your authorized Alpine dealer. Basic No function or display. • Vehicle’s ignition is off.
01GB00IVA-W520E.book Page 60 Thursday, June 10, 2010 4:15 PM Disc playback sound skips due to vibration. • Improper mounting of the unit. - Securely re-mount the unit. • Disc is very dirty. - Clean the disc. • Disc has scratches. - Change the disc. • The pick-up lens is dirty. - Do not use a commercially available lens cleaner disc. Consult your nearest Alpine dealer. Indication for CD/MP3/WMA/AAC • No disc is inserted. - Insert a disc.
01GB00IVA-W520E.book Page 61 Thursday, June 10, 2010 4:15 PM Indication for DVD/Video CD Indication for CD changer • No disc is inserted. - Insert a disc. • Although a disc is inserted, “No Disc” is displayed and the unit does not start to play or eject the disc. - Remove the disc by following these steps. Press for at least 3 seconds. • Protective circuit is activated due to high temperature. - The indicator will disappear when the temperature returns to within operation range.
01GB00IVA-W520E.book Page 62 Thursday, June 10, 2010 4:15 PM Indication for iPod/iPhone Mode • Abnormal current is run to the USB connector device. - Attempt to connect another iPod/iPhone. • A USB device that is not supported by the unit is connected. - Connect a USB device that is supported by the unit. • A USB device/Portable audio player that is not supported by the unit is connected. - Attempt to connect another USB memory/Portable audio player.
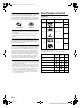
01GB00IVA-W520E.book Page 63 Thursday, June 10, 2010 4:15 PM REMOTE CONTROL Specifications MONITOR SECTION Screen Size 7.0" LCD Type Transparent type TN LCD Operation System TFT active matrix Number of Picture Elements 1,152,000 pcs. (800 × 3 × 480) Effective Number of Picture Elements 99% or more Illumination System LED FM TUNER SECTION Tuning Range Mono Usable Sensitivity Alternate Channel Selectivity Signal-to-Noise Ratio Stereo Separation Capture Ratio 87.5 – 108.0 MHz 9 dBf (0.
01GB00IVA-W520E.book Page 64 Thursday, June 10, 2010 4:15 PM Installation and Connections Before installing or connecting the unit, please read the following and pages 4 to 6 of this manual thoroughly for proper use. Caution HAVE THE WIRING AND INSTALLATION DONE BY EXPERTS. Warning MAKE THE CORRECT CONNECTIONS. The wiring and installation of this unit requires special technical skill and experience. To ensure safety, always contact the dealer where you purchased this product to have the work done.
01GB00IVA-W520E.book Page 65 Thursday, June 10, 2010 4:15 PM 3 Installation Caution Do not block the unit’s fan or heat sink, thus preventing air circulation. If blocked, heat will accumulate inside the unit and may cause a fire. Air ventilation hole Remove the mounting sleeve from the main unit (see “Removal” on page 66). The unit can be installed in the mounting sleeve in three positions by aligning its mounting holes (A to C) on the sides of the unit. Position A will be used in most cases.
01GB00IVA-W520E.book Page 66 Thursday, June 10, 2010 4:15 PM How to use a Seal Reinforce the head unit with the metal mounting strap (not supplied). Secure the ground lead of the unit to a clean metal spot using a screw (*1) already attached to the vehicle’s chassis. If A is used for installation: Affix the seal so that mounting holes B and C are covered. • For the screw marked “*2”, use an appropriate screw for the chosen mounting location.
01GB00IVA-W520E.book Page 67 Thursday, June 10, 2010 4:15 PM Connection of USB extension cable (included) Connect the USB extension cable to the USB connector of the unit, and then secure the connection using the lock case supplied with USB extension cable as shown below.
01GB00IVA-W520E.book Page 68 Thursday, June 10, 2010 4:15 PM Connections Antenna REMOTE OUT (White/Brown) REMOTE IN (White/Brown) REVERSE (Orange/White) M.
01GB07IVA-W520E.fm Page 69 Thursday, June 10, 2010 5:16 PM Radio Antenna Receptacle • Refer to “Setting the AUX+ Mode” (page 32). Remote Control Output Lead (White/Brown) ON: OFF: Connect this lead to the remote control input lead. This lead outputs the controlling signals from the remote control. Remote Control Input Lead (White/Brown) Connect the external Alpine product to the remote control output lead. When the external device is connected. When set to OFF, AUX+ source cannot be selected.
01GB00IVA-W520E.book Page 70 Thursday, June 10, 2010 4:15 PM System Example Connect the Ai-NET compatible audio processor (Fiber optic digital compatible), Navigation system, DVD player and changer.
01GB00IVA-W520E.book Page 71 Thursday, June 10, 2010 4:15 PM When Connecting External Equipment Direct rearview camera HCE-C107D, etc. (sold separately) or To Video Output terminal Rearview camera with RCA video output (sold separately) To Audio Input terminal Rear monitor (sold separately) To Video Input terminal To Video Output terminal DVD Changer (sold separately) To Audio Output terminal (White/Pink) M.CONT M.CONT (White/Pink) * Connect this to the touch panel-compatible rear monitor.