
Owner's Manual


License plate frame
(x1)
Contents
Hex driver
(x1)
Preparation
Machine screw
(x4)
Hex screw
(x2)
Tapping screw
(x4)
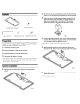
2. Remove the camera mounting bracket from the license plate
frame. It
is
not necessary to disassemble the camera bracket.
3. Attach the camera to the camera mounting bracket. (Fig.
2)
Route the camera cable through the mounting bracket, and
align the mounting holes
in
the camera with the bracket.
Secure the camera to the bracket with the 2 hex screws.
Fig. 2
4. Loosen the angle adjustment screw
on
the camera mounting
bracket. While noting the top of the camera, pivot the camera
to a downward angle and tighten the screw.
Consult with your nearest dealer if installation requires the drilling
of
holes
or
other modifications
of
the vehicle.
1. Check the accessory parts.
2.
Park the vehicle
in
a safe and level location.
3. Apply the brake and remove the ignition key.
4. Disconnect the battery (-) terminal.
• Some vehicles contain a vehicle control computer, or accessories that continuously
use battelY power.
In
this case, contents
of
the computer memory may be erased
when the battery (-) lead
is
disconnected.
Camera
Installation
1. Remove the 4 screws from the camera mounting bracket.
(Fig.
1)
• Tighten the screw until the camera is stable. but remains adjustable.
6. Tighten the 4 screws to secure the bracket and camera to the
license plate frame.
• Do not overtighten the screws