ENGLISH ESPAÑOL FRANÇAIS KD-A815/KD-R810 CD RECEIVER / RECEPTOR CON CD / RÉCEPTEUR CD For canceling the display demonstration, see page 4. / Para cancelar la demostración en pantalla, consulte la página 4. / Pour annuler la démonstration des affichages, référez-vous à la page 4. For installation and connections, refer to the separate manual. Para la instalación y las conexiones, refiérase al manual separado. Pour l’installation et les raccordements, se référer au manuel séparé.
INFORMATION (For U.S.A.) This equipment has been tested and found to comply with the limits for a Class B digital device, pursuant to Part 15 of the FCC Rules. These limits are designed to provide reasonable protection against harmful interference in a residential installation. This equipment generates, uses, and can radiate radio frequency energy and, if not installed and used in accordance with the instructions, may cause harmful interference to radio communications.
How to read this manual The following icons/symbols are used to indicate: [Hold] Press and hold the button(s) until the desired operation begins. Turn the control dial. Thank you for purchasing a JVC product. Please read all instructions carefully before operation, to ensure your complete understanding and to obtain the best possible performance from the unit. CONTENTS 3 How to read this manual 3 How to attach/detach the control Turn the control dial to make a selection, then press to confirm.
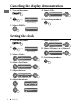
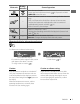
Canceling the display demonstration 1 Turn on the power. 4 Select . DEMO Off On 2 SET UP DEMO Clock PRO EQ [Hold] 5 Finish the procedure. (Initial setting) 3 Select . DEMO Off On Setting the clock 1 Turn on the power. 7 Select <24H/12H>. Clock Set Clock 24H/12H Clock Adjust 2 SET UP DEMO Clock PRO EQ [Hold] (Initial setting) 3 Select . DEMO Clock PRO EQ 4 Select . Clock Set Clock 24H/12H Clock Adjust 5 Adjust the hour. Set Clock 1 : 00 AM 6 Adjust the minute.
Preparing the remote controller (RM-RK50) When you use the remote controller for the first time, pull out the insulation sheet. Insulation sheet For USA-California Only: This product contains a CR Coin Cell Lithium Battery which contains Perchlorate Material— special handling may apply. See www.dtsc.ca.gov/hazardouswaste/ perchlorate If the effectiveness of the remote controller decreases, replace the battery.
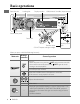
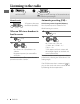
Basic operations Ejects the disc Loading slot Display window USB (Universal Serial Bus) input terminal Detaches the panel Control dial Remote sensor • DO NOT expose to bright sunlight. Auxiliary input jack When you press or hold the following button(s)... Main unit Remote controller General operation Turns on. • When the power is on, pressing /I/ATT on the remote controller also mutes the sound or pauses. Press /I/ATT again to cancel muting or resume playback. Turns off if pressed and held.
Main unit Remote controller — — — General operation Selects the sound mode. 28 ) if pressed and held • Enters tone level adjustment directly ( EQ/BASS-TRE on the main unit. • Enters “Call Menu” screen * or answers incoming call when the unit rings. • Ends a call if pressed and held after a phone call conversation. • Switches the connected mobile phone to the last connected 18 ) mobile phone if pressed and held. ( * If there is no call list, the unit beeps. • Returns to the previous menu.
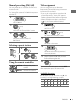
Listening to the radio ~ Ÿ ] “FM” or “AM” lights up when receiving an FM stereo broadcast with sufficient signal strength. Automatic presetting (FM)— Manual search “M” appears, then press the button repeatedly. [Hold] While listening to a station... When an FM stereo broadcast is hard to receive 1 SSM (Strong-station Sequential Memory) You can preset up to 18 stations for FM. [Hold] 2 ] ] ] Reception improves, but stereo effect will be lost.
Manual presetting (FM/AM) Title assignment You can preset up to 18 stations for FM and 6 stations for AM. You can assign titles up to 30 station frequencies (FM and AM) using 8 characters (maximum) for each title. • If you try to assign titles to more than 30 station frequencies, “Name Full” appears. Delete unwanted titles before assignment. • When HD Radio tuner box is connected ( 21 ), this feature will be disabled. Ex.: Storing FM station of 92.50 MHz into preset number “4.” 1 ] “92.
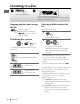
Listening to a disc ~ Ÿ ] Turn on the power. All tracks will be played repeatedly until you change the source or eject the disc. Stopping playback and ejecting the disc “No Disc” appears. Remove the disc, then press / SOURCE to listen to another playback source. Selecting a folder/track on the list While listening to a disc.... 1 ] Enter the list menu. Prohibiting disc ejection 2 [Hold] To cancel the prohibition, repeat the same procedure.
3 Turn the control dial to select your desired track. Then press the control dial to confirm. • Only the existing characters will be shown on the search menu. • Press and hold 5/∞ to continuously change the character of the search menu. • If your disc contains many tracks, searching take some time. Selecting the playback modes You can use only one of the following playback modes at a time.
~ ] Turn on the power. Ÿ USB cable from the rear of the unit USB input terminal and / or USB memory All tracks will be played repeatedly until you change the source or detach the USB device. If you have turned off the power (without detaching the USB device)... Pressing / SOURCE turns on the power and playback starts from where it has been stopped previously. • If a different USB device is currently attached, playback starts from the beginning.
Using the Bluetooth ® device Bluetooth is a short-range wireless radio communication technology for the mobile device such as mobile phones, portable PCs, and other devices. The Bluetooth devices can be connected without cables and communicate with each other. • Refer to page 4 of the Installation/Connection Manual (separate volume) to check the countries where you may use the Bluetooth® function. Bluetooth profile This unit supports the following Bluetooth profiles; HFP (Hands-Free Profile) 1.
Pairing a device When you connect a Bluetooth device to the unit for the first time, make pairing between the unit and the device. • Once the connection is established, it is registered in the unit even if you reset the unit. Up to five devices can be registered in total. • Only one device for Bluetooth phone and one for Bluetooth audio can be connected at a time. 1 [Hold] 6 7 Use the Bluetooth device to search. On the device to be connected, enter the same PIN code you have just entered for this unit.
Deleting a registered device 1 3 [Hold] ] Select a device you want to connect. • “Connecting...” appears, then “Connected [Device Name]” appears on the display when the device is connected. 2 ] ] 3 ] Select a device you want to delete. “Delete OK?” appears on the display. 4 Making a call 1 ] Delete the selection. “OK” appears when the device is deleted. • To return to the previous menu, press BACK.
• Phonebook *2: Shows the name/ phone number of the phonebook registered in the unit or from the connected phone *3. Go to the following step. – To copy the phonebook memory, , 20. – If the phonebook contains many numbers, you can fast search (±10, ±100, ±1000 numbers) through the phonebook by turning the control dial quickly. – To search through the phonebook, right column. • Dial Number: Shows the “Dial Number” screen.
Receiving/ending a phone call 3 ] Show the search menu (A to Z, 0 to 9, and OTHERS). The first character of the first contact on the phonebook appears. • “OTHERS” appears if the 1st character is not A to Z or 0 to 9, such as #, —, !, and etc. 4 ] Select your desired character. The name list of the selected character appears. 5 ] Select your desired contact. • To return to the previous menu, press BACK. • Only the existing characters will be shown on the search menu.
Switching the connected mobile phone You can switch the current connected mobile phone to the last connected mobile phone. [Hold] Phone icon appears and “Connecting” flashes on the display. When the last connected phone is being reconnected again, “Connected [Device Name]” appears on the display. Now you can use the last connected mobile phone with the unit. Using a Bluetooth audio player Operations and display indications differ depending on their availability on the connected device.
Selecting the playback modes Warning messages • For Bluetooth devices that support AVRCP 1.3. Connection Error The device is registered but the connection has failed. Use to connect the device again. 15) ( Error Try the operation again. If “Error” appears again, check if the device supports the function you have tried. Please Wait... The unit is preparing to use the Bluetooth function.
Setting item Auto Connect Selectable setting, [ Initial: Underlined ] • Last • Off Auto Answer • On • Off Message Notice • On MIC Setting • Off — NR/EC Mode • On • Off Ringing Tone • In Unit • In Phone Phonebook Trans — Phonebook Select *1 • In Phone • In Unit Initialize • Yes Information : The connection is established automatically with the last connected Bluetooth device when you turn on the unit. : The unit does not connect the Bluetooth device automatically.
Listening to the HD Radio ™ Broadcast Before operating, connect HD Radio tuner box, KT-HD300 (not supplied) to the expansion port on the rear of the unit. • For details, refer also to the instructions supplied with the HD Radio tuner box. What is HD Radio Technology? HD Radio Technology can deliver high-quality digital sound—AM digital will have FM-like quality (in stereo) and FM digital will have CD-like quality—with static-free and clear reception.
Using the remote controller • This setting cannot take effect for the conventional FM/AM stations. • If the radio station forces the reception or mode to digital or analog, the indicator lights up. 5 U / D ∞ : Changes the preset stations 2 R / F 3 : Searches for stations Listening to the satellite radio Before operating, connect either one of the following systems (not supplied) to the expansion port on the rear of this unit.
Activate your SIRIUS subscription after connection Checking the satellite radio ID While selecting “SIRIUS” or “XM”... 1 ] “SIRIUS” SIRIUS Satellite radio starts updating all the SIRIUS channels. Once completed, SIRIUS Satellite radio tunes in to the preset channel, CH184. 2 3 Check your SIRIUS ID. ( 32) Contact SIRIUS on the internet at to activate your subscription, or you can call SIRIUS toll-free at 1-888-539-SIRIUS (7474).
Selecting preset station/category/ channel on the list 1 2 ] Shows the “List” screen. ] Selects If a category is selected, the first channel of this category is tuned in. 3 Using the remote controller 5 U / D ∞ : Changes the categories 2 R / F 3 : Changes the channels 2 R / F 3 : Changes the channels [Hold] rapidly Information: • To know more about SIRIUS Satellite radio or to sign up, visit .
The operations explained below are under . ~ ] Turn on the power. Ÿ USB input terminal iPod/iPhone USB 2.0 cable (accessory of the iPod/iPhone) and/or USB cable from the rear of the unit iPod/iPhone USB 2.0 cable (accessory of the iPod/iPhone) Playback starts automatically. Caution: • Some of the applications in the connected iPod/iPhone may not work correctly with this unit. • Avoid using the iPod/iPhone if it might hinder your safety while driving.
Selecting a track from the menu The following is not applicable in and . 1 2 ] Select the desired menu. Playlists j Artists j Albums j Songs j Podcasts j Genres j Composers j Audiobooks j (back to the beginning) 3 Selecting the playback modes The following is not applicable in and . 1 [Hold] 2 ] Select your desired track. Repeat this procedure until the desired track is selected.
Using the remote controller The following is not applicable in . 2 R / F 3 : Selects track or chapter 2 R / F 3 : Fast-forwards or reverses the track [Hold] Listening to the other external components You can connect an external component to: • EXT IN: Expansion port on the rear of this unit using the following adapters (not supplied): – KS-U57, Line Input Adapter – KS-U58, AUX Input Adapter Preparation: Make sure is selected for the = setting.
Selecting a preset sound mode You can select a preset sound mode suitable for the music genre. FLAT = NATURAL = DYNAMIC = VOCAL = BASS = USER = (back to the beginning) While listening, you can adjust the tone level of the selected sound mode. 1 Storing your own sound mode You can store your own adjustments in memory. 1 2 [Hold] 3 2 ] Select the tone (Bass / Middle / Treble). 3 4 ] Adjust the level (–06 to +06) of the selected tone. The sound mode is automatically stored and changed to “USER.
Menu operations 1 [Hold] Category 2 3 Menu item DEMO Display demonstration Selectable setting, [ Initial: Underlined ] • On • Off : Display demonstration will be activated automatically if no operation is done for about 20 seconds. : Cancels. ( 4) Set Clock [ 1:00AM ] : Adjust the hour, then the minute. ( 24H/12H • 12Hours • 24Hours : Select the time display mode.
Category Menu item Color Button Zone Display Zone All Zone Day Color Night Color Color Setup Menu Color Selectable setting, [ Initial: Underlined ] Color 01 — Color 29, User, Color Flow 1, 2, 3 • Button Zone : For settings, • Display Zone • On • Off Ring Color *3 • On • Off Fad/Bal *4, *5 Fader/balance R6 – F6, [ 0 ] L6 – R6, [ 0 ] Audio Loud Loudness • Loud 1/2/3 • Off Volume Adjust : For settings, Level –5 — Level +5, [ Level 0 ] 34. 34, 35.
Category Menu item Subwoofer Selectable setting, [ Initial: Underlined ] • LPF • Level Display Audio • Phase : Turn the control dial to select the cutoff frequency to the subwoofer. Off: All signals are sent to the subwoofer. LPF 55Hz/LPF 85Hz/LPF 120Hz: Frequencies higher than 55 Hz/85 Hz/120 Hz are cut off. : Turn the control dial to adjust the subwoofer output level. Level 00 to Level 08 [ Level 04 ] : Turn the control dial to select the subwoofer phase.
Category Menu item Tag Display Selectable setting, [ Initial: Underlined ] • On • Off • Negative • Positive • Auto : Negative pattern of the display. : Positive pattern of the display. : Positive pattern will be selected during the day time *11; while negative pattern will be used during the night time *11. Contrast Level 01 — Level 08 [ Level 05 ] : Adjust the display contrast to make the display indications clear and legible. Display LCD Type : For Bluetooth operations, 14 – 16.
Menu item Blend Hold *16 HD Radio reception mode Selectable setting, [ Initial: Underlined ] • Auto • Analog • Digital Stereo/Mono *17 • Stereo • Mono : Switch between digital and analog audio automatically. ( 21, 22) : Tune in to analog audio only. : Tune in to digital audio only. : Restore the stereo effect. : Activate monaural mode to improve FM reception, but stereo effect will be lost. ( 8) Ext Input *18 • Show • Hide : Enable “EXT IN” in source selection. : Disable “EXT IN” in source selection.
Selecting the variable buttons and display color illumination You can select your preferred color for buttons illumination (except for EQ/BASS-TRE / DISP) and display color seperately. 3 4 Button zone Display zone All zone 1 [Hold] 2 ] Select your preferred color from one of the 29 preset colors, color, or . Repeat steps 2 and 3 to select a different zone and your preferred color.
Ex.: Creating color for
More about this unit Basic operations General • If you turn off the power while listening to a track, playback will start from where it had been stopped previously next time you turn on the power. • If no operation is done for about 60 seconds after pressing MENU button, the operation will be canceled. Tuner operations Storing stations in memory • During SSM search... – All previously stored stations are erased and the stations are stored anew.
• Do not use the following CD-Rs or CD-RWs: – Discs with stickers, labels, or a protective seal stuck to the surface. – Discs on which labels can be directly printed by an ink jet printer. Using these discs under high temperature or high humidity may cause malfunctions or damage to the unit. Playing an MP3/WMA disc • This unit can play back MP3/WMA files with the extension code <.mp3> or <.wma> (regardless of the letter case—upper/lower).
• This unit can play back MP3/WMA/WAV files meeting the conditions below: MP3: – Bit rate: 32 kbps — 320 kbps (for MPEG-1) 8 kbps — 160 kbps (for MPEG-2) – Sampling frequency: 32 kHz, 44.1 kHz, 48 kHz (for MPEG-1) 16 kHz, 22.05 kHz, 24 kHz (for MPEG-2) WMA: – Bit rate: 5 kbps — 320 kbps – Sampling frequency: 8 kHz — 48 kHz – Channel: 1 ch/2 ch WAV: – Bit rate: Linear PCM at 705 kbps and 1 411 kbps – Sampling frequency: 44.
HD Radio reception Menu operations • HD Radio broadcasting can normally be received in the USA, and it may also be received in countries where limited broadcasting has already begun. • During SSM search... – All stations including conventional FM/AM stations are searched and stored for the selected band. • setting for may not work correctly on some vehicles, particularly on those having a control dial for dimming. In this case, change the setting to any other than .
• Microsoft and Windows Media are either registered trademarks or trademarks of Microsoft Corporation in the United States and/or other countries. • The Bluetooth word mark and logos are owned by the Bluetooth SIG, Inc. and any use of such marks by Victor Company of Japan, Limited (JVC) is under license. Other trademarks and trade names are those of their respective owners. • HD Radio ™ and the HD Radio Ready logo are proprietary trademarks of iBiquity Digital Corp.
Maintenance How to clean the connectors To keep discs clean Frequent detachment will deteriorate the connectors. To minimize this possibility, periodically wipe the connectors with a cotton swab or cloth moistened with alcohol, being careful not to damage the connectors. A dirty disc may not play correctly. If a disc does become dirty, wipe it with a soft cloth in a straight line from center to edge. • Do not use any solvents (for example, conventional record cleaner, spray, thinner, benzine, etc.
Troubleshooting Disc playback FM/AM General Symptom 42 Remedy/Cause Sound cannot be heard from the speakers. • Adjust the volume to the optimum level. • Make sure the unit is not muted/paused ( • Check the cords and connections. The unit does not work at all. Reset the unit. ( “Connect Error” appears on the display. Remove the control panel, wipe the connector, then attach it again. ( 3) “AUX IN” cannot be selected. Check the = 33) setting.
MP3/WMA playback Symptom Remedy/Cause Disc cannot be played back. • Use a disc with MP3/WMA tracks recorded in a format compliant with ISO 9660 Level 1, Level 2, Romeo, or Joliet. • Add the extension code <.mp3> or <.wma> to the file names. Noise is generated. Skip to another track or change the disc. (Do not add the extension code <.mp3> or <.wma> to non-MP3 or WMA tracks.) A longer readout time is required (“Reading” keeps flashing on the display).
Symptom Noise is generated. Remedy/Cause The track played back is not an MP3/WMA/WAV track. Skip to another file. (Do not add the extension code <.mp3>, <.wma>, or <.wav> to non-MP3/WMA/WAV tracks.) USB device playback “Reading” keeps flashing on the • Readout time varies depending on the USB device. display. • Do not use too many hierarchy or folders. • Turn off the power then on again. • Do not pull out or connect the USB device repeatedly while “Reading” is displayed on the display.
Symptom The unit does not detect the Bluetooth device. Remedy/Cause • Search from the Bluetooth device again. 3), then search from the Bluetooth • Reset the unit ( device again. HD Radio reception Bluetooth The unit does not make pairing Enter the same PIN code for both the unit and target with the Bluetooth device. device. Echo or noise occurs. Adjust the microphone unit’s position. Phone sound quality is poor. • Reduce the distance between the unit and the Bluetooth mobile phone.
Symptom Remedy/Cause Satellite Radio “CALL 1-888-539-SIRIUS TO SUBSCRIBE” Starts subscribing to SIRIUS Satellite radio. 23) scrolls on the display while listening to ( the SIRIUS Satellite radio. No sound can be heard. “Updating” appears on the display. The unit is updating the channel information and it takes a few minutes to complete. “No Signal” appears on the display. Move to an area where signals are stronger. “No Antenna” appears on the display. Connect the antenna firmly.
iPod/iPhone Symptom Remedy/Cause The iPod does not turn on or does not work. • Check the connecting cable and its connection. • Update the firmware version of the iPod/ iPhone. • Charge the battery of the iPod/iPhone. • Reset the iPod/iPhone. • Check whether setting is appropriate. ( 33) The sound is distorted. Deactivate the equalizer either on this unit or the iPod/iPhone. A lot of noise is generated. Turn off (uncheck) the “VoiceOver” feature of the iPod.
Specifications Power Output: 20 W RMS × 4 Channels at 4 Ω and ≤ 1% THD+N Signal-to-Noise Ratio: 80 dBA (reference: 1 W into 4 Ω) AUDIO AMPLIFIER SECTION Load Impedance: 4 Ω (4 Ω to 8 Ω allowance) Tone Control Range: Bass: ±12 dB (50 Hz, 100 Hz, 200 Hz) Q0.7, Q1.0, Q1.4, Q2.0 Middle: ±12 dB (0.5 kHz, 1.0 kHz, 2.0 kHz) Q0.7, Q1.0, Q1.4, Q2.0 Treble: ±12 dB (5.0 kHz, 10.0 kHz, 15.0 kHz) Q0.7, Q1.0, Q1.4, Q2.
CD PLAYER SECTION Type: Compact disc player Signal Detection System: Non-contact optical pickup (semiconductor laser) Number of Channels: 2 channels (stereo) Frequency Response: 5 Hz to 20 000 Hz Dynamic Range: 96 dB Signal-to-Noise Ratio: 98 dB Wow and Flutter: Less than measurable limit MP3 Decoding Format: (MPEG1/2 Audio Layer 3) Max. Bit Rate: 320 kbps WMA (Windows Media® Audio) Decoding Format: Max.
Having TROUBLE with operation? Please reset your unit Refer to page of How to reset your unit Still having trouble?? USA ONLY Call 1-800-252-5722 http://www.jvc.
KD-A815/KD-R810 Installation/Connection Manual Manual de instalación/conexión Manuel d’installation/raccordement GET0651-002A 0110DTSMDTJEIN [J] EN, SP, FR © 2010 Victor Company of Japan, Limited ENGLISH / ESPAÑOL / FRANÇAIS You need the installation kits which corresponds to your car. / Check the battery system in your car / Verifique el sistema de batería Necesitará los kits de instalación que corresponden con su vehículo.
ELECTRICAL CONNECTIONS / CONEXIONES ELECTRICAS / RACCORDEMENTS ELECTRIQUES IMPORTANT: A custom wiring harness (separately purchased) which is suitable for your car is recommended for connection between the unit and your car. • Consult your JVC car audio dealer or a company supplying kits for details. IMPORTANTE: Para la conexión entre la unidad y su vehículo, se recomienda utilizar un mazo de cables personalizado (vendido separadamente) que sea adecuado para su vehículo.
Connecting the microphone unit / Conexión de la unidad de micrófono / Connexion du microphone G Microphone / Micrófono / Microphone or / o / ou Secure the microphone cord using cord cramps *1 if necessary. / Si es necesario, asegure el cable del micrófono por medio de abrazaderas *1. / Fixez si nécessaire le cordon du microphone en utilisant des serre-fils *1.
7 7 The countries where you may use the Bluetooth® function 7 Die Länder, in denen Sie die Bluetooth® Funktion verwenden können Pays où vous pouvez utiliser la fonction Bluetooth® De landen waar u de Bluetooth®-functie mag gebruiken Países en los que se puede utilizar la función Bluetooth® Paesi nei quali è possibile utilizzare la funzione Bluetooth® Länder där du kan använda Bluetooth®-funktionen Lande, hvor du kan bruge Bluetooth®-funktionen Land hvor du kan bruke Bluetooth®-funksjonen Maat, joissa voi
..
Declaration of Conformity with regard to the R&TTE Directive 1999/S/EC ( E0984 English: Hereby, JVC, declares that this KI-UBTl is in compliance with the essential requirements and other relevant provisions of Directive 1999/5/EC Deutsch: Hiermit erklart JVC, dass sich das Gerat KI-UBTl in Obereinstimmung mit den grundlegenden Anforderungen und den Ubrigen einschlagigen Bestimmungen der Richtlinie 1999/5/EG befindet.
NEDERLANDS -)t Prodotti Batteria Informazioni per gli utenti sullo smaltimento delle apparecchiature e batterie obsolete [Eselusivamente per l'Unione Europea] Questi simboli indicano che il prodotto e la batteria su cui essi appaiono non devono essere smaltiti tra i rifiuti domestici generici alia fine della loro vita utile.
1! - nAnpocpopilC Via TOUt: xonOUC GYctlKG Uf tnv anoppuIJn TaU noAa.o' tEonAlouou KG. TlIlV unOloplCdV. [Eupwna'KIj lvwCll\ ~ovo] Ta aU~~OAa aUHi b~AWVOUV 6T110 npoi6v KOI ~ ~nQ1apia nou
WHEN IT IS NOT REQUIRED TO DETACH THE FRONT CONTRO. PANEL FROM THE MAIN UNIT, USE THE PROVIDED SCREW TO ATTACH THE CONTROL PANEL TO THE MAIN UNIT.
:z w ~ en c:( o ;::) en ~ W 0:::: o LL W OJ W ....J OJ « <.,) w c ~ en w !Z c:( 0 U D:: ~ 0 -w LL ....J W ~ :z :g: « [0
JVC CANADA ONLY CANADA SEULEMENT WAIRANTY GAIANTIE OWNER'S COPY OF WARRANTY CARD COPIE D'ENREGISTREMENT DE lA GARANTIE DU PROPRIETAIRE (Save sales docket together with this warranty card, as a proof of date of purchase. La facture et cette garantie sont vas preuves de la date d'achat; rangez-Ies.) MODEL SERIAL NO. . NO DE SERlE .. MODELE' Purchase from. Date purchased. Achete chez Date achete Dealer's Address Adresse du Vendeur' No. Street No Rue City or Town Ville Owner's Name .
(e) (f) (g) (h) ( i) ( j) (k) Any JVC products on which the serial num-ber has been defaced, modified or removed. Maintenance, cleaning or periodic check-up Conversion to foreign or domestic voltage or frequency. Any JVC product without the Canadian Electrical Safety Regulations ID. Any JVC products used for commercial or institutional, rental, or display purposes. Parts 1 year (except video head - 90 days) Labour ...
Please do not send products or other correspondence to this address. PLEASE PLACE STAMP HERE JVC AMERICAS CORP. 1700 Valley Road Wayne, NJ 07470 PO BOX 1189 BEDFORD, TX 76095-1189 11 ••• 1.111111 ••• 1.1 ••• 1.1 •••• 11 ••• 111111.1.1 •• 1•• 1.1.1111 ••• 11 PRODUCT REGISTRATION CARD I QUESTIONNAIRE USA CUSTOMERS ONLY Registering your product will allow us to contact you in the unlikely event a product safety notification is required. This form is for Product Registration purposes only.
Register online at REGISTER.JVC.COM and receive a special offer! PRODUCT REGISTRATION First Name: Last Name: Address: Apt.
TO OUR VALUED CUSTOMER - THANK YOU FOR PURCHASING THIS JVC PRODUCT. WE WANT TO HELP YOU ACHIEVE A PERFECT EXPERIENCE. NEED HELP ON HOWTO HOOK UP? NEED ASSISTANCE ON HOW TO OPERATE? NEED TO LOCATE A JVC SERVICE CENTER? LIKE TO PURCHASE ACCESSORIES? .JVC® IS HERE TO HELP! TOLL FREE: 1(800)252-5722 http://www.jvc.com Remember to retain your Bill of Sale for Warranty Service. - - - Do not attempt to service the product yourself Caution To prevent electrical shock, do not open the cabinet.
***********************************•••••**••••••••••••*••••••••*************** * i: JVC® LIMITED WARRANTY IONLY FOR PRODUCT PURCHASED IN U.S.A. I 2-2 I USA ONLY * : Ii : JVC Americas Corp. (JVC) warrants this product and all parts thereof, except as set forth below ONLY TO THE * * ORIGINAL RETAIL PURCHASER to be FREE FROM DEFECTIVE MATERIALS AND WORKMANSHIP from the date of : original purchase for the period shown below. ("The Warranty Period") * * *: * IPARTS .