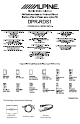
This Package Contains the Following: REM GND +12V DPR-RDS1 Interface Unit iPod dock cable Antenna Power Harness
Step 1: Set the DPR-RDS1’s FM transmission frequency The frequency selector switch is located on the interface unit and is used to set the optimal transmitting frequency. Incorrect dip switch settings may cause the interface not to work properly or not to operate at all. Disconnect the vehicle harness from module and cycle ignition off for 5 seconds after changing the switches! After making changes to the frequency selector be sure to tune to the correct FM frequency on which the iPod will be heard.
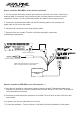
Step 3: Install the DPR-RDS1 in the vehicle (continued) 4. You can access the factory antenna port located on the back of the radio. If the factory antenna cable is connected, unplug it and plug the universal antenna connector into the receptacle. Connect +12 volt, ground and remote wire leads to their proper sources. 5. Connect the power/antenna cable and the iPod docking cable to the interface unit. Apply cable ties to secure the cables. 6. Verify that all connections have been properly made. 7.
Using the DPR-RDS1 Select the FM radio source on the radio and tune to the frequency that was selected on the interface unit. As soon as the radio is tuned to the appropriate frequency, audio from the iPod will be heard. About RDS Radios with RDS capability allow the currently playing song title and album name to be displayed on the screen of the radio. To find out if a radio has RDS, tune to a popular radio station and if the station name is displayed then the radio has RDS capability.