
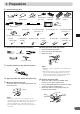
Owner`s manual


12
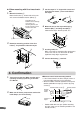
3 Cut the carpet in "x" shape with a cutter and
insert the floor bases 2 from under side of
the carpet.
4 Mount the unit on the carpet with spring
washers (M6) 6 and wing nuts (M6) 8.
Continued to step 5 "Securing leads, etc."
5 Securing leads, etc.
Make sure leads are not pinched by moving parts
such as the seat rail, etc. Also check for dam-
aged from sharp edges or protrusion.
6 Connect the battery (−) terminal.
2
8
6
4. Confirmation
1 Turn on the engine key. Make sure the unit is
operating correctly by referring to the Own-
er’s Manual.
2 Make sure all factory components such as the
brake lamps, etc. work correctly.
ON
aRemote control holder mounting method
• If the remote control is in direct sunlight, remove it
from the holder and keep it in the glove box.
• When the holder cannot be mounted securely with
double-sided adhesive tape !, mount it by using
screws ".
Reinforcement screws "
* Double-sided adhesive tape. (Before attaching
the tape, make sure the mounting location is free
from dust or dirt.)
Console box, etc.
!*
Remote control
Remote
control
holder
Protective
Paper
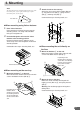
a When mounting with floor base brack-
ets
1 Mount the brackets 1.
Mount the brackets 1 at both sides of the unit
with screws with double washer (M5×8) 3.
2 Determine mounting position of the floor
bases 2 for placement under the carpet.
Depending on the
locations of the mounting
screw holes, the
mounting brackets (for
the left and right) can be
used on either side.
3
3
1
8
6
2