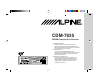
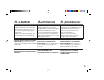
From CDA-7837/CDM-7836/CDM-7834/CDM-7833, 5/11/98 R CDM-7835 FM/AM Compact Disc Receiver PWR MUTE 35 WATTS x 4 AMPLIFIER Reg ulated 1bit DAC CLK DISP ■ VOL•BAS•TRE•BAL•FAD MODE LOUD SOURCE TUNE A.ME BAND D.A.P. DN UP D.A.P. FUNC REPEAT ALL M.I.X. ST DX SEEK LOUD CD RECEIVER M.I.X.
WARNING English 2 AVERTISSEMENT ADVERTENCIA Français Español The exclamation point within an equilateral triangle and "WARNING" are intended to alert the user to the presence of important operating instructions. Failure to heed the instructions will result in severe injury or death. Le point d'exclamation dans un triangle équilatéral et la mention "AVERTISSEMENT" sont destinés à attirer l'attention de l'utilisateur sur la présence d'instructions importantes.
WARNING English AVERTISSEMENT ADVERTENCIA Français Español HALT USE IMMEDIATELY IF A PROBLEM APPEARS. When problems occur such as a lack of sound or video, foreign objects inside the unit, smoke coming out, or noxious odors, stop use immediately and contact the dealer where you bought the equipment. Failure to do so may result in an accident or injury. ARRETEZ-VOUS IMMEDIATEMENT EN CAS DE PROBLEME.
WARNING AVERTISSEMENT English 4 Français ADVERTENCIA Español DO NOT USE THIS EQUIPMENT FOR PURPOSES OTHER THAN STATED FOR THE VEHICLE. Failure to do so may result in electric shock or injury. NE PAS UTILISER L'APPAREIL DANS D'AUTRES BUTS QUE CEUX ENONCES. Il y a sinon risque de choc électrique ou de blessure. NO UTILICE ESTE EQUIPO CON OTROS FINES A LOS INDICADOS PARA EL VEHICULO. De lo contrario, podrá ocasionar una descarga eléctrica o heridas.
CAUTION ATTENTION English ¡PRUDENCIA! Français Español The exclamation point within an equilateral triangle and "CAUTION" are intended to alert the user to the presence of important operating instructions. Failure to heed the instructions can result in injury or material damage. Le point d'exclamation dans un triangle équilatéral et la mention "ATTENTION" sont destinés à attirer l'attention de l'utilisateur sur la présence d'instructions importantes.
English Contents Page Precautions ............................................................... 9 Basic Operation Detaching the Front Panel ................................... 13 Attaching the Front Panel .................................... 14 Initial System Start-Up ......................................... 15 Turning Power On and Off .................................. 16 Adjusting Volume/Bass/Treble/Balance/Fader .... 17 Turning Loudness On/Off ....................................
Français Contenu Page Précautions ............................................................. 9 Fonctionnement de base Retrait du panneau avant .................................. 13 Pose du panneau avant .................................... 14 Mise en service de l’appareil ............................. 15 Mise sous et hors tension .................................. 16 Réglage du volume/graves/aigus/balance droite-gauche/balance avant-arrière .................
Español Indice Página Precauciones ............................................................. 9 Operación básica Extracción del panel frontal ................................. 13 Fijación del panel frontal ..................................... 14 Puesta en funcionamiento inicial del sistema ...... 15 Conexión y desconexión de la alimentación ....... 16 Ajuste de volumen/graves/agudos/equilibrio entre los altavoces izquierdos y derechos/ delanteros y traseros ...........................................
Precautions Précautions English Precauciones Français Español Temperature Température Temperatura Be sure the temperature inside the vehicle is between +60°C (+140°F) and –10°C (+14°F) before turning your unit on. Assurez-vous que la température interne du véhicule est comprise entre +60°C (+140°F) et –10°C (+14°F) avant de mettre l'appareil sous tension. Antes de conectar la alimentación de la unidad, cerciórese de que la temperatura del interior del vehículo esté comprendida entre +60°C y –10°C.
Precautions Précautions English Precauciones Français Never Attempt the Following Ne jamais tenter d'effectuer les opérations suivantes Do not grip or pull out the disc while it is being pulled back into the player by the automatic reloading mechanism. Do not attempt to insert a disc into the unit when the unit power is off. Ne pas attraper ni tirer sur le disque pendant qu'il est attiré dans le lecteur par le mécanisme de recharge automatique.
Precautions Précautions English Precauciones Français Center Hole Orifice central Orificio central Center Hole Orifice central Orificio central Bumps Résidus Abultamientos Español New Disc Disque neuf Disco nuevo Outside (Bumps) Périférie (résidus) Borde exterior (abultamientos) New Discs Disques neufs Discos nuevos As a protective measure, the CD player will automatically eject discs that have either been inserted incorrectly or have irregular surfaces.
Précautions Precautions English Precauciones Français Español Installation Location Emplacement de montage Ubicación de instalación Make sure the CDM-7835 player/receiver will not be exposed to: Ne pas installer le lecteur/tuner CDM-7835 dans un endroit: Cerciórese de que el reproductor/receptor CDM-7835 no quede expuesto a: • • • • • • • • • • • • Direct sun and heat High humidity Excessive dust Excessive vibrations exposé au soleil et à la chaleur très humide très poussiéreux exposé à des vi
English 1 2 3 Français Español Detaching the Front Panel Retrait du panneau avant Extracción del panel frontal Press and hold the PWR (Power) button for at least 3 seconds to turn off the power. Appuyer sur la touche PWR (alimentation) et la maintenir enfoncée pendant au moins 3 secondes pour mettre l'appareil hors tension. Presione el botón PWR (alimentación) y manténgalo presionado durante 3 segundos por lo menos para desconectar la alimentación.
2 English 1 14 1 Français Español Attaching the Front Panel Fijación del panel frontal 1. First, insert the right side of the front panel into the main unit. Align the 2 small holes on the front panel with the 2 projections on the main unit. 2. Push the left side of the front panel until it locks firmly into the main unit. 1. Inserte en primer lugar la parte derecha del panel frontal en la unidad principal.
English 1 Français Español Initial System Start-Up Mise en service de l'appa- Puesta en funcionamiento reil inicial del sistema Immediately after installing or applying power to the unit, it should be initialized. To do this, first, remove the detachable front panel. Behind the front panel, to the right of the connector, is a small hole. Using a pencil or other pointed object, press the red Reset button mounted behind this hole to complete the initialization procedure.
English 1 16 Français Español Turning Power On and Off Mise sous et hors tension Conexión y desconexión de la alimentación Press and hold the PWR button for at least 3 seconds to turn off the unit. Appuyer sur la touche PWR et la maintenir enfoncée pendant au moins 3 secondes pour mettre l'appareil hors tension. Presione el botón PWR y manténgalo presionado durante 3 segundos por lo menos para desconectar la alimentación.
English 1 2 Français Español Adjusting Volume/ Bass/Treble/Balance/ Fader Réglage du volume/graves/aigus/balance droitegauche/balance avantarrière Ajuste de volumen/graves/ agudos/equilibrio entre los altavoces izquierdos y derechos/delanteros y traseros Press and release the MODE/LOUD button repeatedly to choose the desired mode. Note: If the > or < button is not pressed in 5 seconds after selecting the BASS, TREBLE, BALANCE and FADER modes, the unit automatically returns to the VOL mode.
English Turning Loudness On/ Off Loudness introduces a special low- and high-frequency emphasis at low listening levels to compensate for the ear's decreased sensitivity to bass and treble sound. 1 Press and hold the MODE/LOUD button for at least 2 seconds to activate or deactivate the loudness mode. The display shows "LOUD" when the loudness mode is activated.
English Audio Mute Function Activating this function will instantly lower the volume level by 20 dB. 1 To activate, press the MUTE button. The audio level will decrease by about 20 dB. Pressing the MUTE button again will bring the audio back to its previous level and the display will return to normal. Français Fonction de sourdine du son Español Función de silenciamiento de sonido L'activation de cette fonction diminuera instantanément le niveau de volume de 20 dB.
English Displaying Time 1 20 Affichage de l'heure Press the CLK (CLOCK) button to display Appuyez sur la touche CLK (horloge) pour the time. The unit displays the time. afficher l'heure. L'appareil affiche l'heure. Note: Selecting any tuner or CD function while in the Clock mode will interrupt the time display momentarily. The function selected will be displayed for about 5 seconds before the time returns to the display.
English 1 2 3 4 Français Español Setting Time Réglage de l'heure Ajuste de la hora Press and hold the CLK (CLOCK) button for at least 3 seconds. The time indication will begin to blink. Appuyer sur la touche CLK (horloge) et la maintenir enfoncée pendant au moins 3 secondes. L'indication de l'heure commence à clignoter. Presione el botón CLK (reloj) y manténgalo presionado durante 3 segundos por lo menos. La indicación de la hora empezará a parpadear.
1 2 3 4 English 1 2 3 4 Español Manual Tuning Accord manuel Sintonía manual Press the SOURCE button to select the radio mode. Appuyez sur la touche SOURCE pour sélectionner le mode radio. Presione el botón SOURCE para seleccionar el modo de radio. Press the BAND button repeatedly until the desired radio band is displayed. Appuyez plusieurs fois sur la touche BAND jusqu'à ce que la gamme souhaitée soit affichée. Presione repetidamente el botón BAND hasta que se visualice la banda deseada.
1 2 3 4 English 1 2 4 Español Automatic Seek Tuning Accord par recherche automatique Sintonía con búsqueda automática Press the SOURCE button to select the radio mode. Appuyez sur la touche SOURCE pour sélectionner le mode radio. Presione el botón SOURCE para seleccionar el modo de radio. Press the BAND button repeatedly until the desired radio band is displayed. Appuyez plusieurs fois sur la touche BAND jusqu'à ce que la gamme souhaitée soit affichée.
2.# English 1 2 3 4 24 Français Español Manual Storing of Station Presets Mémorisation manuelle des stations Almacenamiento manual de emisoras Tune in the desired radio station you wish to store in the preset memory. Accorder la station à mémoriser sur une touche Sintonice la emisora que desee almacenar en la memoria. de préréglage. Press and hold any one of the preset buttons (1 through 6) for at least 2 seconds. The frequency display will begin to blink.
1 2 3 English 1 2 Español Automatic Memory of Station Presets Mémorisation automatique Almacenamiento automádes stations tico de emisoras Press the SOURCE button to select the radio mode. Appuyez sur la touche SOURCE pour sélectionner le mode radio. Presione el botón SOURCE para seleccionar el modo de radio. Press the BAND button repeatedly until the desired radio band is displayed. Appuyez plusieurs fois sur la touche BAND jusqu'à ce que la gamme souhaitée soit affichée.
English Storing into Direct Access Preset (D.A.P.) Band A combination of radio stations in any band (up to 6 stations) can be manually preset into the D.A.P. band. 1 Press and hold the D.A.P. button for at least 2 seconds until the D.A.P. indicator appears. Français Mémorisation sur les préréglages d'accès direct (D.A.P.) Vous pouvez mémoriser manuellement une combinaison de stations radio de n'importe quelle gamme (jusqu'à 6 stations) sur la gamme D.A.P.
1 2 English 1 2 Français Español Tuning to Preset Stations Accord des stations préré- Sintonía de emisoras meglées morizadas Press the SOURCE button to select the radio mode. Appuyez sur la touche SOURCE pour sélectionner le mode radio. Presione el botón SOURCE para seleccionar el modo radio. Press the BAND button repeatedly until the desired band is displayed. Appuyez plusieurs fois sur la touche BAND jusqu'à ce que la gamme souhaitée soit affichée.
1 2 English 1 2 28 Français Español Inserting/Ejecting Disc Insertion/éjection du disque compact Inserción/extracción del disco Insert a CD half way into the slot with the label side facing up. The player automatically draws the disc into the disc compartment. The DISC indicator appears to show that a disc is loaded. Note: Three-inch (8 cm) CD's can not be used. Insérer un CD à moitié dans la fente avec la face imprimée tournée vers le haut.
English 1 2 Français Español Normal Play and Pause Lecture normale et pause Reproducción normal y pausa Insert a CD. The CD player begins playback from the first track on the disc. The display shows the track number. When the last track is played back the player returns to the first track and begins playback from that point. Insérer un CD. La lecture commence à partir de la première plage du disque. L'affichage indique le numéro de plage.
English 1 30 Français Español Track/Elapsed Time Display Switching Commutation de l'affichage de plage/durée écoulée Conmutación de la visualización de canción/tiempo transcurrido Press and hold the CLK/DISP button for at least 2 seconds to alternate between the Track Number and Elapsed Time displays. Appuyer sur la touche CLK/DISP et la maintenir enfoncée pendant au moins 2 secondes pour changer l'affichage et choisir l'affichage de plage ou de durée écoulée.
English 1 Français Español Music Sensor (Skip) Détection de plage (saut) Sensor de canciones (Salto) Momentarily press the DN (c ) button once to return to the beginning of the current track. If you wish to access a track further back, repeatedly press until you reach the desired track. Appuyer une fois, momentanément, sur la touche DN (c ) pour revenir au début de la plage en cours de lecture.
English 1 32 Français Español Fast Forward and Backward Avance et inversion rapides Avance y retroceso rápidos Press and hold the DN (c ) or UP (f ) button to quickly move backward or forward until you reach the desired section of the track. Maintenir enfoncée la touche DN (c ) ou UP (f ) pour reculer ou avancer rapidement jusqu'au passage souhaité de la plage. Mantenga presionado el botón DN (c ) o UP (f ) para retroceder o avanzar rápidamente hasta llegar al punto deseado de la canción.
English 1 Français Español Repeat Play Lecture répétitive Reproducción repetida Press the RPT (Repeat) button to play back repeatedly the track being played. The REPEAT indicator appears and the track will be played repeatedly. Appuyez sur la touche RPT (répétition) pour répéter la plage en cours de lecture. L’indicateur REPEAT apparaît et la plage est répétée. Presione el botón RPT (repetición) para reproducir de forma repetida la canción que esté reproduciéndose.
English 1 Español M.I.X. (Random Play) M.I.X. (Lecture aléatoire) M.I.X. (Reproducción al azar) Press the M.I.X. button in the play or pause mode. The M.I.X. indicator will illuminate and the tracks on the disc will be played back in a random sequence. After all the tracks on the disc have been played back once, the player will begin a new random sequence play until the M.I.X. mode is canceled. Appuyez sur la touche M.I.X. en mode de lecture ou de pause. L’indicateur M.I.X.
English Scanning Programs 1 Français Balayage des plages Press the SCAN button to activate the Appuyez sur la touche SCAN pour activer le Scan mode. The first 10 seconds of each balayage. Les 10 premières secondes de track will be played back in succession. chaque plage sont reproduites dans l’ordre. Español Exploración de programas Presione el botón SCAN para activar el modo escáner. Se reproducirán los primeros 10 segundos de cada canción en sucesión.
English Controlling CD Shuttle (Optional) 1 2 Commande d’un changeur CD (optionnel) Press the SOURCE button to activate the Appuyez sur la touche SOURCE pour mettre le CD Shuttle. The display shows the disc changeur CD en service. L’affichage indique le number and track number. numéro de disque et le numéro de la plage. Español Cómo controlar el Shuttle de discos compactos (opcional) Presione el botón SOURCE para activar el Shuttle de discos compactos.
CORRECT CORRECTE CORRECTO INCORRECT INCORRECTE INCORRECTO CORRECT CORRECTE CORRECTO Transparent Sheet Feuille transparente Hoja transparente English Disc Stabilizer Stabilisateur de disque Estabilizador del disco Français Español Correct Handling Manipulation correcte Manejo correcto Do not drop the disc while handling. Hold the disc so you will not leave fingerprints on the surface. Do not affix tape, paper, or gummed labels on the disc. Do not write on the disc.
In Case of Difficulty En cas de problème En caso de dificultad English Français Español If you encounter a problem, please review the items in the following check list. This guide will help you isolate the problem if the unit is at fault. Otherwise, make sure the rest of your English system is properly connected or consult your authorized Alpine dealer. En cas de problème, consulter la liste de vérifications suivantes. Ce guide devrait vous aider à résoudre tout problème provenant de l'appareil.
In Case of Difficulty En cas de problème English En caso de dificultad Français Español Unable to receive stations. Impossible de recevoir les stations. Es imposible recibir emisoras. • • • No antenna or open connection in cable. – Make sure the antenna is properly English connected; replace the antenna or cable if necessary. Unable to tune stations in the seek mode. • • • Pas d'antenne ou connexion incorrecte des câbles.
In Case of Difficulty En cas de problème En caso de dificultad English Français Español CD Player/Shuttle not functioning. • Out of operating temperature range +50°C (+120°F) for CD. – Allow the vehicle's interior (or trunk) temperature to cool. English Le lecteur/changeur CD ne fonctionne pas. • La température dépasse +50°C (+120°F). – Laissez la température de l'habitacle (ou du coffre) baisser. El reproductor/cambiador de discos compactos no funciona. • Se encuentra a más de +50°C de temperatura.
In Case of Difficulty En cas de problème English En caso de dificultad Français Español Indications sur le changeur Indicaciones para el cambiador de CD CD Indication for CD Shuttle English Français Español ---H • Protective circuit is activated due to high temperature. – The indicator will disappear when the temperature returns to within operation range. • Le circuit de protection s'est déclenché car la température est trop élevée.
In Case of Difficulty En cas de problème English Indication for CD Shuttle English En caso de dificultad Français Español Indications sur le changeur Indicaciones para el cambiador de CD CD Français Español ERROR-02 • A disc is left inside the CD Shuttle. – Press the EJECT button to activate the eject function. When the CD Shuttle finishes the eject function, insert an empty CD magazine into the CD Shuttle to receive the disc left inside the CD Shuttle. • Un disque est coincé dans le changeur CD.
English Specifications FM TUNER SECTION Tuning Range .................................................................. 87.7 – 107.9 MHz Mono Usable Sensitivity ......................................... 9.3 dBf (0.8µV/75 ohms) English 13.5 dBf (1.3µV/75 ohms) 50 dB Quieting Sensitivity ..................................... Alternate Channel Selectivity ............................................................. 80 dB Signal-to-Noise Ratio ..................................................................
Français Spécifications SECTION TUNER FM Plage d'accord ................................................................. 87,7 – 107,9 MHz Sensibilité utilisable mono ....................................... 9,3 dBf (0,8µV/75 ohms) English 13,5 dBf (1,3µV/75 ohms) Seuil de sensibilité à 50 dB ................................... Sélectivité de canal alternatif .............................................................. 80 dB Rapport signal sur bruit ........................................................
Español Especificaciones SECCION DEL SINTONIZADOR FM Gama de sintonía ............................................................ 87,7 – 107,9 MHz Sensibilidad útil en modo monoaural .................... 9,3 dBf (0,8µV/75 ohmios) English13,5 dBf (1,3µV/75 ohmios) Sensibilidad a 50 dB de silenciamiento ............... Selectividad de canal alternativo ........................................................ 80 dB Relación señal-ruido .........................................................................
English Index A–L Adjusting Volume/Bass/Treble/Balance/Fader ......... 17 Attaching the Front Panel ......................................... 14 Audio Mute Function ................................................ 19 Automatic Memory of Station Presets ...................... 25 English Automatic Seek Tuning ............................................ 23 Basic Operation ....................................................... 13 CD Operation ...........................................................
English Français Español 47
ALPINE ELECTRONICS, INC. Tokyo office: 1-1-8 Nishi Gotanda, Shinagawa-ku, Tokyo 141-8501, Japan Tel.: (03) 3494-1101 ALPINE ELECTRONICS OF AMERICA, INC. 19145 Gramercy Place, Torrance, California 90501, U.S.A. Tel.: 1-800-ALPINE-1 (1-800-257-4631) ALPINE ELECTRONICS OF CANADA, INC. Suite 203, 7300 Warden Ave. Markham, Ontario L3R 9Z6, Canada Tel.: 1-800-ALPINE-1 (1-800-257-4631) ALPINE ELECTRONICS OF AUSTRALIA PTY. LTD. 6-8 Fiveways Boulevarde Keysborough, Victoria 3173, Australia Tel.