Owner’s Manual Version 1.
PRECAUTIONS AND NOTICES ■ Important Information Please Read Carefully Before Using This Product. This product is intended to safely provide turn by turn 7) There may be situations where the navigation system displays the vehicle's location erroneously. instructions to get you to a desired destination. Please Use your own driving judgment in this situation, make certain that all persons using this navigation taking into account current driving conditions.
WARNINGS Points to Observe for Safe Usage Read this manual carefully before using this system. It contains instructions on how to use this product in a safe and effective manner. Alpine cannot be responsible for problems resulting from failure to observe the instructions in this manual. This manual uses various pictorial displays to show you how to use this product safely and to alert you to potential dangers resulting from improper connections and operation.
USER AGREEMENT In using this Blackbird Portable Navigation System (hereinafter referred to as “System”), which includes Alpine Electronics, Inc. (“Alpine”) Specifications, Space Machine, Inc. ("Space Machine") Software and NAVTEQ North America, LLC. (“NAVTEQ”) Database, you are bound by the terms and conditions set forth below. By breaking the seal on the System and using your copy of the System, you have demonstrated your agreement to the terms and conditions of this Agreement.
TABLE OF CONTENTS Precautions and Notices . . . . . . . . . . . . . . . . . 2 Warnings . . . . . . . . . . . . . . . . . . . . . . . . . . . . . 3 User Agreement . . . . . . . . . . . . . . . . . . . . . . . 4 Table of Contents . . . . . . . . . . . . . . . . . . . . . . 5 Installation . . . . . . . . . . . . . . . . . . . . . . . . . . . . 6 How to Mount Blackbird . . . . . . . . . . . . . 6 To Remove the Navigation System from the Cradle . . . . . . . . . . . . . . . . . . . . . . . . .
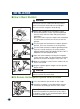
INSTALLATION ■ How to Mount Blackbird WARNING Improper installation may make the navigation system fall out from the cradle while driving. Please make sure all locks and knobs are turned tight. Do not install the navigation while driving. 1 Find a spot suitable for the navigation system. Ensure that both the suction cup and windshield area are clean and free of dirt and grease before attaching it. Stick the suction cup mount against the windshield. Turn the knob to activate the vacuum to lock the position.
■ Battery Installation WARNING Always turn off power to the system before installing or removing the battery. Failure to do so will result in damage to your system. 1 Place Blackbird face down on a flat surface. 2 Press the battery door and pull away from the main unit body. 3 Attach the battery to the battery door until a click sound-heard. 4 Insert and slide the battery assembly back into the main unit until a click sound is heard.
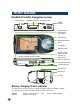
SYSTEM FEATURES Blackbird Portable Navigation System Power Button SD/MMC Card Slot Headphone Jack Volume Control Remote Sensor and Ambient Light Sensor Map Zoom In Main Menu Button Music Destination Map Zoom Out Current Position Button Function, See Page 12 Battery Charging Status Indicator External GPS Antenna Connector Mini USB Connector Cradle Connector GPS Antenna Battery Slot Speaker Battery Charging Status Indicator This illuminates when the system is being charged or requires charging.
Congratulations and thank you for purchasing the Alpine Blackbird Portable Navigation System. We hope you enjoy using this exciting product and trust that it will make your driving experience more comfortable, stress-free, and entertaining. The Blackbird Portable Navigation System provides an easy-to-use user interface, clear, easy-to-understand spoken driving instructions, and award winning design all in a portable product. Blackbird is built upon Alpine's history of navigation success in North America.
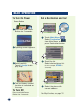
BASIC OPERATION To Turn On Power Set a Destination and Go! Power Button 1 Press and hold Power Button for 2 seconds. 1 Touch Main Menu . Select Destination from Main Menu, or press Destination button. 4 Scroll the list. Select desired place list. (In this example, ATMS is 2 Opening screen appears. 3 Read carefully. Touch I Accept to display map. selected.) 4 The last-known current location is indicated on the map. 7 Select the place with correct address.
The following example briefly describes how to input a destination. 2 Select desired method. (In this example, Places is 3 Select a search method. (In this example, By Place Type is selected.) Select the search method. (In this example, Sort By Name is selected.) 6 Type name of a place. Select OK to Proceed to set the destination. 9 selected.) 5 8 To Go Home, see page 22. If more than one place with the same name exist, sort method screen appears. Map is displayed. Follow the navigation.
MAP FUNCTION Next Maneuver Arrow Next Street Name Main Menu Button Distance to next maneuver Estimated Time Remaining (ETR) / Estimated Time of Arrival (ETA) Direction to Destination Distance to Destination GPS Status bar Battery Status Indicator Map Scale Bar Map Orientation Voice Prompt Repeat Button Current Street Name Setting Estimate Time Display Click this icon to switch between Estimated Time Remaining and Estimated Time of Arrival. Note: The time estimates are based on the average speed.
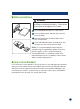
■ Setting a Destination Directly from Map Display 1 Touch anywhere on map screen. The current location arrow changes to Crosshair Cursor on the screen. 2 Move the cursor to the new desired street. Note: Use Map Scale Bar to zoom out the map if the destination is far from the current location. 3 Touch . 4 Select Set as Destination. 5 Touch OK to Proceed on the confirma- tion screen. Note: To use other functions on the confirmation screen, see page 14 for details. To cancel, touch Previous Screen icon.
DESTINATION ■ Setting a Destination by Address 1 Go to Main Menu ➔ Destination . ➔ Address Finding a Destination by Street Name First 2 Select Input Street Name. 3 Type the first characters of the street name. If there are unique matches, the system will automatically display a short list of street names. Touch OK. The list of applicable street names appears. 4 Select the desired street name from the list. 5 Type the street number and touch OK. 6 Select the desired city.
Change State Selecting Letters If you want to choose a different state from the one shown on the screen, touch Change to switch to a different state. Selected characters are displayed. Deleting one letter Adding one space Going to number screen Finding a Destination by City Name First 2 Select Input City Name. 3 Type the first few characters of the city name and press OK. If there are unique matches, the system will automatically display a short list of city names. Select the desired city.
DESTINATION ■ Setting a Destination by Places You can select from approximately 6 Million Point-of-Interest (POI) locations stored inside your Blackbird Portable Navigation System. These destinations are sorted by Place Name or by Place Type and are listed in order of distance from your current location. 1 Go to Main Menu . ➔ Destination ➔ Places Finding a Destination by Place Name 2 Select By Place Name. 3 Type the desired place name. Touch OK. A list of place names appears.
Finding a Destination by Place Type 2 Select By Place Type. 3 Select a desired POI Category. There are 37 POI categories to choose from including ATMS, Banks, Gas Stations, Grocery Stores, Hotels, Parking Lots, Restaurants and more. 4 Select Search Method. Sort by Distance 5 The list of place names appears in order of distance from the current vehicle position within the state region being searched.
DESTINATION ■ Setting a Destination by Recently Entered Destination 1 Go to Main Menu . ➔ Destination ➔ Recent 2 The list of recent destinations appears. Select the destination. 3 Confirmation screen appears. Touch OK to Proceed to set the destination and start guidance. Note: To use other functions on the confirmation screen, see page 14 for details. ■ Setting a Destination by Coordinates 1 Go to Main Menu . ➔ Destination ➔ Coordinate 2 Enter the Latitude of your destination. Touch OK.
■ Setting a Destination by Intersection 1 Go to Main Menu . ➔ Destination ➔ Intersection Finding a Destination by Street Name 2 Select Input Street Name. 3 Type in the street name. Touch OK. The list of applicable street names appears. Select the desired street. 4 Input the second street name. If there is only one street crossing with the first street, the name of the street automatically appears. 5 Confirmation screen appears. Touch OK to Proceed.
OPTIONS ■ Find Local Places The navigation system can display Points of Interest (POI) around the cursor position, when you scroll the map. As with POI categories, with the local places search you can chose from 37 categories including ATMS, Banks, Gas Stations, Grocery Stores, Hotels, Parking Lots, Restaurants and more. How to Find Local Places Directly from the Map 1 Touch anywhere on map screen. The current location arrow changes to cross hair cursor on the screen. 2 Touch .
■ Setting Waypoints You can set up to 10 waypoints between your current location and your destination. The final destination must be set before entering any waypoints. How to Set a Waypoint Directly from Map 1 Touch anywhere on map screen. The current location arrow changes to cross hair cursor on the screen. 2 Move the cursor to the desired waypoint. 3 Touch . 4 Select Set as waypoint and select Re-calculate. 5 When the route search is complete, the current location is displayed.
HOME ■ Finding a Way Home You can get home from anywhere once the home address is set from Edit Menu. 1 Go to Main Menu . ➔ Home 2 Touch OK to Proceed on the confirmation screen. 3 Follow the map and go home. To edit the Home Address, See Page 24.
ROUTE ■ Recalling the Maneuver List during Guidance You can view a list of street names and upcoming turns and streets. 1 Go to Main Menu . ➔ Route 2 Touch Maneuver List. 3 List of upcoming streets and turns appears on the screen. To preview a specific point, select a street name/maneuver on the list. To go back to Route List, Go to Main Menu ➔ Route ■ Finding Alternate Route ■ Finding Detour Touch Main Menu ➔ Route ➔ Change Method Touch Main Menu ➔ Route ➔ Detour .
EDIT Locations and Home addresses saved in the Address Book can be edited for quick recall. Also information including phone numbers and icons can be modified. ■ Editing Home 1 Go to Main Menu ➔ Edit . 2 Touch Edit Home. 3 “Edit Home Point” screen appears. See below for details. Name Touch Name to change the display name of the stored location. Note: For the details of selecting letters, see page 15.
■ Editing Address Book 1 Go to Main Menu ➔ Edit . ■ Deleting Previously Saved Destinations 1 Go to Main Menu 2 Touch Edit Address Book 3 The list of addresses appears. Select the destination you need to modify. 4 “Edit Address Item” screen appears. See below for details. ➔ . Edit 2 Touch Delete Previous Destination. 3 Select destination you need to delete. 4 Touch YES to delete the desti- Note: Select DELETE ALL to delete all addresses saved in the address book.
SETUP You can customize Display, Guidance, Clock, Measuring Unit and FM frequency settings from the Setup Menu. 1 Go to Main Menu 2 Select Setup . . 3 Setup screen appears. ■ Customizing Display Go to Main Menu ➔ Setup ➔ Display .
■ Customizing Guidance Turning Voice On and Off This allows you to turn ON or OFF guidance voice prompts. Changing Navi Mix Volume This allows you to vary the volume of the voice prompts with respect to the music. Setting Estimate Time Display Estimated Time of Arrival (ETA) or Estimated Time Remaining (ETR) can be set here. You can also change between ETA and ETR directly in the map screen. See page 12. ■ Setting up the Clock You can set the Time Zone and Daylight saving setting to fit your region.
INFORMATION ■ Simulating Navigation You can watch a demonstration of the navigation system’s voice and screen guidance. To Start a Demonstration 1 Go to Main Menu . 2 Select Information . 3 Select Start Demo. 4 Demonstration starts. To Stop a Demonstration 1 Go to Main Menu . 2 Select Information . 3 Select Stop Demo. 4 The demonstration will end. ■ Viewing Trip Information The odometer displays the route distance and time traveled. 1 Go to Main Menu . ➔ Information 2 Select Trip Information.
■ Viewing GPS Status You can view the dynamic location information received from satellite such as signal strength, compass (direction information), latitude/longitude, approximate altitude, and speed. This feature allows you to view GPS satellite signal information. An explanation of the messages is shown below. 1 Go to Main Menu ➔ . Information 2 Select GPS Status.
ENTERTAINMENT ■ Listening to Audio Displays Song Titles and Artist Names Folder Number File Number Back Playing Time Play/ Forward Folder Folder Pause Up Down M.I.X. Touch Touch M.I.X. to shuffle songs. M.I.X. again to cancel the shuffle. REPEAT Touch Touch REPEAT to repeat songs. REPEAT again to cancel the repeat. Folder Search ■ Playing Music on Your Blackbird You can play MP3 or WMA music files* from your SD or MMC card.
UPDATING THE SYSTEM ■ How to Listen to Guidance and Music from Your Car Stereo Turning on the Transmitter and Playing Music from Your Radio You can setup Blackbird to broadcast music and navigation voice guidance directly to your FM radio. 1 Plug the cradle into your vehicle’s cigarette lighter/power outlet. 2 Insert Blackbird into the cradle (See page 6 for details). 3 Turn on your radio. Find an FM frequency from the following that is broadcasting nothing but static: 88.1 MHz, 88.3 MHz, 88.5 MHz, 88.
IN CASE OF DIFFICULTY If you encounter a problem, please review the items in the following checklist. This guide will help you isolate the problem if the unit is at fault. Otherwise make sure the rest of your system is properly connected, batteries are completely charged and contact your authorized Alpine dealer or Alpine directly at 1-888NAV-HELP (1-888-628-4357). The vehicle’s position is erroneous.
IN THE BOX ■ Accessories Cradle with Cigarette Lighter Charger Wiping Cloth AC Adapter USB Cable Carrying Case 1200mAh Battery • Dummy SD Card (Inside Main Unit) • Registration Card Owner’s Manual Quick Reference Guide ■ Optional Accessories The following accessories are available from your authorized Alpine dealer. 1. PMD-DOK1 – A Docking Station that allows you to connect and experience 2. 3. 4. 5.
SPECIFICATIONS BLACKBIRD SPECIFICATIONS Main Unit Size 6.1” x 2.9” x 1.
INDEX A Accessories B Background Color Basic Operations Battery Installation Battery Status Brightness S G 33 GPS Status 12, 29 H 26 10 7 12 26 Home Finding a Way Home Finding Alternate Way to Go Home One-Touch Go Home How to Mount Blackbird 27 27 14 26 27 I 22 22 22 22 6 C Changing Navi Mix Volume Configuring System Settings Confirm Destination Screen Customizing Display Customizing Guidance D Deleting Previously Saved Destination 25 Delete Route 23 Destination 14 Setting a Destination by Addre
LIMITED WARRANTY ALPINE ELECTRONICS OF AMERICA, INC. AND ALPINE OF CANADA INC. ("Alpine"), are dedicated to quality craftsmanship and are pleased to offer this Warranty. We suggest that you read it thoroughly. Should you have any questions, please contact your Dealer or contact Alpine at one of the telephone numbers listed below. ●PRODUCTS COVERED: This Warranty covers Car Audio, Navigation Products and Related Accessories ("the product"). Products purchased in the Canada are covered only in the Canada.