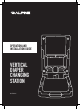
OPERATION AND INSTALLATION GUIDE VERTICAL DIAPER CHANGING STATION ALP411-V 1
THANK YOU FOR YOUR PURCHASE. Known in the industry for excellent products, Alpine Industries is a manufacturer of innovative, solution-based products for the commercial and institutional markets worldwide. Combining commitment to the customer, design innovation and skilled, dedicated workforces, they have produced a range of products that are an essential part of every commercial facility.
TABLE OF CONTENTS 1 Important Safety Information 2 Parts List 3 Installation Instructions 9 Operation Instructions 10 Cleaning and Maintenance 11 Warranty
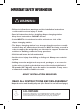
IMPORTANT SAFETY INFORMATION ! WARNING: • F ailure to follow these warnings and the installation instructions could result in serious injury or death. • R ead all instructions before installing diaper changing station. Keep these instructions. DO NOT discard. • A stud MUST be located and used for at least one side of the diaper changing station.
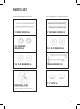
PARTS LIST FOR USE WITH WOOD STUDS FOR USE WITH TOGGLE ANCHORS 3” WOOD SCREWS (4) 3” MACHINE SCREWS (2) 3/4” FINISHING WASHERS (4) 3/4” FLAT WASHERS (4) 3/4” FLAT WASHERS (4) TOGGLE ANCHORS (2) DOOR/WALL PLATE 1 ¼” CAPS (6) To be mounted on the outside of the restroom door 2
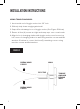
INSTALLATION INSTRUCTIONS ADULT INSTALLATION REQUIRED. TOOLS NEEDED: • Level • Measuring tape • Power drill with 7/32”, 1/8”, and 1/2” masonry bits • Power screwdriver with bull nose phillips bit READ ALL INSTRUCTIONS BEFORE ASSEMBLY Unpack carton and identify all parts (See Parts List on left hand page.) 1. L ocate wood stud where left side of changing station will be mounted to the wall. 2. M easure up 57.5’’ (146cm) from the floor and mark the wall.
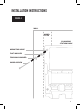
INSTALLATION INSTRUCTIONS FIGURE A WALL WOOD STUD CHANGING STATION BACK MOUNTING HOLE FLAT WASHER FINISHING WASHER WOOD SCREW 4
INSTALLATION INSTRUCTIONS NOTE 2: FOR USE WITH TOGGLE ANCHORS: - If finished wall surface has wood studs that are not 16” on center, has metal studs, or has an underlying surface of concrete block, use 1/2” bit. - Use machine screws and flat washers (See Figure B on Page 6). - F or holes NOT located in a wood stud, toggle anchors Must be used (See Parts List on page 2). See “Using Toggle Anchors” section. 6.
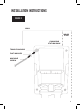
INSTALLATION INSTRUCTIONS FIGURE B WALL WOOD STUD CHANGING STATION BACK TOGGLE ANCHOR FLAT WASHER MACHINE SCREW 6
INSTALLATION INSTRUCTIONS USING TOGGLE ANCHORS: 1. Insert metal end of toggle anchor into 1/2” hole. 2. Slide zip strip down snugly against wall. 3. Snap off break-away pieces of toggle anchor (See Figure C Below). 5. Ensure all four (4) screws are tight and snap caps over screw heads. 4. Align holes in changing station with toggle anchors and secure top left corner of changing station to wall using machine screws and flat washers.
INSTALLATION INSTRUCTIONS RECOMMENDED BLOCKING If the walls do not have studs on center, then additional blocking is necessary (See Figure D below). Contact an architect or building contractor to make sure the blocking is adequate and complies with building codes.
OPERATION INSTRUCTIONS USING THE CHANGING STATION: Rotate base downward. Place infant on top of the changing surface. Use restraint system as described below. After child has been changed, remove restraint system and rotate base back up against the wall. USING RESTRAINT SYSTEM: Place child so restraint strap is located at abdomen. Rotate top of buckle upward and insert strap in buckle. Pull strap through buckle until snug against infant. Rotate top of buckle downward to lock the strap into place.
CLEANING AND MAINTENANCE Check all hardware and components monthly or as required to ensure hardware is tight and there are no missing or damaged components. Take unit out of service if any component is missing or damaged and contact customer service to order replacement parts. Do not substitute parts. For replacement parts, contact customer service at: customerservice@alpineindustries.com Clean by using a damp cloth with mild soap or mild multi-purpose cleaner.
LIMITED WARRANTY Terms and conditions of the Alpine 1 year limited warranty—Your warranty begins at the date of purchase, please retain your proof of purchase. The warranty coverage only covers the original owner. The replacement of any port is warranted for the remainder of the original warranty period. WHAT IS COVERED • The parts are warranted for a 1 year period from the date of purchase.
NOTES 12
Product #ALP411-V 27 Selvage Street • Irvington, NJ • 07111 • ©2020 All Rights Reserved. alpineindustries.