
User manual
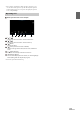


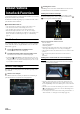

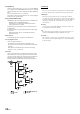

Table Of Contents
- Operating Instructions
- PRECAUTIONS
- WARNING
- Features
- Getting Started
- Location of Controls
- Turning Power On or Off
- Turning the System On
- Initial System Start-Up
- Adjusting the Volume
- Lowering Volume Quickly
- Touch Screen Operation
- Switching Sources
- Operating the Function Button on the Audio/Video Main Screen
- About Basic Operation for List Screen
- About the Shortcut Setup Screen
- About the Menu Screen
- About the Indicator Display
- Opening screen Customisation
- How to Input Characters and Numbers (Keypad)
- Favourite Function
- Applying Alpine TuneIt App
- Setup
- Setup Operation
- Wireless (Bluetooth) Setup
- General Setup
- Sounds Setup
- Setting the Balance/Fader/Rear Speaker/Subwoofer
- Setting the Media Xpander (MX HD)
- Equalizer Presets
- Adjusting the Parametric Equalizer Curve (Dual HD EQ)
- Adjusting the Crossover Settings (X-OVER)
- Adjusting the Time Correction (TCR)
- Setting Defeat
- Setting the Volume for Each Source
- Adjusting the Caller Level
- Adjusting the Microphone Level
- Adjusting the Ring Tone Level
- Volume Setting
- Auto Volume Setting
- Setting Audio Mute On/Off while Backing up
- Setting the Microphone Effect
- Default Sound Settings
- About the Crossover
- About Time Correction
- Visual Setup
- Screen Setup
- General Setup
- Car Setup
- Sounds Setup
- Sources Setup
- System Setup
- Android Auto (Optional)
- Apple CarPlay (Optional)
- Alpine Connect App (Optional) (X902D/X802D-U/INE-W710D only)
- Radio/RDS
- DAB/DAB+/DMB
- USB Flash drive (Optional)
- iPod/iPhone (Optional)
- HDMI Device (Optional)
- About HDMI selector (Optional)
- DVD Player Operation
- CD/MP3/WMA/AAC/WAV
- DVD
- Playing a Disc
- Playing Still Frames (Pausing)
- Stopping Playback
- Fast-forwarding/Fast-reversing
- Finding the Beginnings of Chapters/Tracks/Files
- Forward/Reverse frame-by-frame Playback
- Repeat Playback
- Searching by Title Number
- Searching Directly by Chapter Number
- Switching the Angle
- Switching the Audio Tracks
- Switching the Subtitles (Subtitle Language)
- Info Mode Function
- Switching Display Modes
- HDMI Operation
- Bluetooth Operation
- Auxiliary Device (Optional)
- Camera Operation (Optional)
- About Vehicle Interlock Function
- Information

82-EN
When an optional camera is connected, the view video of camera can be
output to the monitor.
Front camera or Rear camera can be connected to this unit.
Make the Camera Select setting (Front, Rear or Other) according to your
connected camera. For details, see “Setting the Camera Input” (page 44).
Front camera:
When the HCE-C257FD/HCE-C212FD is connected, conditions in front
of the vehicle, such as objects, people and other hazards, can be seen.
Rear camera:
If an HCE-C127D/HCE-C157D/HCE-C252RD, etc., camera is connected,
when the vehicle is reversed, the rear camera view (guide marks for
vehicle width and available distance) is displayed automatically on
the screen of this unit.
Other camera:
Set when connecting to a camera other than the Front camera or Rear
camera, such as a room camera and side camera.
Rear Camera Operation
1 Press the MENU button.
The menu screen is displayed.
• You can also display the menu screen by touching [] on the
lower part of the Audio source screen or by swiping upward.
2 Tou ch [Camera].
The Rear Camera view is displayed.
• Touch the screen while the camera image is being displayed, and touch
[] or [] to return to the main source screen or previous screen.
• You can perform a Guide Adjustment. For details, see “Adjusting the
Rear/Front/Side Camera Guide” (page 45).
1 Shift the gear lever to the reverse (R) position.
The rear view image is displayed while the car remains in
reverse.
2 If you shift the gear lever to a position other than reverse
(R), the monitor returns to the previous screen.
• Never depend solely on the camera when backing up. Always turn and
look and only use the camera for additional assistance.
• This function is effective when the reverse wire is properly connected.
• You can perform a Guide Adjustment. For details, see “Adjusting the
Rear/Front/Side Camera Guide” (page 45).
If the camera has a view switch function, the Direct Change switch is
displayed.
1 Touch the screen when the image from the rear camera is
displayed.
The operation screen is displayed on the screen.
• After a 5-second time-out, the operation screen returns to the
camera display screen.
2 Tou ch [Back], [Panorama], [Corner] or [Top].
The image pattern changes.
• For detailed information about image patterns, see the camera Owner’s
Manual.
• You can perform a Guide Adjustment. For details, see “Adjusting the
Rear/Front/Side Camera Guide” (page 45).
1 Touch the screen when the image from the camera is
displayed.
The operation screen is displayed on the screen.
• After a 5-second time-out, the operation screen returns to the
camera display screen.
2 Tou ch [Guide Off] on the Rear camera display screen.
The guide disappears, and then the [Guide Off ] switch changes
to [Guide On].
3 Tou ch [Guide On] to turn on the guide.
1 Touch the screen when the image from the camera is
displayed.
The operation screen is displayed on the screen.
• After a 5-second time-out, the operation screen returns to the
camera display screen.
2 Tou ch [ Caution].
• For each touch, the caution location moves to the top or bottom of the
screen.
Camera Operation
(Optional)
You can adjust the quality of the camera image.
Setting items: Brightness / Colour / Contrast
See “Visual Setup” (page 36).
Displaying the Rear Camera Image from the
Menu screen
[Camera] button
Displaying the rear view video while the car is
in reverse
Switching the Image Pattern for the Rear
Camera
[Back]: Rear View
[Panorama]: Panorama View
[Corner]: Corner View
[Top]: Ground View
Guide Display ON/OFF Setting
Adjusting the Caution Display Location