
User manual
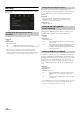

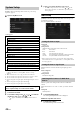
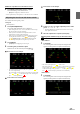
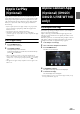
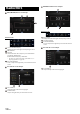
Table Of Contents
- Operating Instructions
- PRECAUTIONS
- WARNING
- Features
- Getting Started
- Location of Controls
- Turning Power On or Off
- Turning the System On
- Initial System Start-Up
- Adjusting the Volume
- Lowering Volume Quickly
- Touch Screen Operation
- Switching Sources
- Operating the Function Button on the Audio/Video Main Screen
- About Basic Operation for List Screen
- About the Shortcut Setup Screen
- About the Menu Screen
- About the Indicator Display
- Opening screen Customisation
- How to Input Characters and Numbers (Keypad)
- Favourite Function
- Applying Alpine TuneIt App
- Setup
- Setup Operation
- Wireless (Bluetooth) Setup
- General Setup
- Sounds Setup
- Setting the Balance/Fader/Rear Speaker/Subwoofer
- Setting the Media Xpander (MX HD)
- Equalizer Presets
- Adjusting the Parametric Equalizer Curve (Dual HD EQ)
- Adjusting the Crossover Settings (X-OVER)
- Adjusting the Time Correction (TCR)
- Setting Defeat
- Setting the Volume for Each Source
- Adjusting the Caller Level
- Adjusting the Microphone Level
- Adjusting the Ring Tone Level
- Volume Setting
- Auto Volume Setting
- Setting Audio Mute On/Off while Backing up
- Setting the Microphone Effect
- Default Sound Settings
- About the Crossover
- About Time Correction
- Visual Setup
- Screen Setup
- General Setup
- Car Setup
- Sounds Setup
- Sources Setup
- System Setup
- Android Auto (Optional)
- Apple CarPlay (Optional)
- Alpine Connect App (Optional) (X902D/X802D-U/INE-W710D only)
- Radio/RDS
- DAB/DAB+/DMB
- USB Flash drive (Optional)
- iPod/iPhone (Optional)
- HDMI Device (Optional)
- About HDMI selector (Optional)
- DVD Player Operation
- CD/MP3/WMA/AAC/WAV
- DVD
- Playing a Disc
- Playing Still Frames (Pausing)
- Stopping Playback
- Fast-forwarding/Fast-reversing
- Finding the Beginnings of Chapters/Tracks/Files
- Forward/Reverse frame-by-frame Playback
- Repeat Playback
- Searching by Title Number
- Searching Directly by Chapter Number
- Switching the Angle
- Switching the Audio Tracks
- Switching the Subtitles (Subtitle Language)
- Info Mode Function
- Switching Display Modes
- HDMI Operation
- Bluetooth Operation
- Auxiliary Device (Optional)
- Camera Operation (Optional)
- About Vehicle Interlock Function
- Information

45-EN
Multi View compatible Front Camera/Rear Camera
2 Tou ch [Back], [Panorama], [Corner], or [Top].
The view will change to the selected view.
• [Back] will not appear for the Front camera.
• For an explanation of video patterns, see the camera Owner’s Manual.
You can adjust the camera guide position.
Setting item:
Guide Adjustment
1 Tou ch [Guide Adjustment].
The camera guide adjustment screen is displayed.
• If the video pattern is set to “Corner (Rear/Front Camera only),”
the camera guide will not be displayed.
• When you connect a Multi View compatible camera, select a
Video Pattern to make a guide adjustment.
• When you connect a Multi View compatible Side Camera, after
selecting the Video Pattern, touch [] (Left steering) or
[ ] (Right steering) to make the guide adjustment that
matches the position of the steering wheel in your vehicle.
2 Tou ch [Adjust].
•If [Adjust] does not appear, proceed to step 3.
3 Touch the guide you intend to adjust.
Guide line can also be selected by touching [] [].
Rear Camera screen example
• You cannot adjust the position of the yellow guide line “ ” in
the centre independently.
It is controlled by a system to be the centre of the two yellow guide
lines “ ” and “ ” on the left and right, or the central green
line “ ” and red guide line “ ”.
Front Camera screen example
Side Camera screen example
4 Tou ch [], [], [] or [] to adjust the position of the
guide.
•Touching [Clear] clears adjustments and returns to the setting
before guide line alteration.
5 After the adjustment is completed, touch [Set].
Adjusting Guides Simultaneously (for Rear/Side Camera
only)
<Rear Camera>
1 Tou ch [Link].
The 3 vertical guides of the currently-selected guide link
together, allowing them to be adjusted simultaneously.
• Note on the yellow guide line “ ” in the centre
The yellow guide line “ ” in the centre is controlled by a system that
locates it in the centre of the two yellow guide lines, “ ” and “ ”
on the left and right, or the green line “ ” on the top and red guide
line “ ” below. Therefore you cannot move it manually.
<Side Camera>
1 Tou ch [Link].
The 2 vertical guides of the currently-selected guide link
together, allowing them to be adjusted simultaneously.
Adjusting the Rear/Front/Side Camera Guide