
User manual


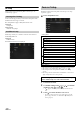
Table Of Contents
- Operating Instructions
- PRECAUTIONS
- WARNING
- Features
- Getting Started
- Location of Controls
- Turning Power On or Off
- Turning the System On
- Initial System Start-Up
- Adjusting the Volume
- Lowering Volume Quickly
- Touch Screen Operation
- Switching Sources
- Operating the Function Button on the Audio/Video Main Screen
- About Basic Operation for List Screen
- About the Shortcut Setup Screen
- About the Menu Screen
- About the Indicator Display
- Opening screen Customisation
- How to Input Characters and Numbers (Keypad)
- Favourite Function
- Applying Alpine TuneIt App
- Setup
- Setup Operation
- Wireless (Bluetooth) Setup
- General Setup
- Sounds Setup
- Setting the Balance/Fader/Rear Speaker/Subwoofer
- Setting the Media Xpander (MX HD)
- Equalizer Presets
- Adjusting the Parametric Equalizer Curve (Dual HD EQ)
- Adjusting the Crossover Settings (X-OVER)
- Adjusting the Time Correction (TCR)
- Setting Defeat
- Setting the Volume for Each Source
- Adjusting the Caller Level
- Adjusting the Microphone Level
- Adjusting the Ring Tone Level
- Volume Setting
- Auto Volume Setting
- Setting Audio Mute On/Off while Backing up
- Setting the Microphone Effect
- Default Sound Settings
- About the Crossover
- About Time Correction
- Visual Setup
- Screen Setup
- General Setup
- Car Setup
- Sounds Setup
- Sources Setup
- System Setup
- Android Auto (Optional)
- Apple CarPlay (Optional)
- Alpine Connect App (Optional) (X902D/X802D-U/INE-W710D only)
- Radio/RDS
- DAB/DAB+/DMB
- USB Flash drive (Optional)
- iPod/iPhone (Optional)
- HDMI Device (Optional)
- About HDMI selector (Optional)
- DVD Player Operation
- CD/MP3/WMA/AAC/WAV
- DVD
- Playing a Disc
- Playing Still Frames (Pausing)
- Stopping Playback
- Fast-forwarding/Fast-reversing
- Finding the Beginnings of Chapters/Tracks/Files
- Forward/Reverse frame-by-frame Playback
- Repeat Playback
- Searching by Title Number
- Searching Directly by Chapter Number
- Switching the Angle
- Switching the Audio Tracks
- Switching the Subtitles (Subtitle Language)
- Info Mode Function
- Switching Display Modes
- HDMI Operation
- Bluetooth Operation
- Auxiliary Device (Optional)
- Camera Operation (Optional)
- About Vehicle Interlock Function
- Information

39-EN
Setting item:
Time Adjust
Additional items:
Hour / Minute
Setting content:
AM12 - PM12 or 0-23 / 0-59
• Cannot be adjusted while no GPS signal is received.
You can set the system to be unusable without entering a password.
When you turn this setting to “On” and set a password, password input
is required when the system is connected to a battery and turned on for
the first time.
Setting item:
Security Code
Setting contents:
Off (Initial setting) / On
Setting the password
1 Touch the checkbox “Off” ( ) of the Security Code.
2 After the confirmation message appears, touch [OK].
The password setting screen is displayed.
3 Enter a password, then touch [OK].
• Enter the 6-digit number.
• Input numbers are displayed as “*”.
•Touch [] to delete an entered number.
4 Enter the same password again, then touch [OK].
The password is set and the system returns to the General Setup
Menu screen, then the checkbox of the Security Code is set to
“On” ( ).
• If you forget a registered password, you can not use this unit. In this
case, service will be required.
Clearing the password
1 Touch the checkbox “On” ( ) of the Security Code.
The password setting screen is displayed.
2 Enter the password you have set, then touch [OK].
The password is cleared and the system returns to the General
Setup Menu screen, then the checkbox of the Security Code is
set to “Off” ( ).
• Input numbers are displayed as “*”.
[About] enables you to check the Serial Number, Firmware Version,
Model Name, and to initialise various settings.
Displaying the Product Information
You can view the version information of this product. Make note of this
information and refer to it whenever you contact Alpine Tech Support
or an Alpine-authorized dealer.
Setting contents:
Serial Number / Firmware Version / Model Name
Initializing the System
You can initialise all data, to restore the factory settings. Remove the
USB flash drive, etc. from the system before operation
Setting item:
Clear All Settings
1 Tou ch [Reset] of “Clear All Settings.”
2 After the confirmation message appears, touch [OK].
The confirmation screen appears again.
3 Tou ch [OK].
The system starts initialisation.
• Do not turn on/off the power, change the ignition key position or
remove the screen panel until system restart is completed.
This unit has a Demonstration feature for the display. When you install
and use the unit for the first time, the unit will enter demo mode
automatically. To quit demo mode, set Demo mode to Off.
Setting item:
Demo mode
Setting contents:
Off / On (Initial setting)
• If you perform an operation during the Demo mode, the demonstration
is temporarily stopped.
Setting the Time (i902D/ iLX-702D only)
Hour: Adjust the hour.
Minute: Adjust the minute.
Setting Security code
About X902D/X802D-U/INE-W710D/i902D/
iLX-702D
Setting Demo mode to Off/On