
User manual
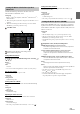
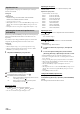


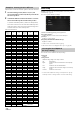
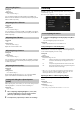
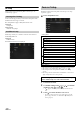
Table Of Contents
- Operating Instructions
- PRECAUTIONS
- WARNING
- Features
- Getting Started
- Location of Controls
- Turning Power On or Off
- Turning the System On
- Initial System Start-Up
- Adjusting the Volume
- Lowering Volume Quickly
- Touch Screen Operation
- Switching Sources
- Operating the Function Button on the Audio/Video Main Screen
- About Basic Operation for List Screen
- About the Shortcut Setup Screen
- About the Menu Screen
- About the Indicator Display
- Opening screen Customisation
- How to Input Characters and Numbers (Keypad)
- Favourite Function
- Applying Alpine TuneIt App
- Setup
- Setup Operation
- Wireless (Bluetooth) Setup
- General Setup
- Sounds Setup
- Setting the Balance/Fader/Rear Speaker/Subwoofer
- Setting the Media Xpander (MX HD)
- Equalizer Presets
- Adjusting the Parametric Equalizer Curve (Dual HD EQ)
- Adjusting the Crossover Settings (X-OVER)
- Adjusting the Time Correction (TCR)
- Setting Defeat
- Setting the Volume for Each Source
- Adjusting the Caller Level
- Adjusting the Microphone Level
- Adjusting the Ring Tone Level
- Volume Setting
- Auto Volume Setting
- Setting Audio Mute On/Off while Backing up
- Setting the Microphone Effect
- Default Sound Settings
- About the Crossover
- About Time Correction
- Visual Setup
- Screen Setup
- General Setup
- Car Setup
- Sounds Setup
- Sources Setup
- System Setup
- Android Auto (Optional)
- Apple CarPlay (Optional)
- Alpine Connect App (Optional) (X902D/X802D-U/INE-W710D only)
- Radio/RDS
- DAB/DAB+/DMB
- USB Flash drive (Optional)
- iPod/iPhone (Optional)
- HDMI Device (Optional)
- About HDMI selector (Optional)
- DVD Player Operation
- CD/MP3/WMA/AAC/WAV
- DVD
- Playing a Disc
- Playing Still Frames (Pausing)
- Stopping Playback
- Fast-forwarding/Fast-reversing
- Finding the Beginnings of Chapters/Tracks/Files
- Forward/Reverse frame-by-frame Playback
- Repeat Playback
- Searching by Title Number
- Searching Directly by Chapter Number
- Switching the Angle
- Switching the Audio Tracks
- Switching the Subtitles (Subtitle Language)
- Info Mode Function
- Switching Display Modes
- HDMI Operation
- Bluetooth Operation
- Auxiliary Device (Optional)
- Camera Operation (Optional)
- About Vehicle Interlock Function
- Information

37-EN
Setting item:
Brightness
Setting content:
-15 to +15 (Initial setting: 0)
You can adjust the brightness between MIN (-15) and MAX (+15).
When it reaches the minimum or maximum point, the display shows
“MIN” or “MAX” respectively.
Setting item:
Colour
Setting content:
-15 to +15 (Initial setting: 0)
You can adjust the colour between MIN (-15) and MAX (+15). When it
reaches the minimum or maximum point, the display shows “MIN” or
“MAX” respectively.
Setting item:
Tint
Setting content:
R15 to G15 (Initial setting: 0)
Adjust the Colour from R15 to G15.
Setting item:
Contrast
Setting content:
-15 to +15 (Initial setting: 0)
You can adjust the contrast between MIN (-15) and MAX (+15). When
it reaches the minimum or maximum point, the display shows “MIN”
or “MAX” respectively.
Setting item:
Sharpness
Setting content:
-5 to +5 (Initial setting: 0)
Picture quality adjustment range is -5 to +5. “SOFT” and “HARD”
appear as the minimum and maximum values specified.
When adjusting audio (video media), you can store the settings made for
“Adjusting Brightness, Colour, Tint, Contrast and Sharpness.”
Setting item:
Preset 1 / Preset 2
1 After completing “Adjusting Brightness, Colour, Tint,
Contrast and Sharpness” (page 37), touch and hold
[Preset 1] or [Preset 2] to save the settings.
2 Tou ch [Preset 1] or [Preset 2] to call the saved settings.
Screen Setup
[Screen] is selected on the General Setup Menu screen in step 2. See
“General Setup” (page 30).
You can set up the brightness, colour, display, etc., of the screen.
1 Tou ch [Screen/Lighting] in the Display/Key Setup Menu
screen.
The Screen/Lighting setup screen appears.
Setting item:
Dimmer / Key Illumination Level / Screen Dimmer Level
Setting the Brightness of the Backlighting
Backlighting is provided by LEDs light built into the liquid crystal panel.
The illumination control adjusts the brightness of the backlighting based
on the car ambient lighting for easier viewing.
Setting item:
Dimmer
Setting contents:
Auto (Initial setting) / On / Off
• When “On” is set, the setting is also applied for the button lighting in
“Adjusting the Dimmer of Button Lighting at Night” (page 37), and
“Adjusting the Minimum Level of Backlight” (page 38).
Adjusting the Dimmer of Button Lighting at Night
You can adjust the brightness of the button lighting at night with the
dimmer.
Setting item:
Key Illumination Level
Setting level:
-2 to +2 (Initial setting: 0)
• This setting is only available when “Dimmer” is set to “On.”
Adjusting Brightness
Adjusting Colour of Picture
Adjusting Tint of Picture
Adjusting Image Contrast
Adjusting Picture Quality
Saving and calling the adjusted picture
quality
Screen/Lighting Customise
Auto: Adjust the brightness of the background illumination of
the monitor automatically to the brightness of the car
interior.
On: Keep the background illumination of the monitor dark.
Off: Deactivate Auto Dimmer mode to keep the background
illumination of the monitor bright.