
User manual
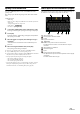
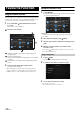
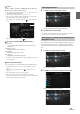
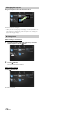
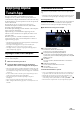
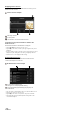
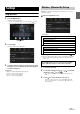
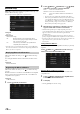
Table Of Contents
- Operating Instructions
- PRECAUTIONS
- WARNING
- Features
- Getting Started
- Location of Controls
- Turning Power On or Off
- Turning the System On
- Initial System Start-Up
- Adjusting the Volume
- Lowering Volume Quickly
- Touch Screen Operation
- Switching Sources
- Operating the Function Button on the Audio/Video Main Screen
- About Basic Operation for List Screen
- About the Shortcut Setup Screen
- About the Menu Screen
- About the Indicator Display
- Opening screen Customisation
- How to Input Characters and Numbers (Keypad)
- Favourite Function
- Applying Alpine TuneIt App
- Setup
- Setup Operation
- Wireless (Bluetooth) Setup
- General Setup
- Sounds Setup
- Setting the Balance/Fader/Rear Speaker/Subwoofer
- Setting the Media Xpander (MX HD)
- Equalizer Presets
- Adjusting the Parametric Equalizer Curve (Dual HD EQ)
- Adjusting the Crossover Settings (X-OVER)
- Adjusting the Time Correction (TCR)
- Setting Defeat
- Setting the Volume for Each Source
- Adjusting the Caller Level
- Adjusting the Microphone Level
- Adjusting the Ring Tone Level
- Volume Setting
- Auto Volume Setting
- Setting Audio Mute On/Off while Backing up
- Setting the Microphone Effect
- Default Sound Settings
- About the Crossover
- About Time Correction
- Visual Setup
- Screen Setup
- General Setup
- Car Setup
- Sounds Setup
- Sources Setup
- System Setup
- Android Auto (Optional)
- Apple CarPlay (Optional)
- Alpine Connect App (Optional) (X902D/X802D-U/INE-W710D only)
- Radio/RDS
- DAB/DAB+/DMB
- USB Flash drive (Optional)
- iPod/iPhone (Optional)
- HDMI Device (Optional)
- About HDMI selector (Optional)
- DVD Player Operation
- CD/MP3/WMA/AAC/WAV
- DVD
- Playing a Disc
- Playing Still Frames (Pausing)
- Stopping Playback
- Fast-forwarding/Fast-reversing
- Finding the Beginnings of Chapters/Tracks/Files
- Forward/Reverse frame-by-frame Playback
- Repeat Playback
- Searching by Title Number
- Searching Directly by Chapter Number
- Switching the Angle
- Switching the Audio Tracks
- Switching the Subtitles (Subtitle Language)
- Info Mode Function
- Switching Display Modes
- HDMI Operation
- Bluetooth Operation
- Auxiliary Device (Optional)
- Camera Operation (Optional)
- About Vehicle Interlock Function
- Information

23-EN
Audio
[Radio]*
1
/ [DAB]*
2
/ [USB/iPod] / [HDMI/DVD] / [AUX] / [Bluetooth
Audio] / [Apple CarPlay]*
3
/ [Android Auto]*
3
*1 You can choose the frequency from Preset 1 - 12, registered into each
FM1/FM2/MW/LW band of Radio.
*2 You can choose a channel registered to Presets 1 - 18.
*3 You can register now playing Apple CarPlay Music or Google Play
Music depending on the connected Smartphone.
• You can also register directly by touching [] in the Audio source
screen.
However, if it is already registered, [] is not displayed.
Navigation (X902D/X802D-U/INE-W710D only)
[Specific Place]:
You can display places registered in Favourite and set your
destination.
[Quick Place search]:
Displays the address search keypad.
[Help Nearby]:
Displays the nearby search screen.
[POI category]:
Displays the selected POI category list.
• For details on navigation operations, refer to “Navigation System OM”
in the CD-ROM.
Phone (Shortcut Dialing)*
4
You can register the user’s shortcut dialing stored in the Phone Book.
• If multiple phone numbers are stored, select a number you want to
register.
• You can register directly by touching [] of the Contacts list.
(page 71)
• You can change the icon you registered. (page 23)
*4 You can only select Phone when a Smartphone is connected.
For details on how to register a mobile phone and downloading Phone
Book, see “Bluetooth Operation” (page 71).
1 Touch the text area of the registered item.
The Input User Name screen (Keypad) is displayed.
2 Input the name and touch [OK].
• For details on how to input characters using the keypad, see “How to
Input Characters and Numbers (Keypad)” (page 21).
You can change the icons of Shortcut Dialing and Navigation category.
The following example explains how to change the Shortcut Dialing
icon. Perform the same procedure to change the Navigation category
icon.
1 Touch the icon that you want to change.
The icon list is displayed.
2 Touch the icon you want to change from the icon list.
The icon is changed to the selected icon.
Changing Item Names
Changing Icons (only the Shortcut Dialing and
Navigation icons)