
User manual

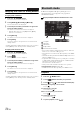
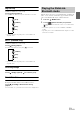
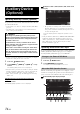
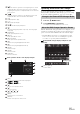
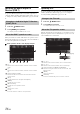


Table Of Contents
- Operating Instructions
- PRECAUTIONS
- WARNING
- Features
- Getting Started
- Accessory List
- Location of Controls
- Turning Power On or Off
- Turning the System On
- Initial System Start-Up
- Inserting/Ejecting a Disc
- Adjusting the Screen Viewing Angle
- Adjusting the Volume
- Lowering Volume Quickly
- Common Operations
- Using My Favorites
- User Registration
- Setting My Favorites
- Easy Sound Setup mode/BASS ENGINE SQ mode
- Access to iDataLink Mode
- Applying TuneIt
- Settings When Switching Users
- How to Input Characters and Numbers (Keypad)
- Top banner and Bottom banner Fade Out Setting
- Switching Sources
- Rear Entertainment Function
- Switching the Dual Screen Display
- Touch operation
- Selecting an Item in a List
- About the Indicator Display
- Radio/HD RadioTM/RBDS
- Listening to the Radio
- Presetting Stations Manually
- Presetting Stations Automatically
- Tuning to Preset Stations
- Forced Analog Mode
- Receiving a Multicast (HD Radio mode only)
- PTY (Program Type) Tuning (Analog Broadcasts only)
- Displaying Radio Text
- Storing the tag information (HD Radio mode only)
- About the Feature Logos
- CD/MP3/WMA/AAC
- DVD
- Playing a Disc
- Stopping Playback (PRE STOP)
- Stopping Playback
- Fast-forwarding/Fast-reversing
- Finding the Beginnings of Chapters/Tracks/Files
- Playing Still Frames (Pausing)
- Forward frame-by-frame Playback
- Slow Motion Playback
- Selecting Folders
- Repeat Playback
- Searching by Title Number
- Searching Directly by Chapter Number
- Searching for a Desired Video File
- Switching the Angle
- Switching the Audio Tracks
- Switching the Subtitles (Subtitle Language)
- About DivX®
- Setup
- Setup Operation
- General Setup
- Sound Setup
- Sound Setup Operation
- Setting the Balance/Fader/Subwoofer
- Setting the MX (Media Xpander)
- Equalizer Presets
- Adjusting the Parametric Equalizer Curve (Parametric EQ)
- Adjusting the Time Correction (Time Correction)
- Adjusting the Crossover Settings (X-Over)
- Setting Defeat
- Volume Setting
- Setting the Volume for Each Source
- About Time Correction
- About the Crossover
- Source Setup
- Bluetooth Setup
- Bluetooth Setup Operation
- Setting Hands-free Connection of iDataLink
- Bluetooth Setting
- Displaying Bluetooth Information
- Registering the Bluetooth Device
- Automatic Connection setting
- Setting the Passcode
- Changing the Character Code of the Phone Book
- Selecting the Output Speaker
- Adjusting the Caller Volume
- Adjusting the Microphone Level
- Adjusting the Ring Tone Volume
- Deleting All the Histories
- Camera Setup
- Bluetooth Operation
- Setup Before Using
- Hands-Free Phone Control
- Bluetooth Audio
- Playing the iDataLink- Bluetooth Audio
- Auxiliary Device (Optional)
- Camera Operation (Optional)
- SiriusXM Satellite Radio Operation (Optional)
- Receiving Channels with the SiriusXM Tuner
- Tuning Channels by Category
- Changing the Display
- Checking the SiriusXM Radio ID Number
- Storing Channel Presets
- Tuning Channels using Presets
- Tune Start Function
- Tune Scan Function
- Search Function
- Selecting the Channel directly
- Storing the desired Song/Artist
- Receiving and Tuning to an Alert
- Replay Function
- Parental Lock Function
- Using Jump Memory and Jump Recall function
- Storing the Tag information
- Playing the iDataLink SiriusXM
- Flash Memory (Optional)
- iPod/iPhone (Optional)
- HDMI Device (Optional)
- Pandora® internet radio (optional)
- Information
- Installation and Connections
- LIMITED WARRANTY

72-EN
Assigning as a Short Cut Dialing Number
Assigning from Call History
1
Press the (PHONE) button.
The Phone menu screen is displayed.
2
Touch [Dialed], [Received] or [Missed].
The last four histories are displayed.
3
Touch the person name you intend to assign as the
Short Cut dialing number.
The details screen of the Phone book is displayed.
• To display all the histories, touch [All]. Touching [Delete]
deletes the selected histories.
4
Touch [Preset].
The details screen for the Short Cut is displayed.
5
Touch [Save].
The phone number is assigned to the selected Short Cut
dialing number.
• If Dial1, Dial2, Dial3 or Dial4 is already registered, it is overwritten.
• Touch [Delete] to delete an assigned short cut dialing number.
Assigning from the Phone Book
1
Press the (PHONE) button.
The Phone menu screen is displayed.
2
Touch [].
The Phone Book screen is displayed.
3
Touch the phone number you intend to assign as the
Short Cut dialing number.
The details screen of the Phone book is displayed.
4
Touch [Preset].
The details screen for the Short Cut is displayed.
5
Touch [Save].
The phone number is assigned to the selected Short Cut
dialing number.
• If Dial1, Dial2, Dial3 or Dial4 is already registered, it is overwritten.
• Touch [Delete] to delete an assigned short cut dialing number.
If a Bluetooth compatible mobile phone, portable player, etc. is
connected by wireless, you can play back a song (operation is
controllable from the unit).
Display example for Bluetooth Audio main screen
Song title
Artist title
Album title
Elapsed time
Bluetooth devices Name
• Before playing the Bluetooth Audio function, make sure “Bluetooth
Audio” is set to other than “OEM” (page 43).
• The displayed onscreen buttons may differ depending on the AVRCP
version.
• Status Indicator/Song title/Artist title/Album title/Elapsed time do not
display for AVRCP Ver. 1.0.
• To play back audio, a mobile phone or a portable player conforming
to A2DP (Advanced Audio Distribution Profile) or AVRCP (Audio/
Video Remote Control Profile) is required.
Not all functions work with all devices.
• During a call, sound on the Bluetooth audio source is paused.
Compatible AVRCP versions: 1.0, 1.3, 1.4
• Available functions may differ depending on the AVRCP version.
Playback
1
Press the AUDIO button.
2
Touch [] (Bluetooth Audio) of Top banner.
3
Touch [] or [] to select the desired track (file).
Returning to the beginning of the current file:
Touch [].
Fast backward the current file:
Touch and hold [].
Advance to the beginning of the next file:
Touch [].
Fast forward the current file:
Touch and hold [].
4
To pause playback, touch [ / ].
Bluetooth Audio
Touch [<<], [>>]