
User manual

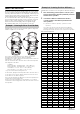
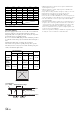
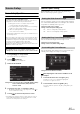
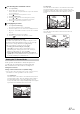
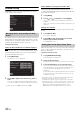
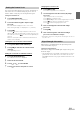
Table Of Contents
- Operating Instructions
- PRECAUTIONS
- WARNING
- Features
- Getting Started
- Accessory List
- Location of Controls
- Turning Power On or Off
- Turning the System On
- Initial System Start-Up
- Inserting/Ejecting a Disc
- Adjusting the Screen Viewing Angle
- Adjusting the Volume
- Lowering Volume Quickly
- Common Operations
- Using My Favorites
- User Registration
- Setting My Favorites
- Easy Sound Setup mode/BASS ENGINE SQ mode
- Access to iDataLink Mode
- Applying TuneIt
- Settings When Switching Users
- How to Input Characters and Numbers (Keypad)
- Top banner and Bottom banner Fade Out Setting
- Switching Sources
- Rear Entertainment Function
- Switching the Dual Screen Display
- Touch operation
- Selecting an Item in a List
- About the Indicator Display
- Radio/HD RadioTM/RBDS
- Listening to the Radio
- Presetting Stations Manually
- Presetting Stations Automatically
- Tuning to Preset Stations
- Forced Analog Mode
- Receiving a Multicast (HD Radio mode only)
- PTY (Program Type) Tuning (Analog Broadcasts only)
- Displaying Radio Text
- Storing the tag information (HD Radio mode only)
- About the Feature Logos
- CD/MP3/WMA/AAC
- DVD
- Playing a Disc
- Stopping Playback (PRE STOP)
- Stopping Playback
- Fast-forwarding/Fast-reversing
- Finding the Beginnings of Chapters/Tracks/Files
- Playing Still Frames (Pausing)
- Forward frame-by-frame Playback
- Slow Motion Playback
- Selecting Folders
- Repeat Playback
- Searching by Title Number
- Searching Directly by Chapter Number
- Searching for a Desired Video File
- Switching the Angle
- Switching the Audio Tracks
- Switching the Subtitles (Subtitle Language)
- About DivX®
- Setup
- Setup Operation
- General Setup
- Sound Setup
- Sound Setup Operation
- Setting the Balance/Fader/Subwoofer
- Setting the MX (Media Xpander)
- Equalizer Presets
- Adjusting the Parametric Equalizer Curve (Parametric EQ)
- Adjusting the Time Correction (Time Correction)
- Adjusting the Crossover Settings (X-Over)
- Setting Defeat
- Volume Setting
- Setting the Volume for Each Source
- About Time Correction
- About the Crossover
- Source Setup
- Bluetooth Setup
- Bluetooth Setup Operation
- Setting Hands-free Connection of iDataLink
- Bluetooth Setting
- Displaying Bluetooth Information
- Registering the Bluetooth Device
- Automatic Connection setting
- Setting the Passcode
- Changing the Character Code of the Phone Book
- Selecting the Output Speaker
- Adjusting the Caller Volume
- Adjusting the Microphone Level
- Adjusting the Ring Tone Volume
- Deleting All the Histories
- Camera Setup
- Bluetooth Operation
- Setup Before Using
- Hands-Free Phone Control
- Bluetooth Audio
- Playing the iDataLink- Bluetooth Audio
- Auxiliary Device (Optional)
- Camera Operation (Optional)
- SiriusXM Satellite Radio Operation (Optional)
- Receiving Channels with the SiriusXM Tuner
- Tuning Channels by Category
- Changing the Display
- Checking the SiriusXM Radio ID Number
- Storing Channel Presets
- Tuning Channels using Presets
- Tune Start Function
- Tune Scan Function
- Search Function
- Selecting the Channel directly
- Storing the desired Song/Artist
- Receiving and Tuning to an Alert
- Replay Function
- Parental Lock Function
- Using Jump Memory and Jump Recall function
- Storing the Tag information
- Playing the iDataLink SiriusXM
- Flash Memory (Optional)
- iPod/iPhone (Optional)
- HDMI Device (Optional)
- Pandora® internet radio (optional)
- Information
- Installation and Connections
- LIMITED WARRANTY

51-EN
Adjusting the Frequency
Touch [] or [] of “Freq.” to adjust the frequency of the
selected band.
Adjustable frequency bands: 20 Hz to 20 kHz (in 1/3 octave steps)
Adjusting the Level
Touch [] or [] of “Level” to adjust the level of selected
band.
Setting contents: -7 to +7 (Initial setting: 0)
Setting the Bandwidth
Touch [] or [] of “Q Adjust” to select the bandwidth.
Setting contents: Wide (Initial setting) / Medium / Narrow
2
To adjust another band, repeat step 1, and adjust all
bands.
3
To store the adjusted setting value, touch and hold
[Preset1], [Preset2], or [Preset3] for at least 2
seconds.
• BAND2 and BAND8 are the same as the Bass and Treble controls.
Their Level adjustment can also be controlled by pressing and
holding / AUDIO and selecting Bass Level or Treble Level. Refer
to “Easy Sound Setup mode” on page 24.
• Settings exceeding the frequency of adjacent bands are not available.
• While adjusting the Parametric EQ, you should consider the
frequency response of the connected speakers.
• When the parametric EQ is adjusted, the Equalizer Presets are
overridden.
• When Equalizer Presets is set, the linked Parametric EQ settings are
also changed. We recommend storing Parametric EQ settings in a
Preset in advance.
• Touch [Flat] to initialize all values.
• The Parametric EQ setting can be configured when Defeat is “Off”.
Calling the Parametric EQ adjusted value
Calling the pre-set Parametric EQ adjusted value.
Touch [Preset1], [Preset2], or [Preset3] on the
Parametric EQ screen.
The setting stored in the Preset will be recalled.
Adjusting the Time Correction (Time
Correction)
[Time Correction] is selected on the Sound setup menu in step 3. Refer
to “Sound Setup Operation” (page 48).
Before performing the following procedures, refer to “About Time
Correction” (page 53).
Setting item: Time Correction
1
Touch [cm], [inch] or [ms] to select mode for
making adjustments.
Each time you touch, the onscreen button and correction
mode changes.
cm/inch: Adjust listening position and distance from each
speaker.
ms: Adjust time.
2
Touch [] or [] for each speaker to adjust the
time or distance.
0.0 msec to 9.9 msec (0.1 msec/step)
0.0 cm (0.0 inch) to 336.6 cm (132.7 inch) (3.4 cm/step)
All speaker setting values are adjustable in the range of 15 ms
or 510 cm.
3
To store the adjusted setting value, touch and hold
[Preset1], [Preset2], or [Preset3] for at least 2
seconds.
• Touch [Flat] to set all values to 0.0.
• If the Rear Speaker setting is “Off”, the Rear Speaker setting cannot
be edited (refer to page 49).
• If the Subwoofer setting is “Off”, the Subwoofer setting cannot be
edited (refer to page 49).
Calling the Time Correction Value
Calling the pre-set time correction value.
Touch [Preset1], [Preset2], or [Preset3] on the time
correction screen.
The setting stored in the Preset will be recalled.
Band1: 20 Hz~100 Hz (63 Hz)
Band2: 63 Hz~315 Hz (125 Hz)
Band3: 125 Hz~500 Hz (250 Hz)
Band4: 250 Hz~1 kHz (500 Hz)
Band5: 500 Hz~2 kHz (1 kHz)
Band6: 1 kHz~4 kHz (2 kHz)
Band7: 2 kHz~7.2 kHz (4 kHz)
Band8: 5.8 kHz~12 kHz (8 kHz)
Band9: 9 kHz~20 kHz (16 kHz)
Correction mode